In this post we will give you everything you need to know about mining Ethereum Classic as a beginner.
Although Ethereum Classic (ETC) is considered a relatively easy coin to mine, there are a number of things that you need to consider before you start your hashing for some ETC.
These include factors such as the type of hardware you buy to the mining software you install and the configuration of said software. There is a great deal of optimisation that can be done to increase your mining returns.
With that being said, let's jump right into our step-by-step guide to Ethereum classic mining.
Ethereum Classic Overview
For those who do not know, Ethereum classic is actually the original Ethereum blockchain. The current Etheruem blockchain is actually a fork of Ethereum classic.
We have covered this extensively in our post on Etheruem classic vs. Ethereum but the just the split came down to a disagreement in the Ethereum community. In June of 2015, a famous event called the DAO hack occurred. This was when a hacker was able to exploit a project's code to siphon off millions of ETH.
There were some developers who were in favour of hard forking the code (current Ethereum devs) but there were others that viewed this as a breach of the "code is law" maxim. Hence, the Ethereum developers forked the code to rescue the users who had their ETH stolen in the hack.
The Ethereum classic developers dissapproved and kept on running the existing Etheruem blockchain. This is the now the Ethereum classic that we have today.
Can We Mine Ethereum Classic?
Just as Ethereum is a Proof-of-Work cryptocurrency, so too Ethereum Classic is a Proof-of-Work cryptocurrency. This means it can be mined, and the good news is that the network difficulty for Ethereum Classic is far lower than for Ethereum, making it more suitable for miners using GPUs rather than ASIC rigs.
One of the best places you can look at to get an idea of the mining profitability of various coins is whattomine. Ethereum classic often features as one of the most profitable coins to mine. Below is a screenshot from the ETC mining calculator.
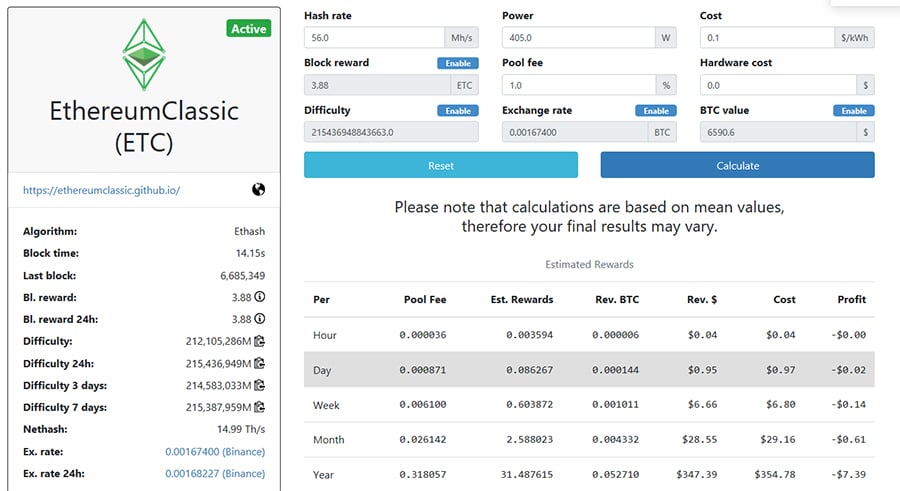 Ethereum Classic Profitability on WhattoMine
As you can see, the required hashrate in order to breakeven for your mining is only 56 Mh/s at the time of this post. This is almost half of that for the hashpower required to breakeven on Ethereum. Given that they are both mined with the Etash mining algorithm, it is a no-brainer where you will turn your hashing power at.
What’s Needed to Mine Ethereum Classic
Mining Ethereum Classic is similar to any other Proof-of-Work coin and you need pretty much the same hardware and software. To begin with, you’ll need a wallet that’s capable of storing Ethereum Classic. While there are many wallets for holding Ethereum, there are less that can hold Ethereum Classic, so make sure yours is an ETC wallet, not an ETH wallet. For the purposes of this tutorial I’ll be using the Exodus wallet, but you could also use Coinomi or one of the hardware wallets, among other choices.
Of course you’ll need hardware for mining, and the better choices are the higher end Nvidia graphics cards such as the 1080 and 1080i. You can also mine using AMD GPUs, but they’ve been found to be less powerful for Ethereum Classic mining. One further requirement is a minimum of 4GB RAM, either dedicated video RAM or system RAM. If you’re technically inclined, the best setup is one that includes multiple GPU’s, as many as 6 can be combined into one mining rig.
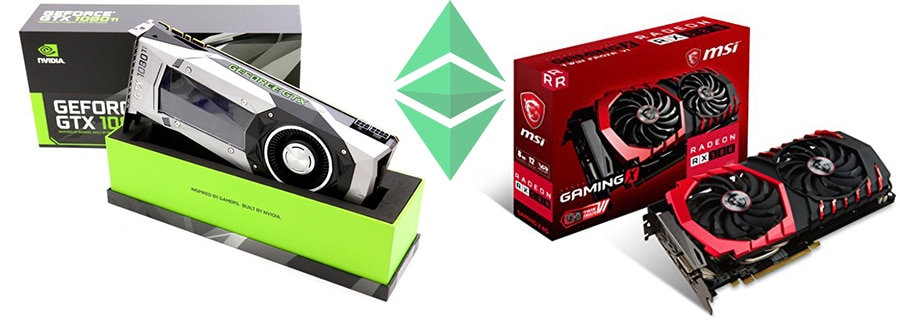 Nvidia and AMD GPU cards used in ETC Mining
You’ll need mining software as well, and there are several choices. The most popular, and the one I’ll be using for this tutorial is the Claymore Dual Ethereum miner available from Bitcointalk forums. This miner can be used with both Nvidia and AMD GPU’s and has versions for both Windows and Linux. It also supports dual mining, so when you become more experienced you can dual mine Ethereum Classic and Siacoin or Decred among others.
Another option is Ethminer, which can be downloaded from Github and also supports both AMD and Nvidia cards, as well as Windows and Linux.
Those who decide they don’t want to be bothered with all the technical aspects of mining can consider using MinerGate, which provides a graphical user interface and has no setup requirements other than downloading the application and letting MinerGate know what ETC address to send the coins to. This is the easiest solution, but also gives the lowest returns.
One final consideration is whether you’re going to solo mine or if you want to join a mining pool. You’ll give up a small percentage of your mining profits (generally around 1% for most mining pools), but by combining your hash power with other miners you can get more regular payouts. Two popular Ethereum Classic mining pools are Nanopool and Ethermine
Now, let’s get into the step by step instructions for mining Ethereum Classic.
Mining Ethereum Classic the Easy Way
I’m going to be using Nanopool as my Ethereum Classic mining pool, because they’ve made it super easy to get started by creating a quick start app that makes it a breeze to download and setup the mining software.
Plus Nanopool is one of the most popular mining pools, with global servers and enough history that I know they are trustworthy. There is a 1% mining pool fee, but that’s pretty standard when using a mining pool.
First head over to Nanopool.org and click the Quick Start button under Ethereum Classic.
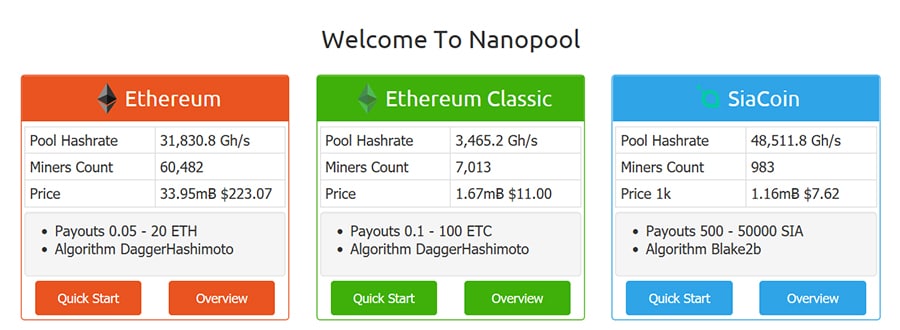 Selecting What to Mine on Nanopool
You’ll be presented with a set of five simple instructions. The first one instructs you to choose either Nvidia or AMD for your GPU. When you click the appropriate button it will take you to GitHub to download the mining software. You’ll download it as a .zip archive and then extract the archive to a folder on your computer.
Note that the Nvidia choice takes you to the FinMiner software, while the AMD choice takes you to the Claymore Dual Ethereum miner, which can actually be used for both AMD and Nvidia cards, and has been the preferred choice for Ethereum Classic miners.
We will take a look at mining with both the Finminer and Claymore although the latter is preferred.
Using the Claymore Miner
Once you have downloaded the Claymore files and unzipped them, you need to generate a configuration file to run it. There are a number of online tools that will help you to do this although conveniently, Nanopool has one as well.
You can now go back to the Nanopool Quick Start menu and click the button under step 3 to generate your config file. This is the file that starts the miner and specifies the various parameters such as the server to connect to, and what Ethereum Classic address to send earnings to, and what address to send secondary earnings (Siacoin or PascalCoin) to.
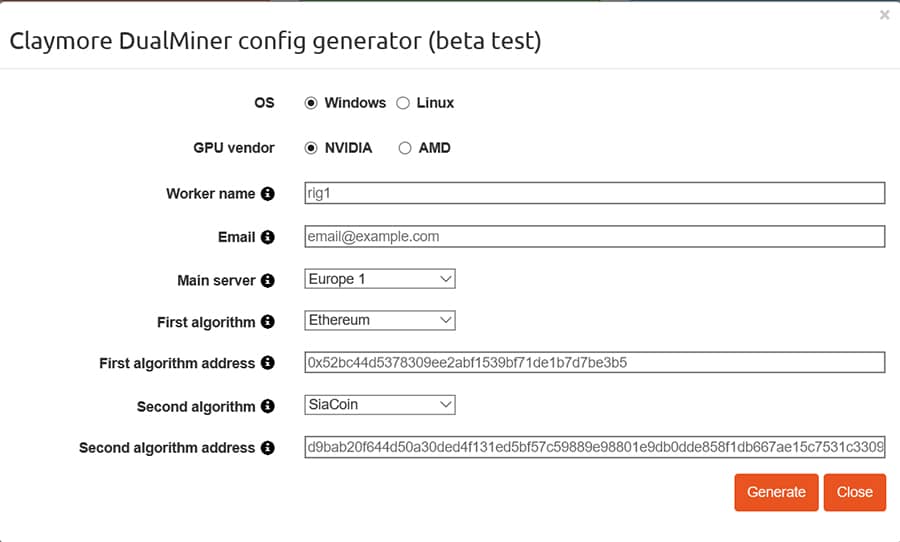 Ethereum Classic Claymore Configuration
Note that the secondary wallet field is mandatory, so you will need to choose either SiaCoin or PascalCoin and generate a wallet address. That could mean you need to download and install a SiaCoin or PascalCoin wallet.
Click “Generate”.
Once you click the Generate button another .zip file will be created. You need to download this .zip file and then extract the contents (dpools.txt, epools.txt and start.bat) to the same folder where you extracted the miner in the first step. You’ll be asked if you want to overwrite files of the same name, click yes.
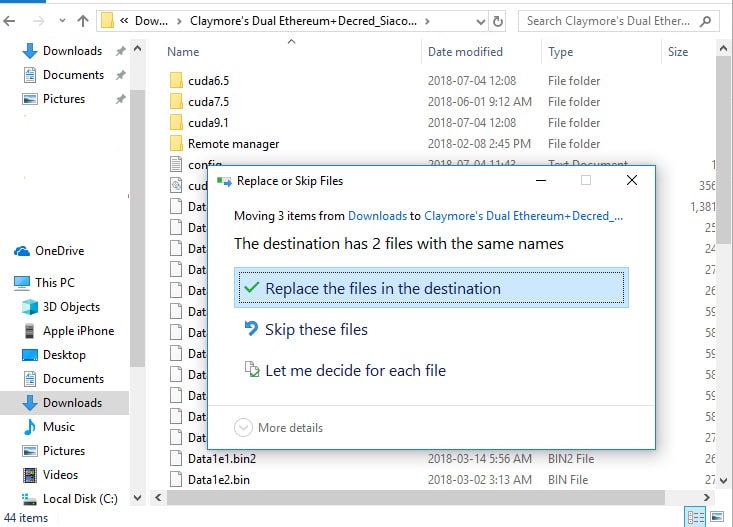 Place Claymore Config Files in mining Folder
Now to mine some coins!
Go to the folder where you extracted everything and double click the ‘start.bat’ file.
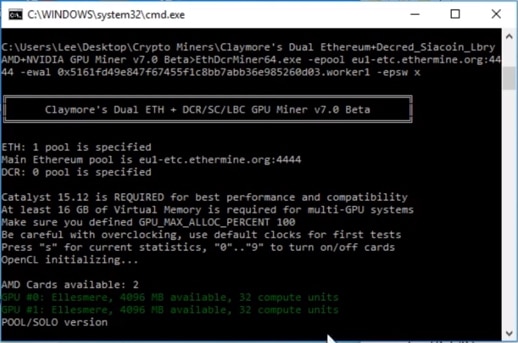 Claymore miner hashing for ETC in Command line. Image Source
The miner will go through several steps verifying the parameters and will then launch the mining software. If everything is working properly you’ll see the software begin to find shares.
Using FinMiner
If you do choose to use the FinMiner by clicking the Nvidia choice you’ll need to make some additional changes.
Much like with Claymore, you must download the .zip file from the Github repository for the FinMiner. Once you have downloaded the files and extracted them then you need to configure the miner to run.
Then open the config.ini file with Notepad or similar and insert the following under the line “Address to send funds to”, replacing the line “wallet=”:
wallet=YOUR_ETH_ADDRESS algorithm=Ethash coin=ETH rigName=YOUR_WORKER email=YOUR_EMAIL pool1 = eth-eu1.nanopool.org:9999 pool2 = eth-eu2.nanopool.org:9999 pool3 = eth-us-east1.nanopool.org:9999 pool4 = eth-us-west1.nanopool.org:9999 pool5 = eth-asia1.nanopool.org:9999
Note that you must replace YOUR_ETH_ADDRESS with your actual Ethereum Classic wallet address, and you can replace YOUR_WORKER and YOUR_EMAIL with actual values, but it isn’t strictly necessary. Save and close the file.
Now all you need to is to run the Finminer.exe file and it will launch in the command line and start mining just like with the claymore example above.
Conclusion
With the Nanopool configuration tool, Ethereum Classic mining is a simple task that shouldn’t take more than 20 minutes to get set-up and running, even if this is the first time you’ve ever mined a cryptocurrency. And if that’s too long simply head over to MinerGate, where you can download the GUO client and be mining in 5 minutes or less, depending on the speed of your internet connection.
The other great thing about mining Ethereum Classic is the hash power required to be profitable is still fairly low since the network difficulty of the coin remains low. A strong gaming computer would almost surely be profitable mining ETC at current prices.
And to make things even sweeter, you can even dual mine SiaCoin or PascalCoin while you’re mining Ethereum Classic, getting more bang for your buck so to speak. While you won’t get rich from these coins since you’ll be mining with your CPU, it’s still a nice bit of icing on the cake.


