For those of you who have been following Monero, you will know that a significant milestone for the project was the upgrade to the RandomX mining algorithm in 2019.
The intention behind this upgrade was to fight off the constant threat that ASIC mining rigs have been posing to the Monero ecosystem. Moreover, with the upgrade to RandomX it means that you can now mine Monero with your CPU. No expensive mining rigs and equipment required!
So you are perhaps wondering how you would do this?
Well, in this in-depth guide, I will take you through the exact steps required in order to mine Monero with your CPU. I will also give you some top mining tips.
Why The Upgrade?
For those that have been following the Monero story for quite some time, you will no doubt have heard of their battle against ASIC mining chips. ASIC mining can lead to the centralisation of a network which can threaten the privacy of Monero.
Last year, Monero forked the blockchain and made tiny changes to the code. This seemed to work for a while as the ASICs that were developed were rendered moot. However, the issue raised its head again recently as it became clear that ASICs were still hashing Monero.
 Monero's Anti ASIC Stance. Image via Shutterstock
The problem lay with the old mining algorithm that Monero used. This was the cryptonite algorithm that was pretty easy to develop an ASIC for. Hence, Monero could continue forking the code or they could look to a completely new solution.
Enter RandomX
RandomX is a mining algorithm that takes the fight against ASICs one step further. It is able to achieve this through the use of random code execution and memory hard techniques.
Moreover, RandomX was optimised for more general-purpose CPU use. Of course, this could have a perverse effect on some of the GPU miners that have been hashing on the old algorithm. Indeed, the mining return for those running GPUs dropped considerably post-update.
However, one miner's loss is another's gain. Given that RandomX was optimised for CPU mining it means that you can use your home machine to start mining some Monero. So, let's take a look at how exactly that is done.
XMR RandomX Mining: Step-by-Step
Now let’s get you set up to begin mining XMR with the CPU in your machine. It’s a quick and easy process.
If you don’t already have a wallet that supports Monero the first thing you’ll need to do is to download a wallet so you have somewhere to receive the XMR you mine. We recently did a review of the Best Monero Wallets that you can use to help you decide which wallet to use.
You could solo mine Monero, but you’ll almost surely need to wait a long time to find a block. The better solution is to use one of the many mining pools. It’s easy to set up and it stabilizes your earnings from mining. We’ve done a Monero Mining Pool guide previously, but there are many other good pools you can choose from too.
Once you’ve decided which mining pool you’re going to use you will need to download the mining software for Monero. The two best choices are XMR-STAK-RX and XMRIG.
Using XMR-STAK-RX
Here are the instructions for using XMR-STAK-RX. Note that all mining software is identified as a virus by Windows. Click for "More Information" and allow the download.
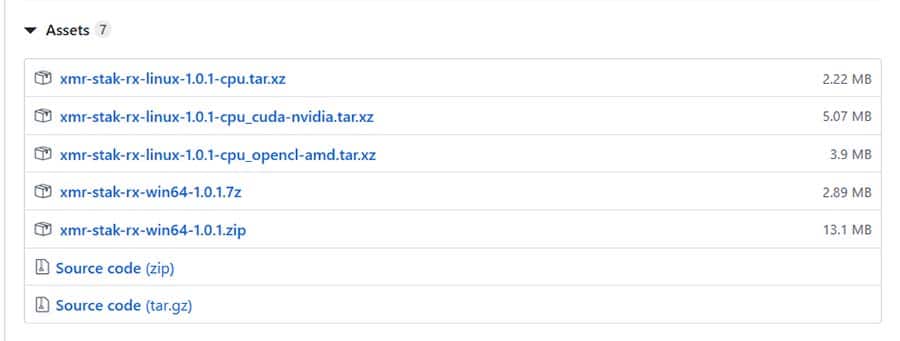 Step 1: Downloading the Files
After downloading the appropriate version of XMR-STAK-RX you will need to extract it, and then you can run xmr-stak-rx.exe. You may get a similar message from Windows about the software being a virus when trying to run the software, again you'll want to add it as an exception and allow it to run.
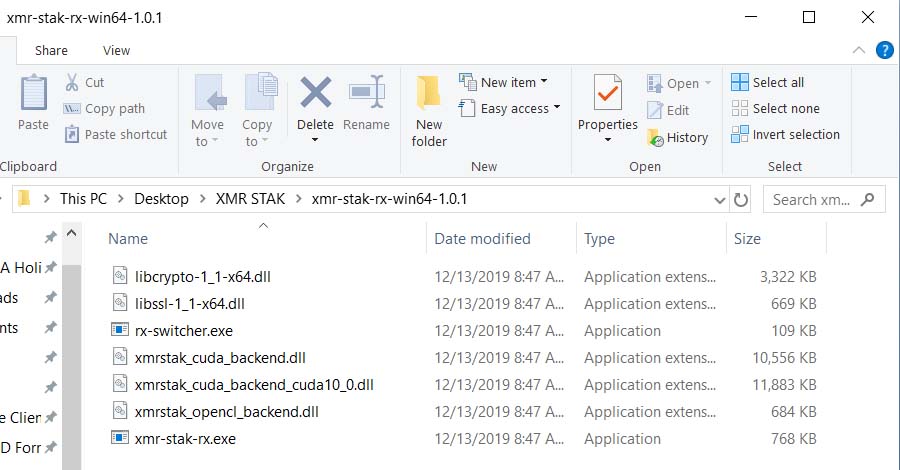 Step 2: Running the Chosen Files
It will open a command prompt window and ask if you want to use the simple setup method. Press ‘Y’ and then enter.
 Step 3: Simple Setup
You will be asked which currency you wish to mine. Type ‘monero’ and press enter.
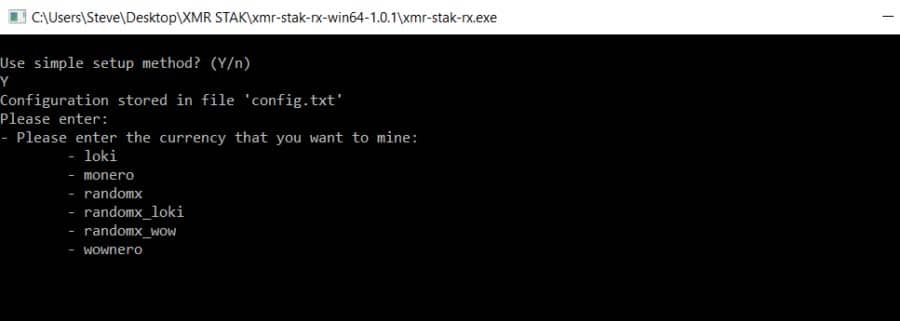 Step 4: Choose Monero
Next, you’ll be asked for your pool address. We’re using 2Miners as our pool. Once you’ve entered the appropriate mining pool address press enter.
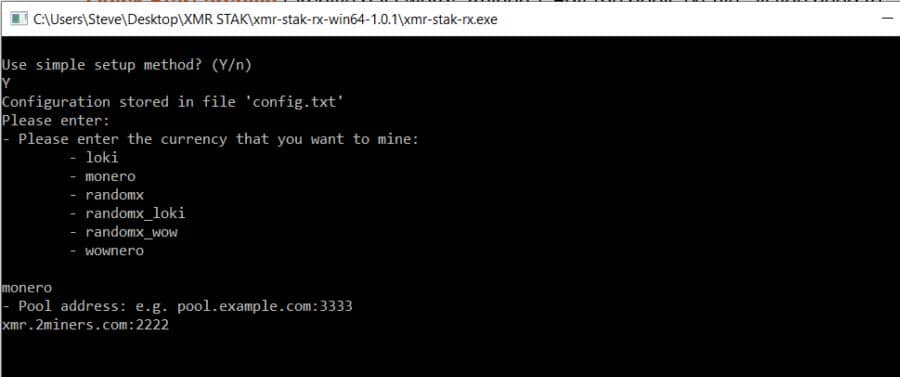 Step 5: Entering Mining Pool information
Next, you’ll be asked for a username, which is your wallet address or pool login. If using a wallet address you should copy/paste and then press enter.
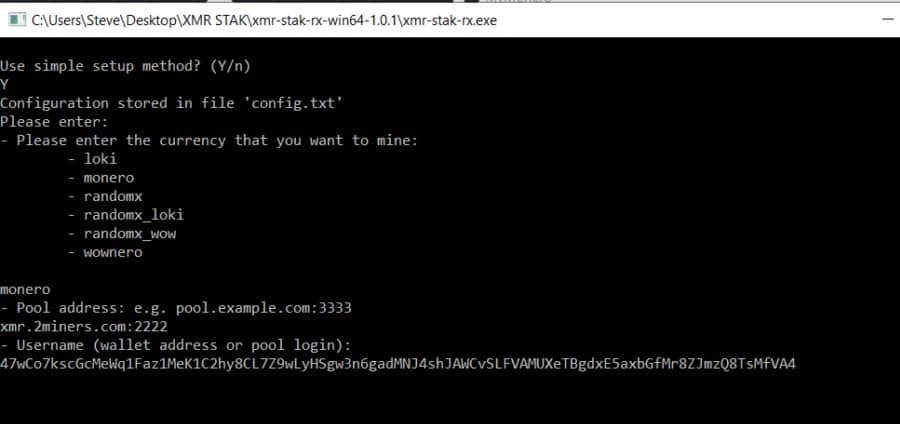 Step 6: Entering your XMR Address
Next, you’ll be prompted for a password. You can simply type ‘x’ and press enter.
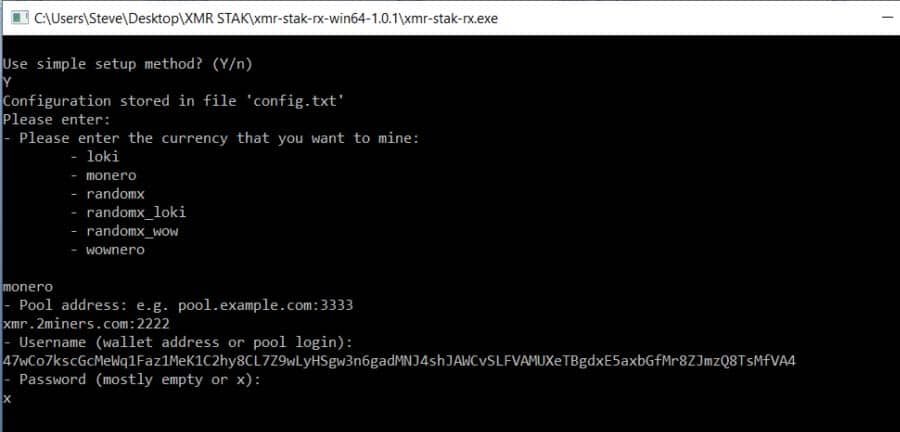 Step 7: Entering your XMR Address
Next, you’ll be asked if the pool supports TLS/SSL. If you’re unsure you can just type ‘n’ and press enter. If you’re using 2Miners like us you’ll want to type ‘n’.
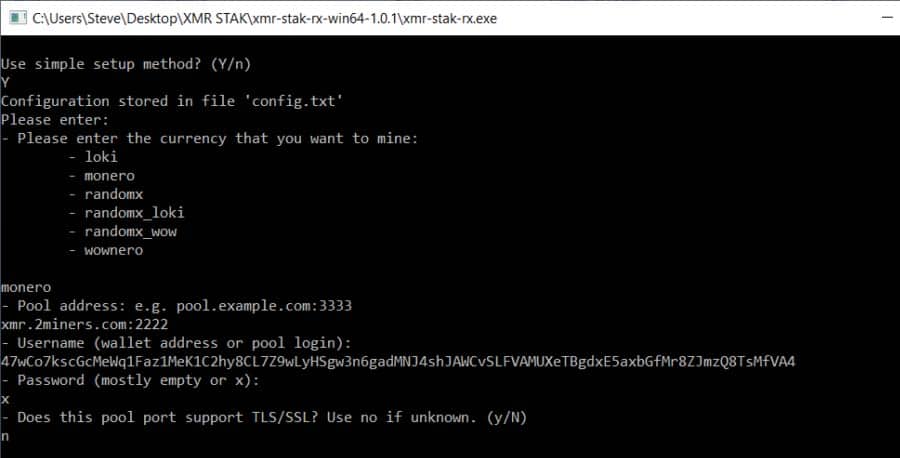 Step 8: Pool supports TLS/SSL?
Another command window will open and it may ask you to reboot. Don’t reboot just yet. You can just press enter and the command prompt should move to the next step. The original window will also be open, but it can be closed now that you’re done configuring the mining software.
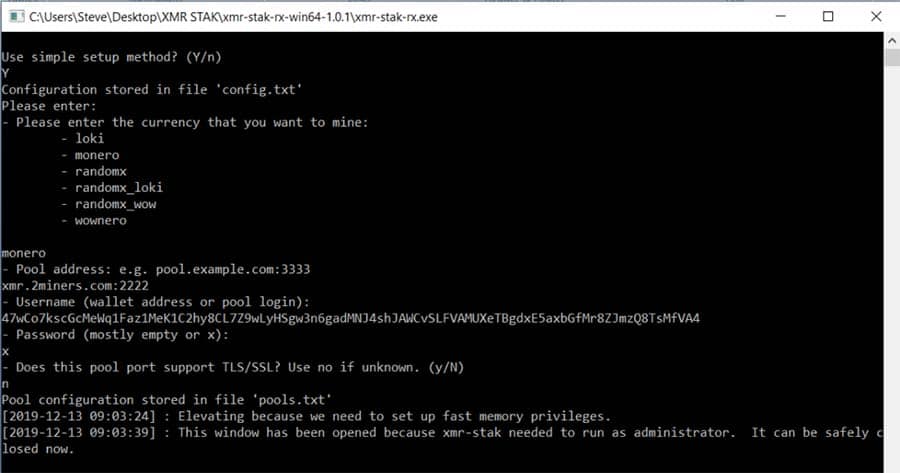 Step 9: Don't Reboot
And in the second window, you should see that you’re now mining. You may see several error messages, but eventually, the software will begin using your CPU to mine and will begin detecting blocks.
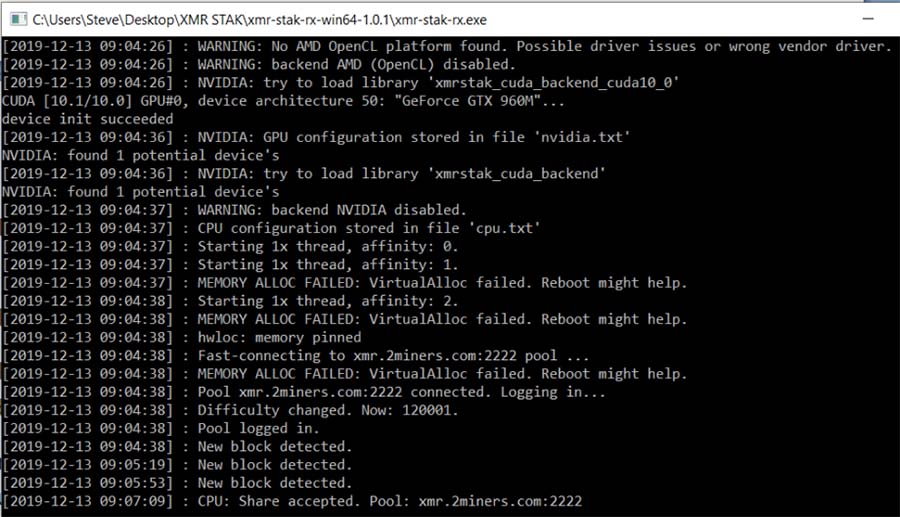 Step 10: Mining XMR on XMR-STAK
Now you are mining Monero using your CPU. It will give you an update of the amount of blocks that you have found and the XMR that you have mined.
Using XMRIG
If you prefer you could also use the XMRIG mining software for Monero, however, it comes with a default developer fee of 5%. You can change that in the config file, but you cannot go below 1%, so the XMRIG miner is not free.
Here are the instructions for downloading and running XMRIG.
First, download the proper version of the miner from Github.
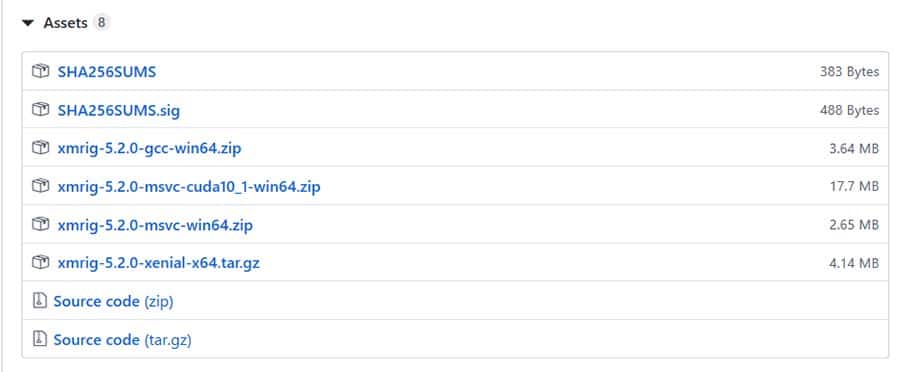 Step 1: Downloading XMRIG
Once the files are downloaded they will need to be extracted to a location of your choice. The files will almost certainly be flagged as a virus and you will need to add an exception to save and later to run the miner.
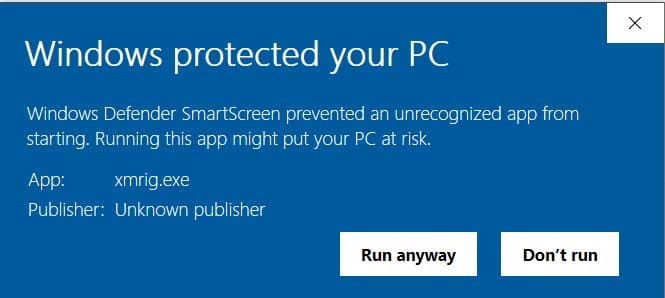 Step 2: Allow files to be run
Once the files have been extracted you can go to the folder and see the files. You will need to open the config.json file with Notepad or another text editor (not Word) so that you can set your parameters.
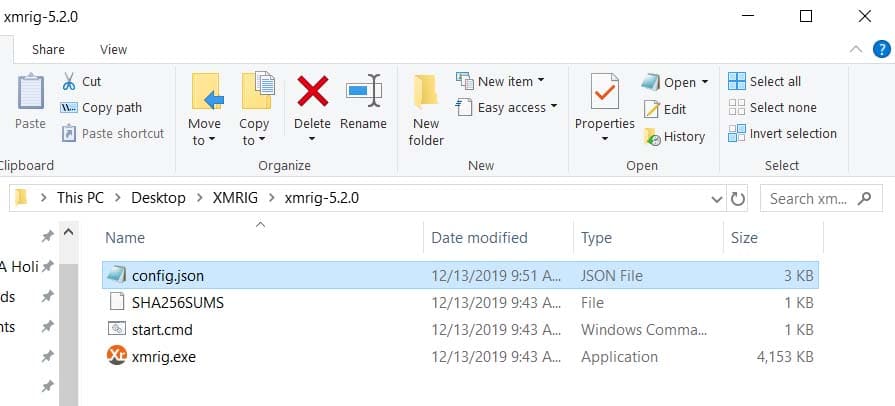 Step 3: Setting Mining Parameters
Once you open the config.json file scroll down near the bottom to the section called "pools". There you will add "rx/0" for the algo, "monero" for the coin, the pool address for the url, your wallet address for the user field, and "x" for the pass field. You will also want to change the keepalive setting from false to true. Don't forget the parenthesis or the miner won't work properly.
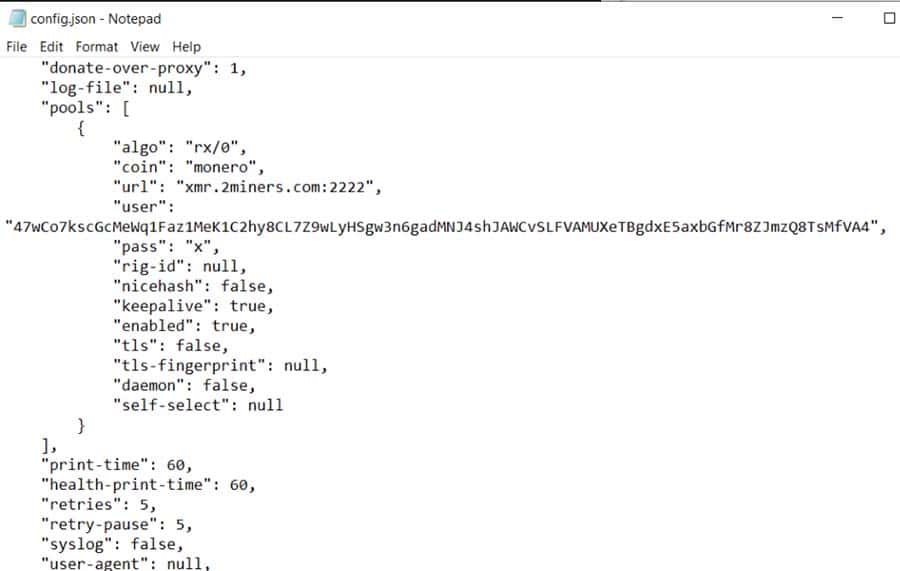 Step 4: Optimal XMRIG Config Settings
Save and close the file and then double-click the xmrig.exe file to start the miner. You will get a command prompt that opens and the miner will be running.
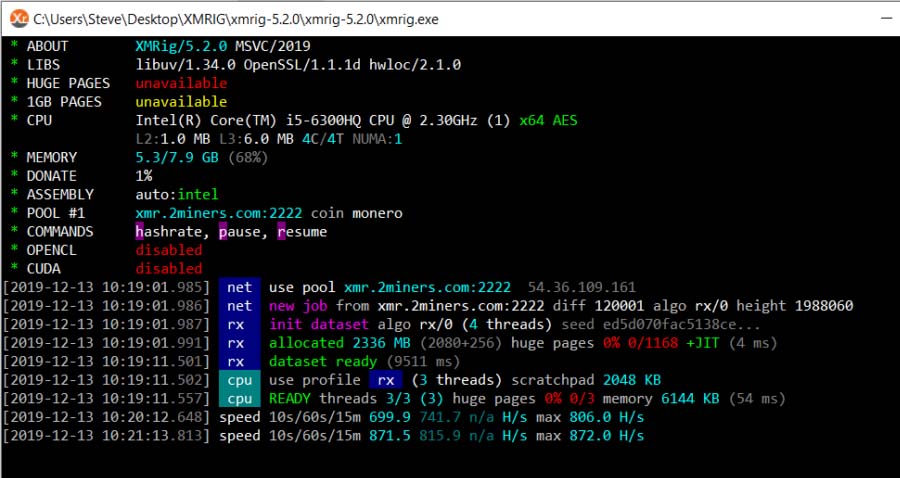 Step 5: Letting XMRIG Run & Mining XMR
There you have it. You can now leave XMRIG running and it will send the block rewards to the wallet that you have chosen. Of course, this will be reduced by 5% as you will have to give some over to the developers of the software - so pros and cons.
Conclusion
And there you have it, my simple guide about how to mine Monero with a CPU. Of course, if you have been mining XMR with your GPU rigs then you may discover a fall in your ROI which is an unfortunate side effect of this RandomX upgrade.
However, if you want to increase your returns from Mining with your CPUs then you can look to invest in some high-quality ones. These will no doubt be cheaper than the cost of buying GPUs or advanced ASICs.
For example, you can look to buy the Intel i5 7600 or the Intel i7 8700k. Both of these CPUs should get you added bang for your buck. The i5 has been tested to produce about 1.63 kh/s whereas the i7 can output about 2.36 kh/s. Of course, these are just two examples and there are many other CPUs that can work.
Indeed, now may be one of the best times to start mining XMR with your CPU. As more miners start joining the network the difficulty will increase and your ROI would fall. Be sure to do the appropriate calculations on this number before buying a new CPU.
Happy Hashing! 😉


