Crypto trading bots can be useful, but they are not magic money machines. They simply execute the rules they are given, which means weak strategy, poor risk controls, bad testing, unsafe API setup or ignored fees can turn automation into a very efficient way to lose money.
This guide breaks down the biggest crypto trading bot mistakes to avoid, from overfitted backtests and oversized trades to leverage, slippage, paper trading, monitoring and AI bot guardrails.
Editor's Note (July 5, 2026): We fully updated this article in July 2026 to reflect the current crypto trading bot landscape, with expanded coverage of strategy design, backtesting, paper trading, risk limits, API security, bot type selection, fees, slippage, monitoring, kill switches and AI bot guardrails. We also added clearer tables, updated FAQs and a practical failure diagnosis section to help readers identify what can go wrong before putting live capital at risk.
Quick Answer: The Biggest Crypto Trading Bot Mistakes To Avoid
Crypto trading bots fail when vague strategies are automated too early, risk controls are weak, costs are ignored, API keys are over-permissioned, and live monitoring is treated as optional. A safer bot starts with written rules, realistic testing, strict limits, secure permissions, and a clear kill switch.
Crypto Trading Bot Mistakes At A Glance
| Mistake | Why It Hurts | Safer Approach |
|---|---|---|
| Trading Without Clear Rules | The bot cannot interpret vague intent | Define entry, exit, size, stop-loss, and no-trade conditions |
| Trusting Overfitted Backtests | The strategy may only work on old data | Use out-of-sample and walk-forward testing |
| Risking Too Much Per Trade | A few bad trades can damage the account | Cap risk per trade and daily loss |
| Using Leverage Too Early | Small moves can become liquidation events | Test spot first, then use tiny futures size if needed |
| Ignoring Fees, Spread, Slippage, And Funding | The edge can disappear after execution costs | Model round-trip cost before launch |
| Giving API Keys Too Much Access | A leaked key can become account access | Use read and trade permissions only |
| Skipping Paper Trading | Backtests do not show real execution behavior | Run a 30-day dry run before live capital |
| Running The Wrong Bot For The Market | Each bot type needs the right market regime | Match the bot to trend, range, volatility, and liquidity |
| Failing To Monitor After Launch | Errors compound while the bot keeps running | Use alerts, logs, and a manual kill switch |
Key Takeaways on Crypto Trading Bot Mistakes
-
Rules come before code A bot should not go live until entry, exit, stop-loss, position sizing, and no-trade conditions are written clearly.
-
Backtests need stress testing Historical results are only useful when fees, slippage, out-of-sample data, walk-forward testing, and drawdowns are included.
-
Risk limits protect the account Per-trade risk, daily loss limits, exposure caps, and drawdown circuit breakers decide how much damage the bot can do.
-
Execution costs can erase the edge Fees, spread, slippage, funding, gas, and partial fills should be modeled before the bot touches live funds.
-
Live bots still need supervision API errors, stale prices, rejected orders, duplicate orders, outages, and failed stops require alerts, logs, and a manual kill switch.
Disclaimer
This guide is for educational purposes only and is not financial advice.
Disclosure
Some links in this guide may be affiliate links. If you choose to use a service through these links, we may earn a commission at no additional cost to you.

Mistake 1: Building A Bot Before Defining The Strategy
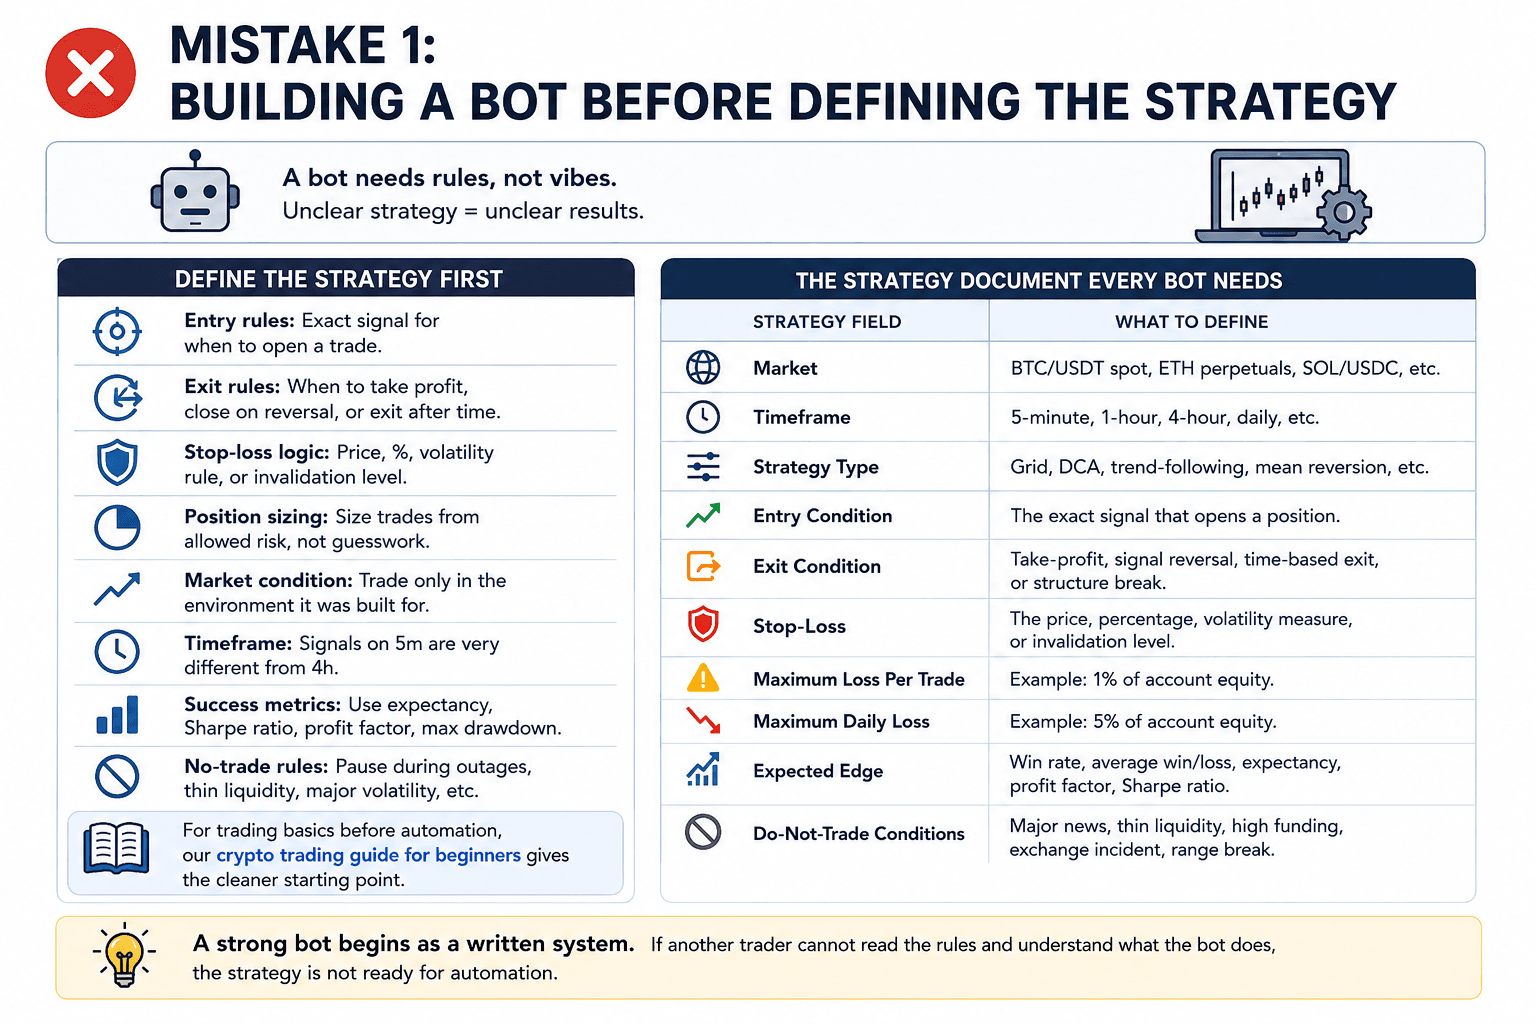
A bot needs rules, not vibes. The code can be clean and the dashboard can look professional, but unclear trading logic still produces unclear results.
 Clear Trading Rules Come Before Any Bot Code
Before building or connecting anything, the strategy should answer these points:
- Entry rules: The bot needs an exact signal for when to open a trade.
- Exit rules: It must know when to take profit, close on reversal, or exit after time-based failure.
- Stop-loss logic: Every trade needs a price, percentage, volatility rule, or invalidation level.
- Position sizing: The bot should calculate trade size from allowed risk, not from guesswork.
- Market condition: A range bot, trend bot, or DCA bot should only trade in the environment it was built for.
- Timeframe: Signals on a 5-minute chart behave differently from signals on a 4-hour chart.
- Success metrics: ROI alone is weak; expectancy, Sharpe ratio, profit factor, and maximum drawdown give a cleaner view.
- No-trade rules: The bot should pause during exchange outages, thin liquidity, major volatility spikes, or conditions outside the strategy.
A strong bot begins as a written system. If another trader cannot read the rules and understand what the bot does, the strategy is not ready for automation.
Read: How To Set Up A Crypto Trading Bot
The Strategy Document Every Bot Needs
Every bot should have a short strategy document before it touches live funds. This does not need to be complicated. It needs to be specific.
| Strategy Field | What To Define |
|---|---|
| Market | BTC/USDT spot, ETH perpetuals, SOL/USDC, or another exact pair |
| Timeframe | 5-minute, 1-hour, 4-hour, daily, or another fixed window |
| Strategy Type | Grid, DCA, trend-following, mean reversion, arbitrage, scalping |
| Entry Condition | The exact signal that opens a position |
| Exit Condition | Take-profit, signal reversal, time-based exit, or structure break |
| Stop-Loss | The price, percentage, volatility measure, or invalidation level |
| Maximum Loss Per Trade | Example: 1% of account equity |
| Maximum Daily Loss | Example: 5% of account equity |
| Expected Edge | Win rate, average win/loss, expectancy, profit factor, Sharpe ratio |
| Do-Not-Trade Conditions | Major news, thin liquidity, high funding, exchange incident, range break |
The sharper the document, the easier it becomes to backtest, paper trade, diagnose failures, and avoid random live adjustments.
The “Buy The Dip” Problem
“Buy the dip” is not a trading strategy until the dip is defined. A bot needs the vague idea turned into mechanical rules.
The key questions are:
- Dip from what level? The reference could be the last swing high, daily open, moving average, or support zone.
- Over what timeframe? A 3% hourly pullback is different from a 20% weekly drawdown.
- With what confirmation? The bot may need volume recovery, a reclaim of support, RSI recovery, or a candle close above a level.
- How much size? The bot should cap the first order and total allocation before the trade begins.
- Where is the invalidation level? The bot needs to know where the dip thesis is wrong.
- How many failed dips are allowed? Repeated entries without a limit can turn a dip bot into a loss-compounding machine.
- What market condition blocks the trade? Buying dips during a clean uptrend is different from buying every breakdown in a bear market.
Without those answers, “buy the dip” becomes automatic catching of falling knives.
Mistake 2: Trusting A Backtest That Was Built To Win The Past
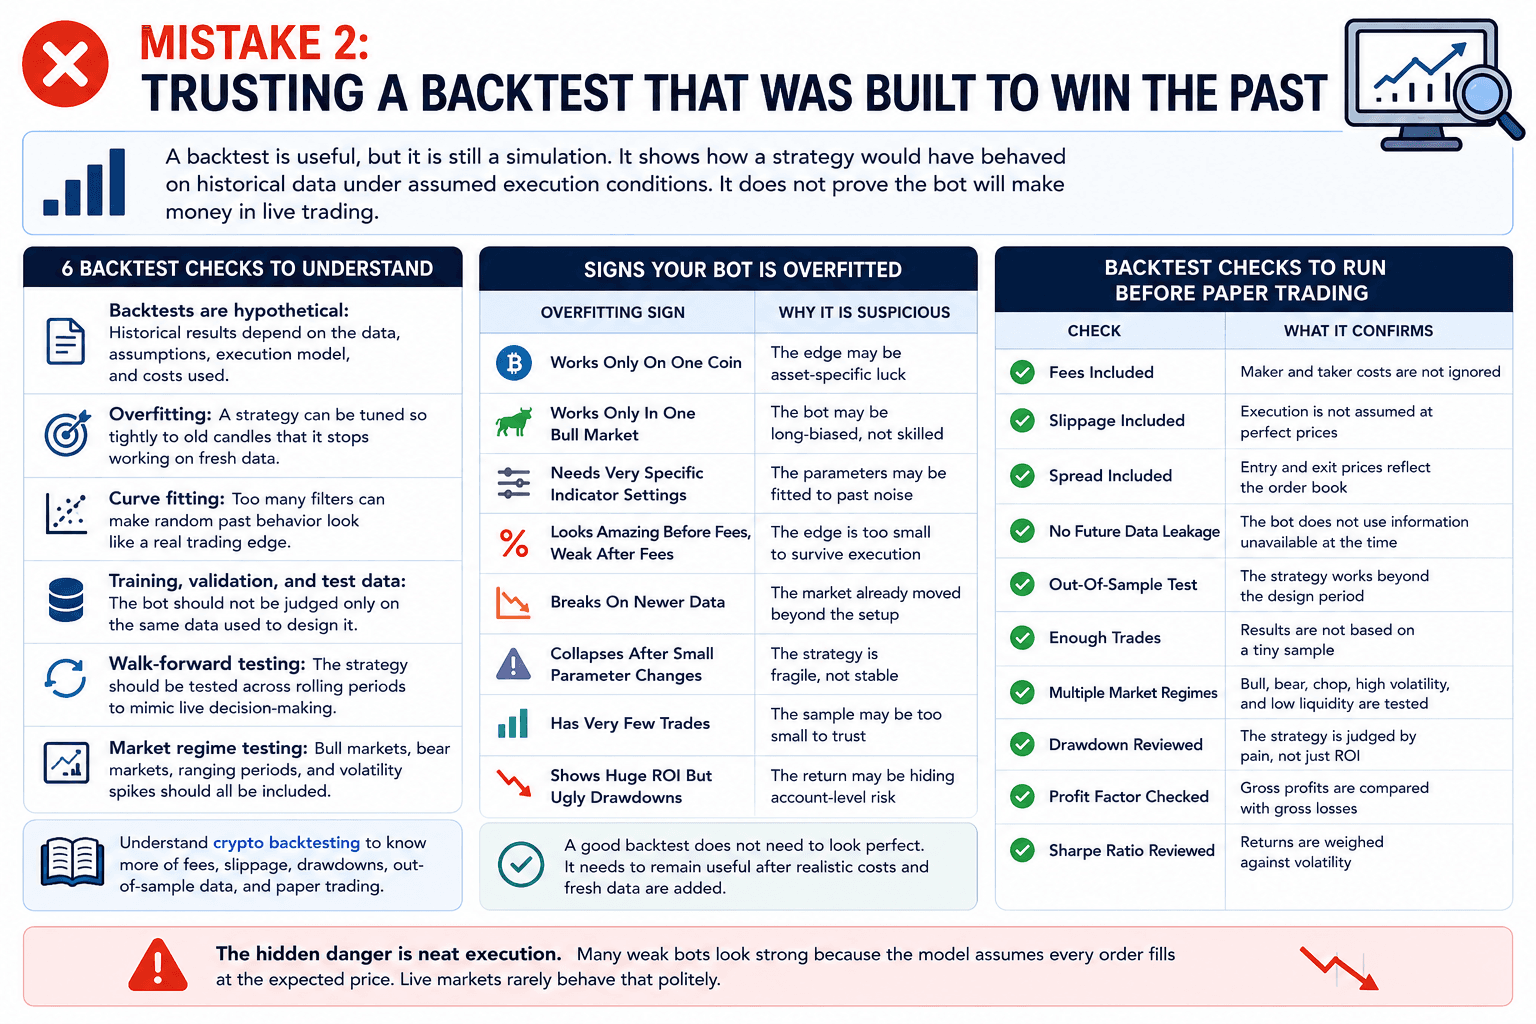
A backtest is useful, but it is still a simulation. It shows how a strategy would have behaved on historical data under assumed execution conditions. It does not prove the bot will make money in live trading.
 Backtests Can Flatter Strategies That Fail Live Markets
A backtest should cover six checks clearly:
- Backtests are hypothetical: Historical results depend on the data, assumptions, execution model, and costs used.
- Overfitting: A strategy can be tuned so tightly to old candles that it stops working on fresh data.
- Curve fitting: Too many filters can make random past behavior look like a real trading edge.
- Training, validation, and test data: The bot should not be judged only on the same data used to design it.
- Walk-forward testing: The strategy should be tested across rolling periods to mimic live decision-making.
- Market regime testing: Bull markets, bear markets, ranging periods, and volatility spikes should all be included.
Overfitting often feels productive while it is happening. The trader adds one more filter, then another, then another. The equity curve improves, but the strategy becomes less transferable. A bot that only works with one coin, one date range, and one exact indicator setting is usually fragile.
Read our guide on crypto backtesting to know more on fees, slippage, drawdowns, out-of-sample data and paper trading.
Signs Your Bot Is Overfitted
Use this checklist before taking any backtest seriously:
| Overfitting Sign | Why It Is Suspicious |
|---|---|
| Works Only On One Coin | The edge may be asset-specific luck |
| Works Only In One Bull Market | The bot may be long-biased, not skilled |
| Needs Very Specific Indicator Settings | The parameters may be fitted to past noise |
| Looks Amazing Before Fees, Weak After Fees | The edge is too small to survive execution |
| Breaks On Newer Data | The market already moved beyond the setup |
| Collapses After Small Parameter Changes | The strategy is fragile, not stable |
| Has Very Few Trades | The sample may be too small to trust |
| Shows Huge ROI But Ugly Drawdowns | The return may be hiding account-level risk |
A good backtest does not need to look perfect. It needs to remain useful after realistic costs and fresh data are added.
The Backtest Checks To Run Before Paper Trading
Before paper trading, the backtest should answer more than “did it make money?”
| Check | What It Confirms |
|---|---|
| Fees Included | Maker and taker costs are not ignored |
| Slippage Included | Execution is not assumed at perfect prices |
| Spread Included | Entry and exit prices reflect the order book |
| No Future Data Leakage | The bot does not use information unavailable at the time |
| Out-Of-Sample Test | The strategy works beyond the design period |
| Enough Trades | Results are not based on a tiny sample |
| Multiple Market Regimes | Bull, bear, chop, high volatility, and low liquidity are tested |
| Drawdown Reviewed | The strategy is judged by pain, not just ROI |
| Profit Factor Checked | Gross profits are compared with gross losses |
| Sharpe Ratio Reviewed | Returns are weighed against volatility |
The hidden danger is neat execution. Many weak bots look strong because the model assumes every order fills at the expected price. Live markets rarely behave that politely.
Mistake 3: Ignoring Risk Limits Before The Bot Starts Trading
Yes, a crypto trading bot can lose all the money allocated to it if risk controls are weak enough. The loss may come from a bad signal, but it usually becomes serious because of position size, repeated entries, missing stop-loss rules, leverage, or no account-level circuit breaker.
 Risk Limits Decide How Much Damage Bots Can Do
Risk limits should be defined before profit targets:
- Risk per trade: The bot should know the maximum account percentage it can lose on one trade.
- Account-level risk: Total exposure across all open positions should be capped.
- Stop-loss rules: Every trade needs an exit when the setup is invalidated.
- Position sizing: Trade size should adjust based on stop distance and account balance.
- Daily loss limits: The bot should stop for the day after a fixed account drawdown.
- Consecutive loss limits: Repeated losses should trigger a pause, not larger revenge trades.
- Drawdown circuit breakers: The bot should shut down if account equity falls beyond a set threshold.
- Leverage limits: First bots should avoid leverage because liquidation risk changes the whole game.
Good risk management accepts that the bot will be wrong. The goal is to keep each wrong decision small enough that the strategy survives the next test.
For a cleaner framework, read our crypto risk management strategies guide before deciding how much capital to assign to a bot.
Position Sizing Comes Before Profit Targets
The bot should know how much it is allowed to lose before it knows how much it wants to make.
A simple first setup might look like this:
| Risk Rule | Example |
|---|---|
| Risk Per Trade | 1% of account equity |
| Daily Loss Limit | 5% of account equity |
| Consecutive Loss Limit | Pause after 3 losing trades |
| Failed Order Limit | Pause after 3 failed or rejected orders |
| Max Asset Exposure | No more than 20% in one coin |
| Max Open Positions | 1 to 3 positions for a first live test |
| Drawdown Circuit Breaker | Stop if account equity drops 10% from starting balance |
Example: If the account has $10,000 and the bot risks 1% per trade, the maximum loss is $100. If the stop-loss is 5% away, the position size should be around $2,000 before fees and slippage. If the stop is 20% away, the position size should be smaller.
That calculation prevents a common beginner mistake: using the same trade size even when the stop distance changes.
Why Leverage Breaks Beginner Bots
Leverage compresses the room for error. A 2% move against a spot position is uncomfortable. The same move on 10x leverage can become account-damaging, especially when maintenance margin, funding fees, and liquidation price enter the trade.
Beginner bots often fail in clusters. They chase entries, trade during volatility spikes, repeat orders, or widen losses. Leverage makes those clusters harsher. A strategy that would be annoying on spot can become dangerous on futures or margin.
Once the bot survives live spot execution with tiny size, leverage can be tested with strict caps. The better question is not “how much leverage can I use?” It is “how little leverage can I use while still testing the idea?”
Before adding leverage, read our crypto margin trading guide and understand liquidation before trying to automate it.
Mistake 4: Choosing The Wrong Bot For The Market
Different bots are built for different market conditions. A grid bot likes range-bound price action. A trend-following bot needs direction. A DCA bot assumes the user is willing to accumulate through drawdowns. A futures bot can work in liquid, volatile markets, but leverage makes weak rules more expensive.
 Each Bot Type Needs The Right Market Regime
Bot choice should start with market regime:
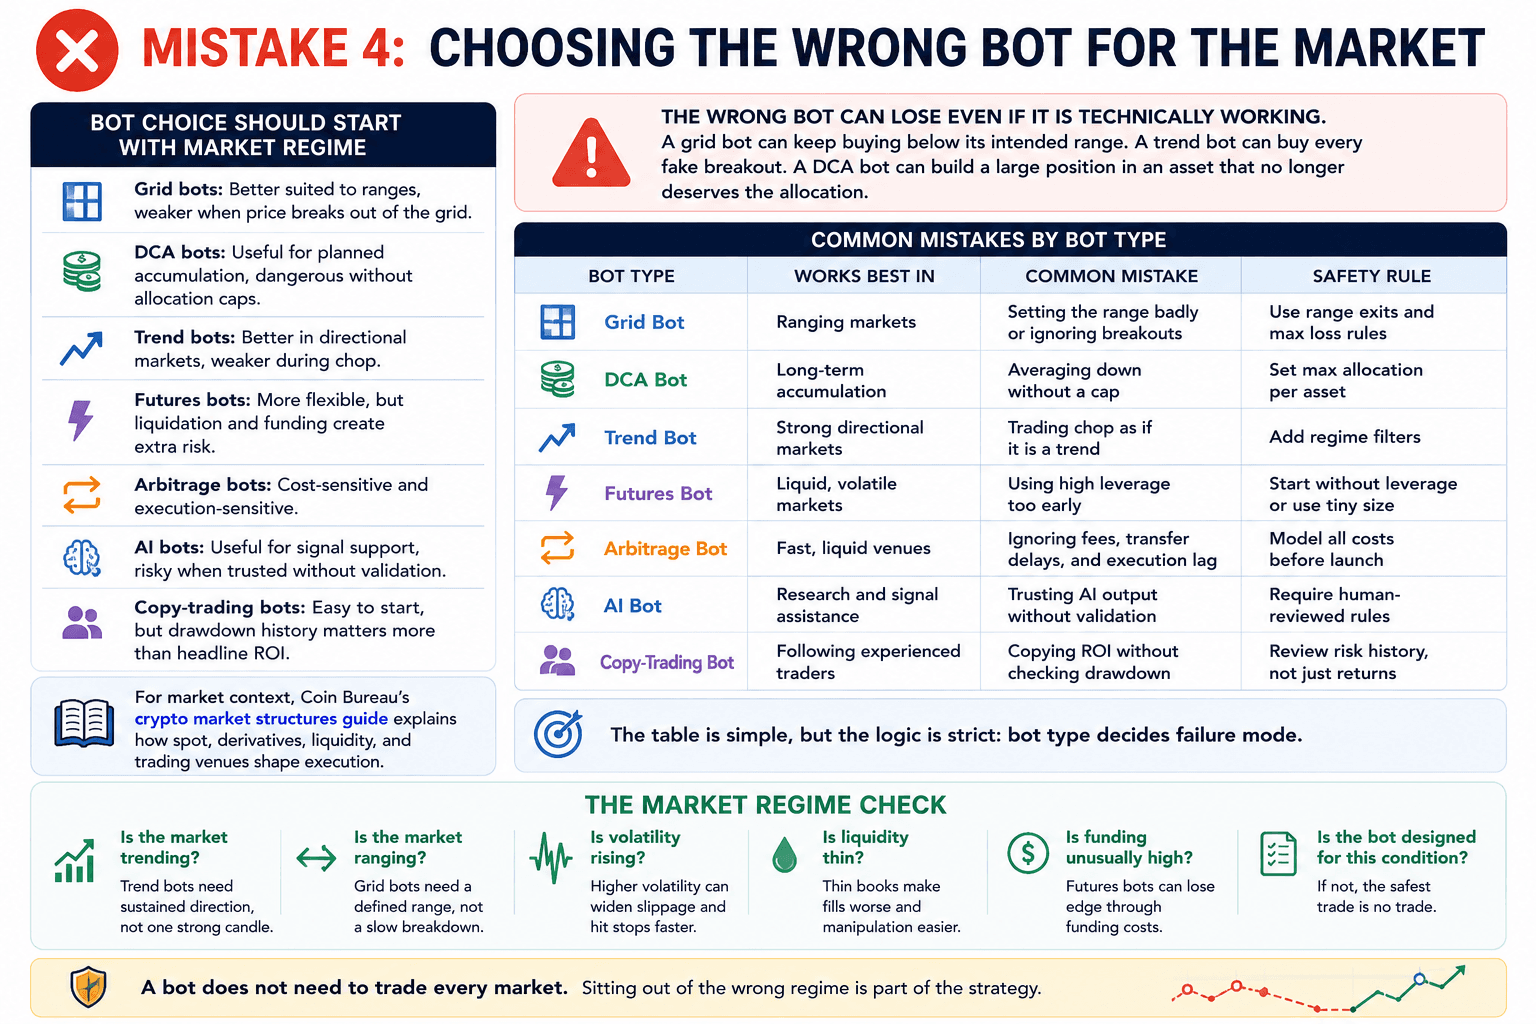
- Grid bots: Better suited to ranges, weaker when price breaks out of the grid.
- DCA bots: Useful for planned accumulation, dangerous without allocation caps.
- Trend bots: Better in directional markets, weaker during chop.
- Futures bots: More flexible, but liquidation and funding create extra risk.
- Arbitrage bots: Cost-sensitive and execution-sensitive.
- AI bots: Useful for signal support, risky when trusted without validation.
- Copy-trading bots: Easy to start, but drawdown history matters more than headline ROI.
The wrong bot can lose even if it is technically working. A grid bot can keep buying below its intended range. A trend bot can buy every fake breakout. A DCA bot can build a large position in an asset that no longer deserves the allocation.
Common Mistakes By Bot Type
| Bot Type | Works Best In | Common Mistake | Safety Rule |
|---|---|---|---|
| Grid Bot | Ranging markets | Setting the range badly or ignoring breakouts | Use range exits and max loss rules |
| DCA Bot | Long-term accumulation | Averaging down without a cap | Set max allocation per asset |
| Trend Bot | Strong directional markets | Trading chop as if it is a trend | Add regime filters |
| Futures Bot | Liquid, volatile markets | Using high leverage too early | Start without leverage or use tiny size |
| Arbitrage Bot | Fast, liquid venues | Ignoring fees, transfer delays, and execution lag | Model all costs before launch |
| AI Bot | Research and signal assistance | Trusting AI output without validation | Require human-reviewed rules |
| Copy-Trading Bot | Following experienced traders | Copying ROI without checking drawdown | Review risk history, not just returns |
The Market Regime Check
Before launch, the reader should ask:
- Is the market trending? Trend bots need sustained direction, not one strong candle.
- Is the market ranging? Grid bots need a defined range, not a slow breakdown.
- Is volatility rising? Higher volatility can widen slippage and hit stops faster.
- Is liquidity thin? Thin books make fills worse and manipulation easier.
- Is funding unusually high? Futures bots can lose edge through funding costs.
- Is the bot designed for this condition? If not, the safest trade is no trade.
A bot does not need to trade every market. Sitting out of the wrong regime is part of the strategy.
Mistake 5: Forgetting That Fees And Slippage Can Kill The Edge
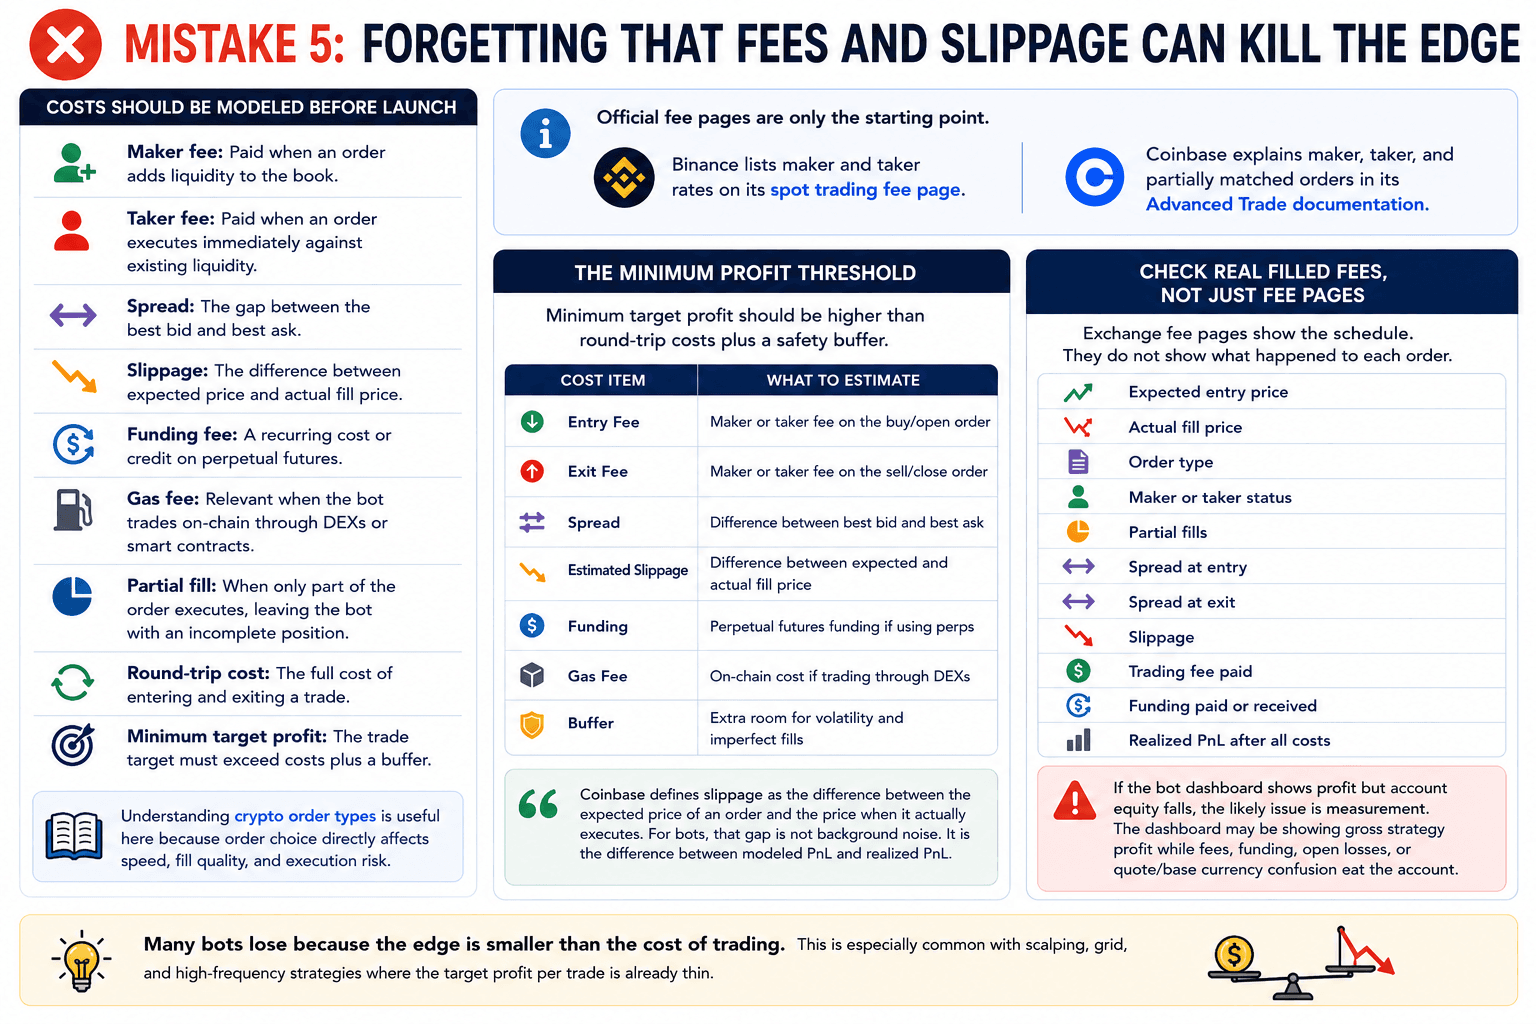
Many bots lose because the edge is smaller than the cost of trading. This is especially common with scalping, grid, and high-frequency strategies where the target profit per trade is already thin.
 Fees And Slippage Can Quietly Erase Bot Profits
Costs should be modeled before launch:
- Maker fee: Paid when an order adds liquidity to the book.
- Taker fee: Paid when an order executes immediately against existing liquidity.
- Spread: The gap between the best bid and best ask.
- Slippage: The difference between expected price and actual fill price.
- Funding fee: A recurring cost or credit on perpetual futures.
- Gas fee: Relevant when the bot trades on-chain through DEXs or smart contracts.
- Partial fill: When only part of the order executes, leaving the bot with an incomplete position.
- Round-trip cost: The full cost of entering and exiting a trade.
- Minimum target profit: The trade target must exceed costs plus a buffer.
Official fee pages are only the starting point.
The Minimum Profit Threshold
Minimum target profit should be higher than round-trip costs plus a safety buffer.
| Cost Item | What To Estimate |
|---|---|
| Entry Fee | Maker or taker fee on the buy/open order |
| Exit Fee | Maker or taker fee on the sell/close order |
| Spread | Difference between best bid and best ask |
| Estimated Slippage | Difference between expected and actual fill price |
| Funding | Perpetual futures funding if using perps |
| Gas Fee | On-chain cost if trading through DEXs |
| Buffer | Extra room for volatility and imperfect fills |
For bots, slippage is the difference between modeled PnL and realized PnL.
Check Real Filled Fees, Not Just Fee Pages
Exchange fee pages show the schedule. They do not show what happened to each order.
A bot should log:
- Expected entry price
- Actual fill price
- Order type
- Maker or taker status
- Partial fills
- Spread at entry
- Spread at exit
- Slippage
- Trading fee paid
- Funding paid or received
- Realized PnL after all costs
If the bot dashboard shows profit but account equity falls, the likely issue is measurement. The dashboard may be showing gross strategy profit while fees, funding, open losses, or quote/base currency confusion eat the account.
Mistake 6: Treating API Keys Like A Minor Setup Step
API keys are account access. For trading bots, they are the bridge between the strategy and the exchange account. If that bridge is poorly secured, the risk shifts from bad trades to account abuse.
 API Key Permissions Can Become Hidden Account Risk
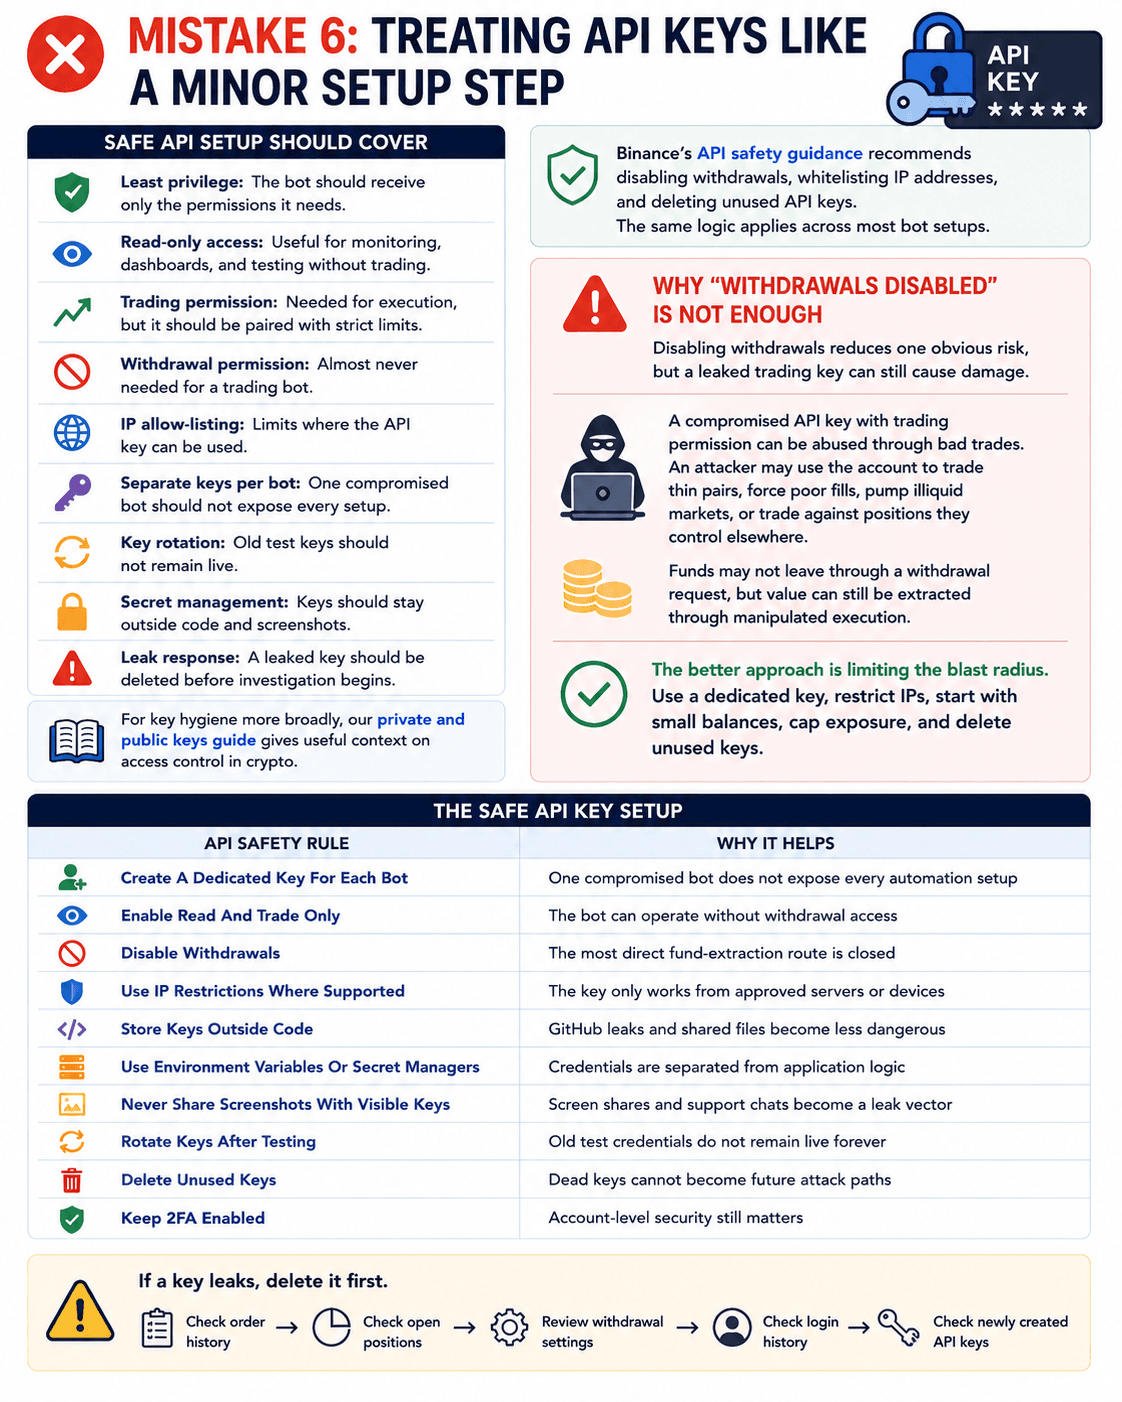
Safe API setup should cover:
- Least privilege: The bot should receive only the permissions it needs.
- Read-only access: Useful for monitoring, dashboards, and testing without trading.
- Trading permission: Needed for execution, but it should be paired with strict limits.
- Withdrawal permission: Almost never needed for a trading bot.
- IP allow-listing: Limits where the API key can be used.
- Separate keys per bot: One compromised bot should not expose every setup.
- Key rotation: Old test keys should not remain live.
- Secret management: Keys should stay outside code and screenshots.
- Leak response: A leaked key should be deleted before investigation begins.
Why "Withdrawals Disabled" Is Not Enough
Disabling withdrawals reduces one obvious risk, but a leaked trading key can still cause damage.
A compromised API key with trading permission can be abused through bad trades. An attacker may use the account to trade thin pairs, force poor fills, pump illiquid markets, or trade against positions they control elsewhere. Funds may not leave through a withdrawal request, but value can still be extracted through manipulated execution.
The better approach is limiting the blast radius. Use a dedicated key, restrict IPs, start with small balances, cap exposure, and delete unused keys.
The Safe API Key Setup
| API Safety Rule | Why It Helps |
|---|---|
| Create A Dedicated Key For Each Bot | One compromised bot does not expose every automation setup |
| Enable Read And Trade Only | The bot can operate without withdrawal access |
| Disable Withdrawals | The most direct fund-extraction route is closed |
| Use IP Restrictions Where Supported | The key only works from approved servers or devices |
| Store Keys Outside Code | GitHub leaks and shared files become less dangerous |
| Use Environment Variables Or Secret Managers | Credentials are separated from application logic |
| Never Share Screenshots With Visible Keys | Screen shares and support chats become a leak vector |
| Rotate Keys After Testing | Old test credentials do not remain live forever |
| Delete Unused Keys | Dead keys cannot become future attack paths |
| Keep 2FA Enabled | Account-level security still matters |
If a key leaks, delete it first. Then check order history, open positions, withdrawal settings, login history, and newly created API keys.
Mistake 7: Going Live Without A 30-Day Reality Test
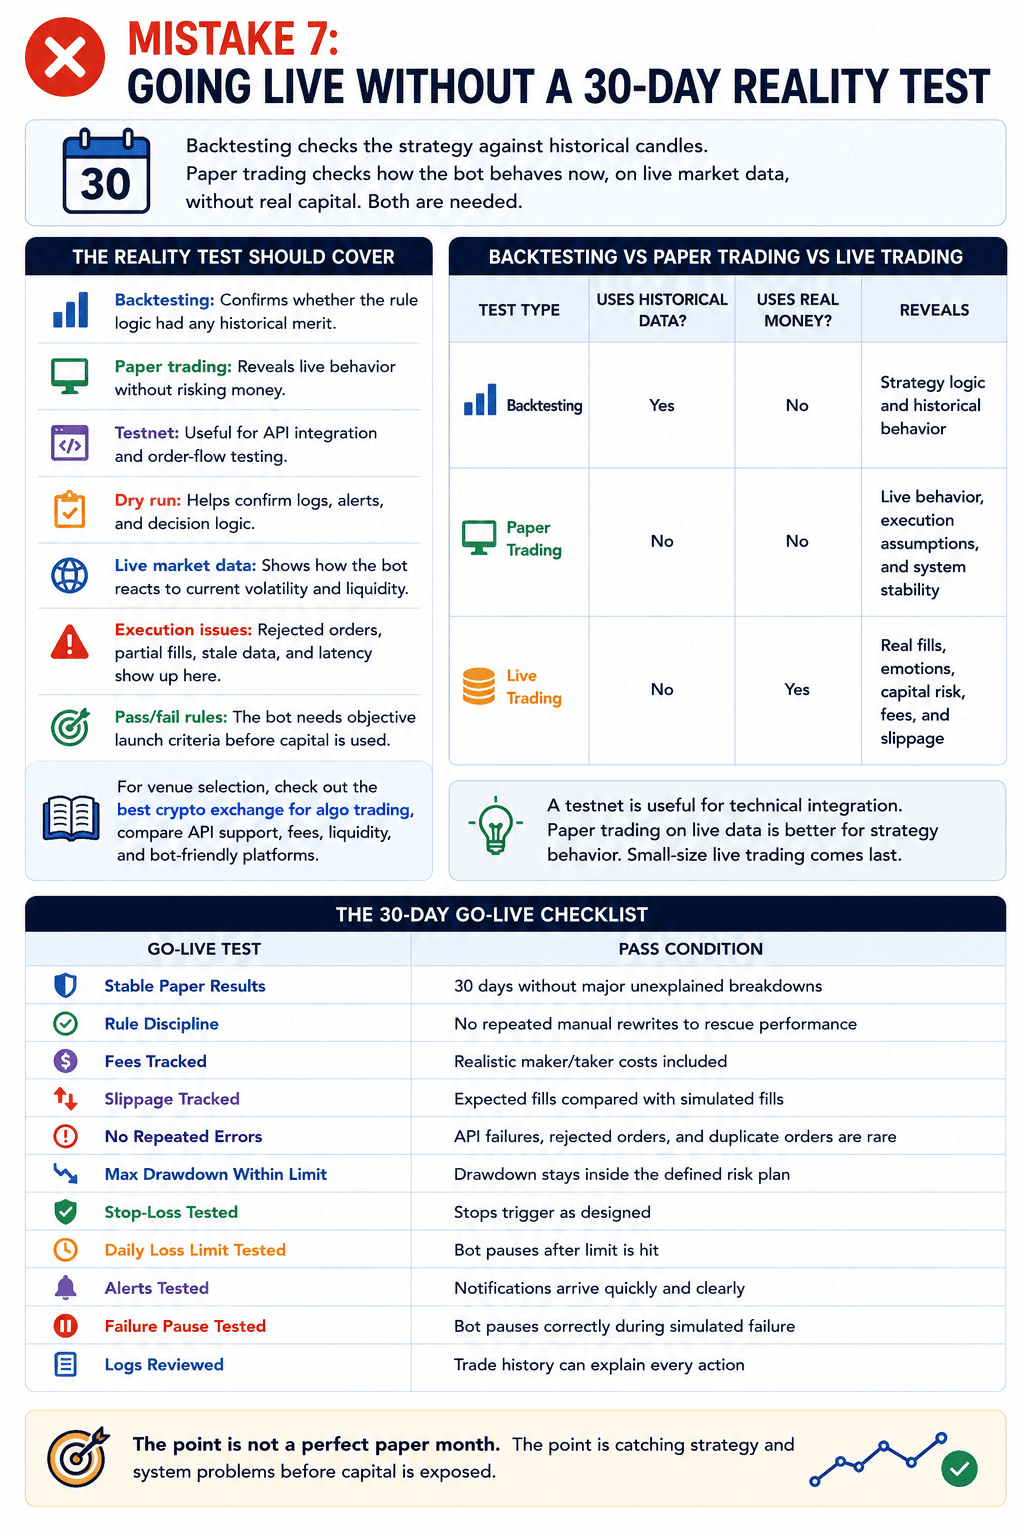
Backtesting checks the strategy against historical candles. Paper trading checks how the bot behaves now, on live market data, without real capital. Both are needed.
 Paper Trading Exposes Live Problems Backtests Usually Miss
The reality test should cover:
- Backtesting: Confirms whether the rule logic had any historical merit.
- Paper trading: Reveals live behavior without risking money.
- Testnet: Useful for API integration and order-flow testing.
- Dry run: Helps confirm logs, alerts, and decision logic.
- Live market data: Shows how the bot reacts to current volatility and liquidity.
- Execution issues: Rejected orders, partial fills, stale data, and latency show up here.
- Pass/fail rules: The bot needs objective launch criteria before capital is used.
A 30-day paper test is not a guarantee. It is a filter. It forces the bot through different market days, volatility pockets, exchange responses, and operational quirks before the first live order.
Backtesting Vs Paper Trading Vs Live Trading
| Test Type | Uses Historical Data? | Uses Real Money? | Reveals |
|---|---|---|---|
| Backtesting | Yes | No | Strategy logic and historical behavior |
| Paper Trading | No | No | Live behavior, execution assumptions, and system stability |
| Live Trading | No | Yes | Real fills, emotions, capital risk, fees, and slippage |
A testnet is useful for technical integration. Paper trading on live data is better for strategy behavior. Small-size live trading comes last.
The 30-Day Go-Live Checklist
The bot should pass these conditions before real funds are used:
| Go-Live Test | Pass Condition |
|---|---|
| Stable Paper Results | 30 days without major unexplained breakdowns |
| Rule Discipline | No repeated manual rewrites to rescue performance |
| Fees Tracked | Realistic maker/taker costs included |
| Slippage Tracked | Expected fills compared with simulated fills |
| No Repeated Errors | API failures, rejected orders, and duplicate orders are rare |
| Max Drawdown Within Limit | Drawdown stays inside the defined risk plan |
| Stop-Loss Tested | Stops trigger as designed |
| Daily Loss Limit Tested | Bot pauses after limit is hit |
| Alerts Tested | Notifications arrive quickly and clearly |
| Failure Pause Tested | Bot pauses correctly during simulated failure |
| Logs Reviewed | Trade history can explain every action |
The point is not a perfect paper month. The point is catching strategy and system problems before capital is exposed.
Mistake 8: Running The Bot Without Monitoring, Alerts, Or A Kill Switch
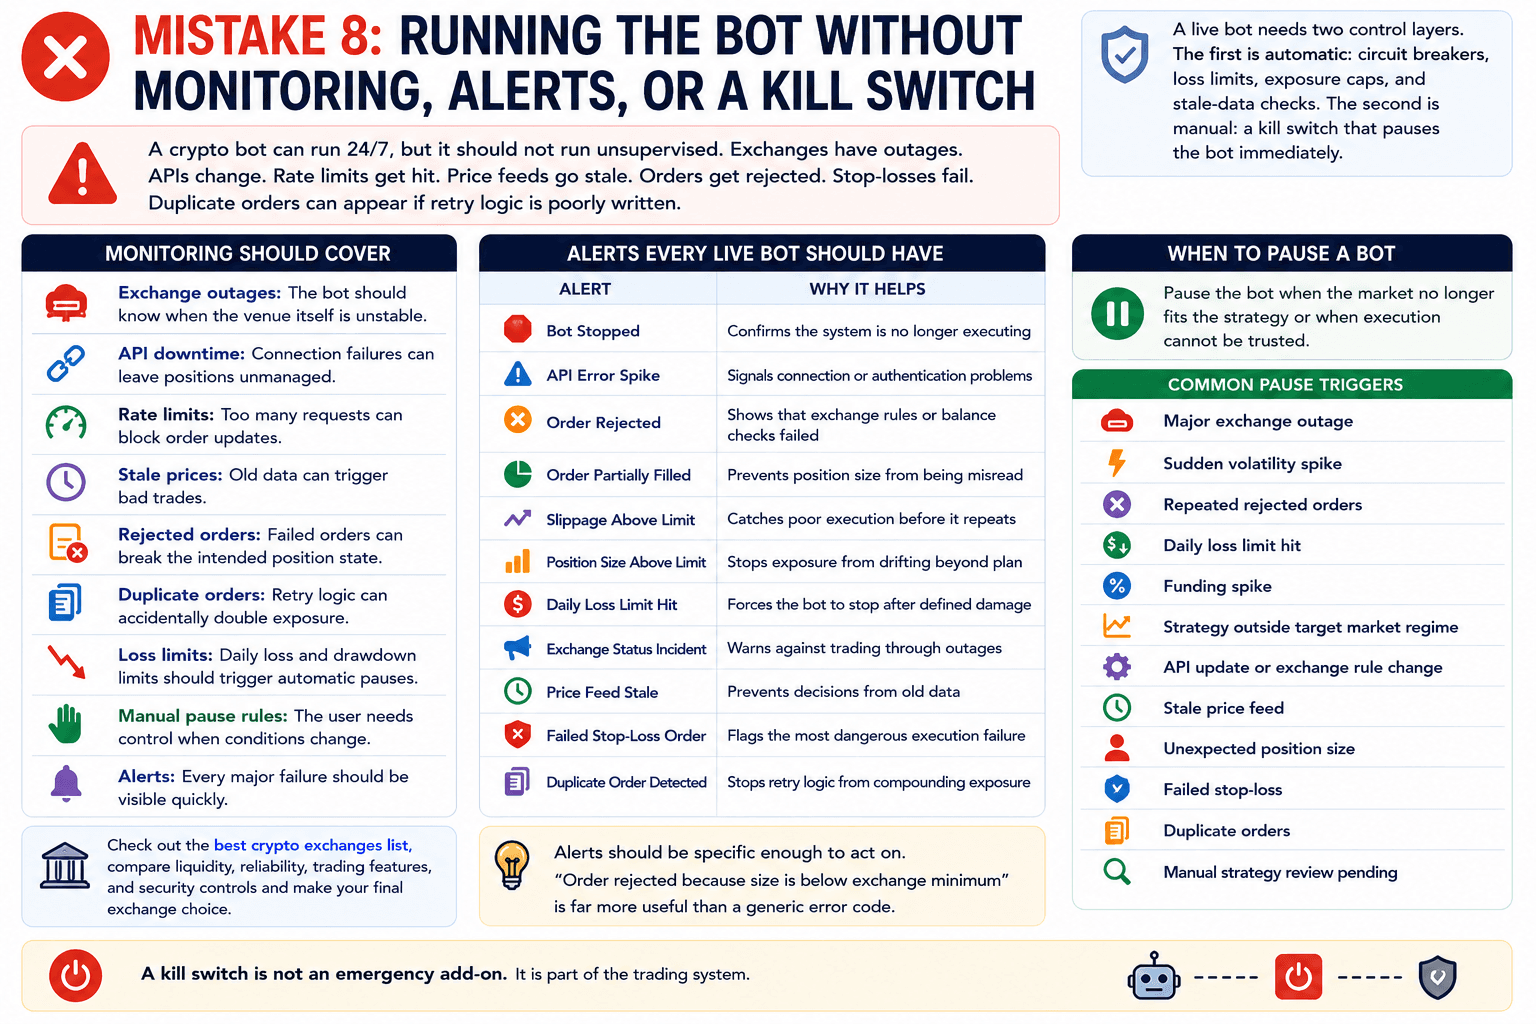
A crypto bot can run 24/7, but it should not run unsupervised. Exchanges have outages. APIs change. Rate limits get hit. Price feeds go stale. Orders get rejected. Stop-losses fail. Duplicate orders can appear if retry logic is poorly written.
 Live Bots Need Alerts, Logs, And Kill Switches
Monitoring should cover:
- Exchange outages: The bot should know when the venue itself is unstable.
- API downtime: Connection failures can leave positions unmanaged.
- Rate limits: Too many requests can block order updates.
- Stale prices: Old data can trigger bad trades.
- Rejected orders: Failed orders can break the intended position state.
- Duplicate orders: Retry logic can accidentally double exposure.
- Loss limits: Daily loss and drawdown limits should trigger automatic pauses.
- Manual pause rules: The user needs control when conditions change.
- Alerts: Every major failure should be visible quickly.
A live bot needs two control layers. The first is automatic: circuit breakers, loss limits, exposure caps, and stale-data checks. The second is manual: a kill switch that pauses the bot immediately.
Alerts Every Live Bot Should Have
| Alert | Why It Helps |
|---|---|
| Bot Stopped | Confirms the system is no longer executing |
| API Error Spike | Signals connection or authentication problems |
| Order Rejected | Shows that exchange rules or balance checks failed |
| Order Partially Filled | Prevents position size from being misread |
| Slippage Above Limit | Catches poor execution before it repeats |
| Position Size Above Limit | Stops exposure from drifting beyond plan |
| Daily Loss Limit Hit | Forces the bot to stop after defined damage |
| Exchange Status Incident | Warns against trading through outages |
| Price Feed Stale | Prevents decisions from old data |
| Failed Stop-Loss Order | Flags the most dangerous execution failure |
| Duplicate Order Detected | Stops retry logic from compounding exposure |
When To Pause A Bot
Pause the bot when the market no longer fits the strategy or when execution cannot be trusted.
Common pause triggers include:
- Major exchange outage
- Sudden volatility spike
- Repeated rejected orders
- Daily loss limit hit
- Funding spike
- Strategy outside target market regime
- API update or exchange rule change
- Stale price feed
- Unexpected position size
- Failed stop-loss
- Duplicate orders
- Manual strategy review pending
A kill switch is not an emergency add-on. It is part of the trading system.
Mistake 9: Trusting AI Bots Without Guardrails
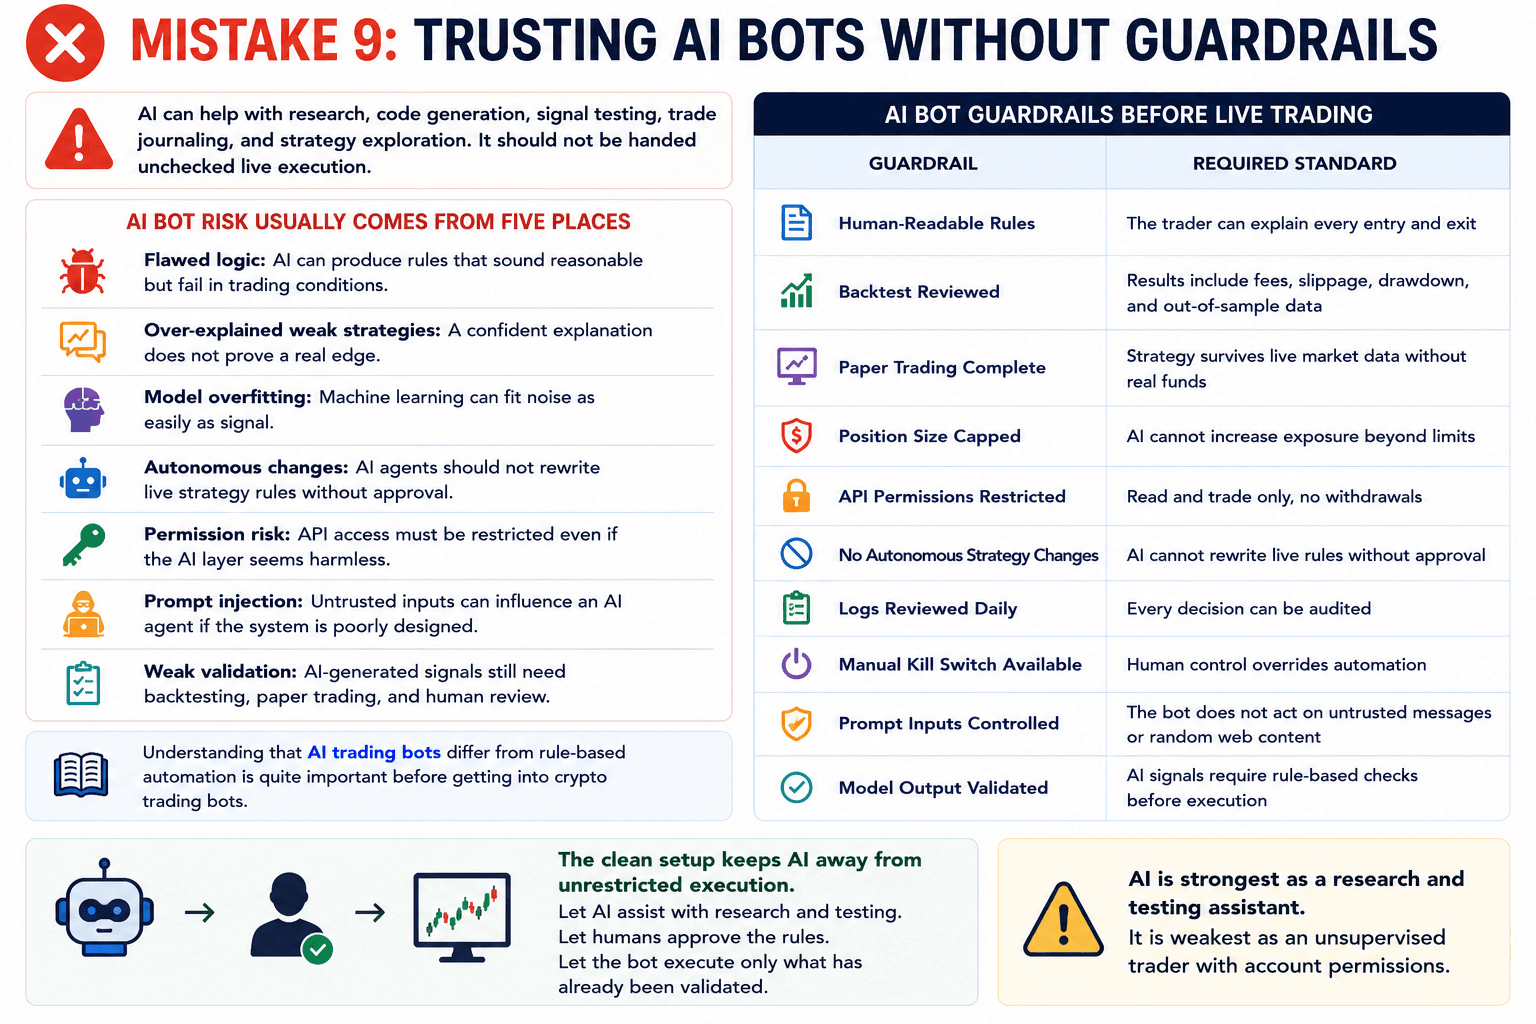
AI can help with research, code generation, signal testing, trade journaling, and strategy exploration. It should not be handed unchecked live execution.
 AI Trading Bots Still Need Human Guardrails
AI bot risk usually comes from five places:
- Flawed logic: AI can produce rules that sound reasonable but fail in trading conditions.
- Over-explained weak strategies: A confident explanation does not prove a real edge.
- Model overfitting: Machine learning can fit noise as easily as signal.
- Autonomous changes: AI agents should not rewrite live strategy rules without approval.
- Permission risk: API access must be restricted even if the AI layer seems harmless.
- Prompt injection: Untrusted inputs can influence an AI agent if the system is poorly designed.
- Weak validation: AI-generated signals still need backtesting, paper trading, and human review.
The clean setup keeps AI away from unrestricted execution. Let AI assist with research and testing. Let humans approve the rules. Let the bot execute only what has already been validated.
Read our guide on AI trading bots. Then, check out our top picks for the best crypto-AI trading bots.
AI Bot Guardrails Before Live Trading
| Guardrail | Required Standard |
|---|---|
| Human-Readable Rules | The trader can explain every entry and exit |
| Backtest Reviewed | Results include fees, slippage, drawdown, and out-of-sample data |
| Paper Trading Complete | Strategy survives live market data without real funds |
| Position Size Capped | AI cannot increase exposure beyond limits |
| API Permissions Restricted | Read and trade only, no withdrawals |
| No Autonomous Strategy Changes | AI cannot rewrite live rules without approval |
| Logs Reviewed Daily | Every decision can be audited |
| Manual Kill Switch Available | Human control overrides automation |
| Prompt Inputs Controlled | The bot does not act on untrusted messages or random web content |
| Model Output Validated | AI signals require rule-based checks before execution |
AI is strongest as a research and testing assistant. It is weakest as an unsupervised trader with account permissions.
Crypto Bot Failure Diagnosis: What To Check First
When a crypto trading bot starts losing money, do not immediately add indicators, widen stops, increase leverage, or switch coins. Those changes often hide the real problem.
 Bot Losses Usually Leave Clues In The Logs
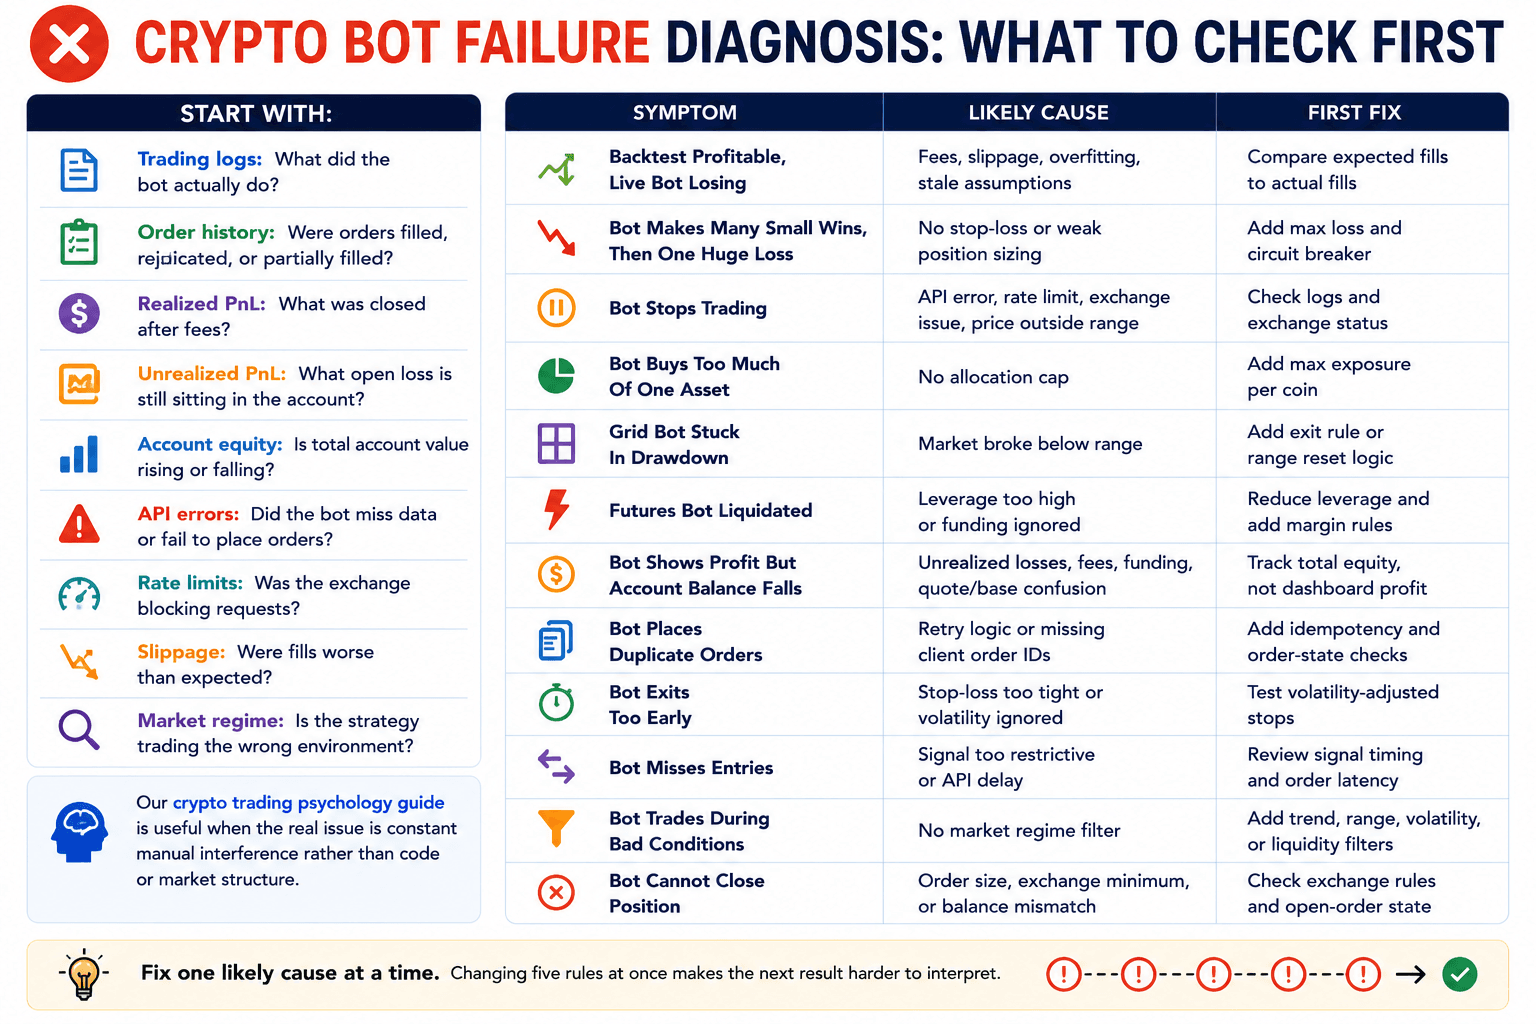
Start with:
- Trading logs: What did the bot actually do?
- Order history: Were orders filled, rejected, duplicated, or partially filled?
- Realized PnL: What was closed after fees?
- Unrealized PnL: What open loss is still sitting in the account?
- Account equity: Is total account value rising or falling?
- API errors: Did the bot miss data or fail to place orders?
- Rate limits: Was the exchange blocking requests?
- Slippage: Were fills worse than expected?
- Market regime: Is the strategy trading the wrong environment?
Our crypto trading psychology guide is useful when the real issue is constant manual interference rather than code or market structure.
Symptom, Likely Cause, First Fix
| Symptom | Likely Cause | First Fix |
|---|---|---|
| Backtest Profitable, Live Bot Losing | Fees, slippage, overfitting, stale assumptions | Compare expected fills to actual fills |
| Bot Makes Many Small Wins, Then One Huge Loss | No stop-loss or weak position sizing | Add max loss and circuit breaker |
| Bot Stops Trading | API error, rate limit, exchange issue, price outside range | Check logs and exchange status |
| Bot Buys Too Much Of One Asset | No allocation cap | Add max exposure per coin |
| Grid Bot Stuck In Drawdown | Market broke below range | Add exit rule or range reset logic |
| Futures Bot Liquidated | Leverage too high or funding ignored | Reduce leverage and add margin rules |
| Bot Shows Profit But Account Balance Falls | Unrealized losses, fees, funding, quote/base confusion | Track total equity, not dashboard profit |
| Bot Places Duplicate Orders | Retry logic or missing client order IDs | Add idempotency and order-state checks |
| Bot Exits Too Early | Stop-loss too tight or volatility ignored | Test volatility-adjusted stops |
| Bot Misses Entries | Signal too restrictive or API delay | Review signal timing and order latency |
| Bot Trades During Bad Conditions | No market regime filter | Add trend, range, volatility, or liquidity filters |
| Bot Cannot Close Position | Order size, exchange minimum, or balance mismatch | Check exchange rules and open-order state |
Fix one likely cause at a time. Changing five rules at once makes the next result harder to interpret.

Final Verdict: Bots Reward Discipline, Not Blind Automation
Crypto trading bots can help disciplined traders execute rules consistently. They are useful when the strategy is clear, risk is capped, fees are modeled, API access is restricted, and monitoring is active. They are risky when used like passive-income machines. A bot will not fix a vague strategy, poor position sizing, unsafe API setup, or a backtest built to flatter the past.
The safest first bot is simple, tested, monitored, and tightly permissioned. Do not go live until strategy, backtesting, risk limits, API security, fees, slippage, alerts, and the kill switch all pass the checklist. A bot can enforce discipline, but it cannot create discipline that was never built into the system.


