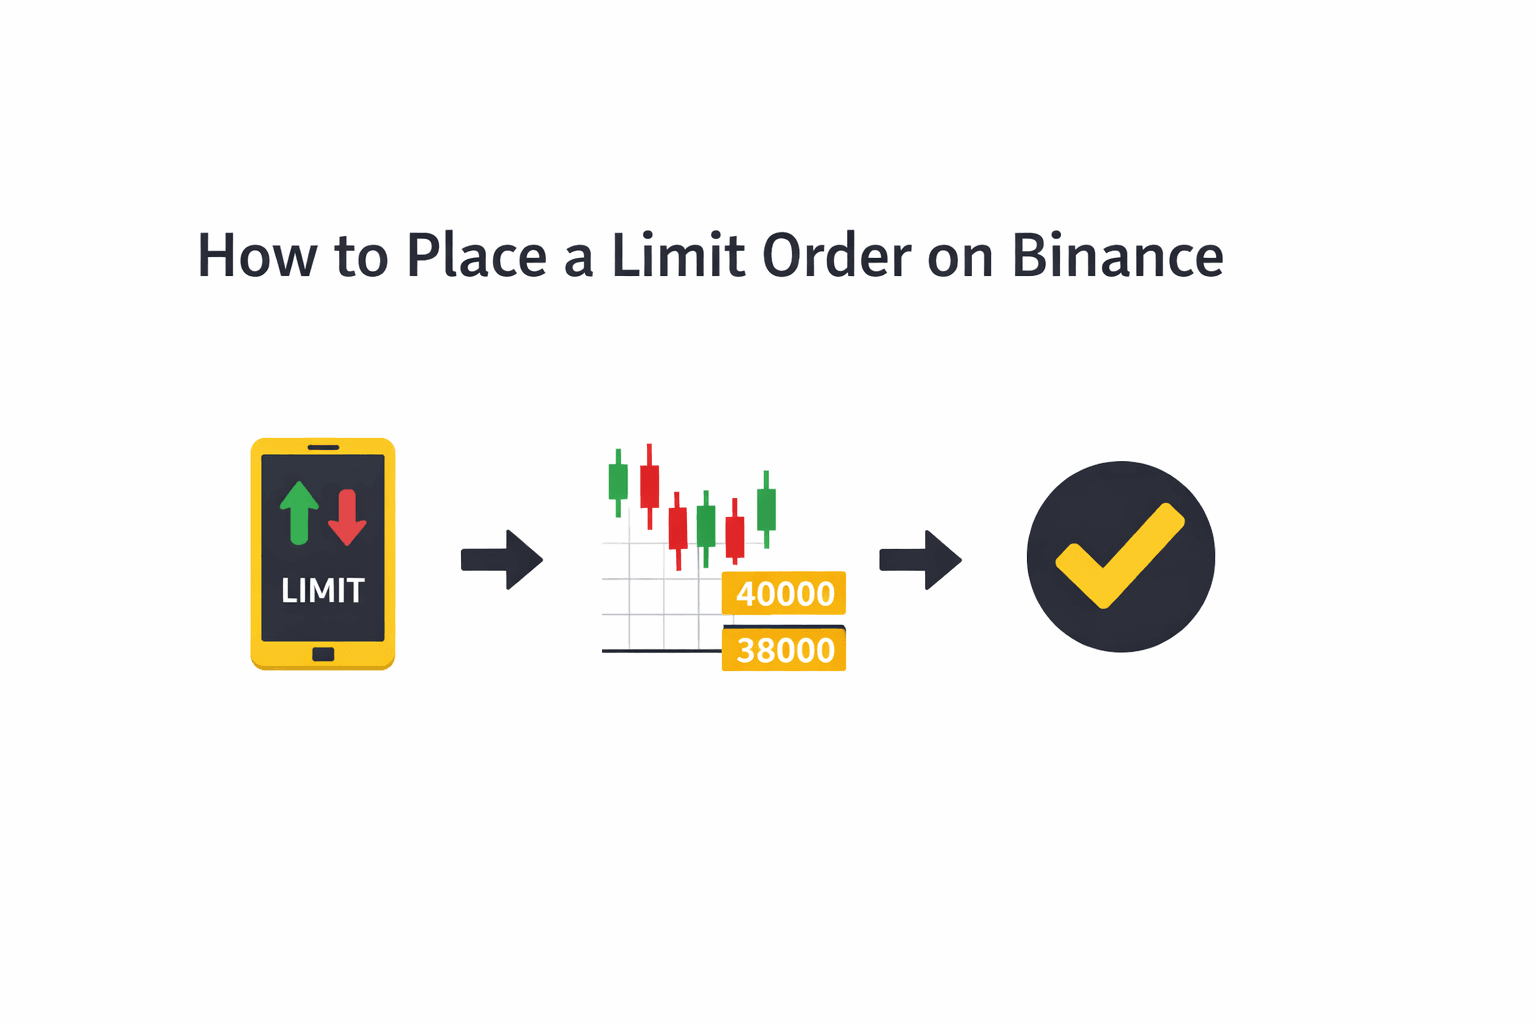
Crypto trading looks complicated until you do it once. Binance can feel like a lot on day one, mostly because there are so many buttons and tabs. But if you stick to the basic path of creating an account, verifying your identity, securing it, funding it, and placing a Spot order, the rest starts to make sense fast.
This guide sticks to the practical stuff beginners actually need. You’ll learn how to set up your account cleanly, deposit without messing up networks, place a Spot trade, and understand the fees, security settings, and order types that matter early on, so you can avoid common mistakes and trade with more confidence.
Editor’s note (March 5, 2026): This Binance trading guide has been fully refreshed for 2026 with a beginner-first, execution-focused structure. We tightened the “Quick Answer” flow, rebuilt the walkthrough and expanded the sections beginners most often get wrong. We also added a simple framework for choosing between Convert, Spot, Margin, and Futures, plus updated mobile guidance (Lite vs Pro) to match how most readers trade today.
Quick Answer: How to Trade on Binance
Create an account → complete verification (if required) → turn on security (2FA) → add funds → go to Spot → pick a pair (e.g., BTC/USDT) → choose Market (instant) or Limit (set price) → enter amount → Buy/Sell → check Orders to confirm it filled.
Note: Availability of features (especially fiat deposits/withdrawals and verification requirements) can vary by country and account type.
After your first trade, you mostly repeat steps 5 and 6: pick the pair, choose order type, place the order, then track its status.
Time estimates
Account creation is quick. Verification can be fast, but Binance notes reviews are typically completed within 48 hours (and may take longer during high-volume periods). Once funded, placing a Spot order is usually under a minute.
Minimum trade
There isn’t one universal minimum. Each pair enforces rules like minimum notional value and step sizes. The simplest habit: check the trade panel for the pair you’re using. (Reference)
Regular users: 0.10% maker / 0.10% taker. With “pay fees with BNB”: 25% off (effective 0.075% / 0.075% at that tier). Fees can vary by VIP level and promotions. (Binance fee schedule)
Extra credit: use a password manager and enable withdrawal address whitelisting (if available) to reduce account takeover risk.
This is general information, not financial advice. Trading carries risk, and rules/features can vary by location and change over time. Always confirm current requirements, fees, and network details inside Binance before executing a deposit or trade.

How To Trade On Binance
The Quick Answer gets you moving, and this section is the full walk-through, with the small choices that usually trip people up. If you follow the steps in order, you avoid the classic beginner mess: rushing to deposit, then scrambling to secure the account after money is already sitting there.
Step 1: Create an Account
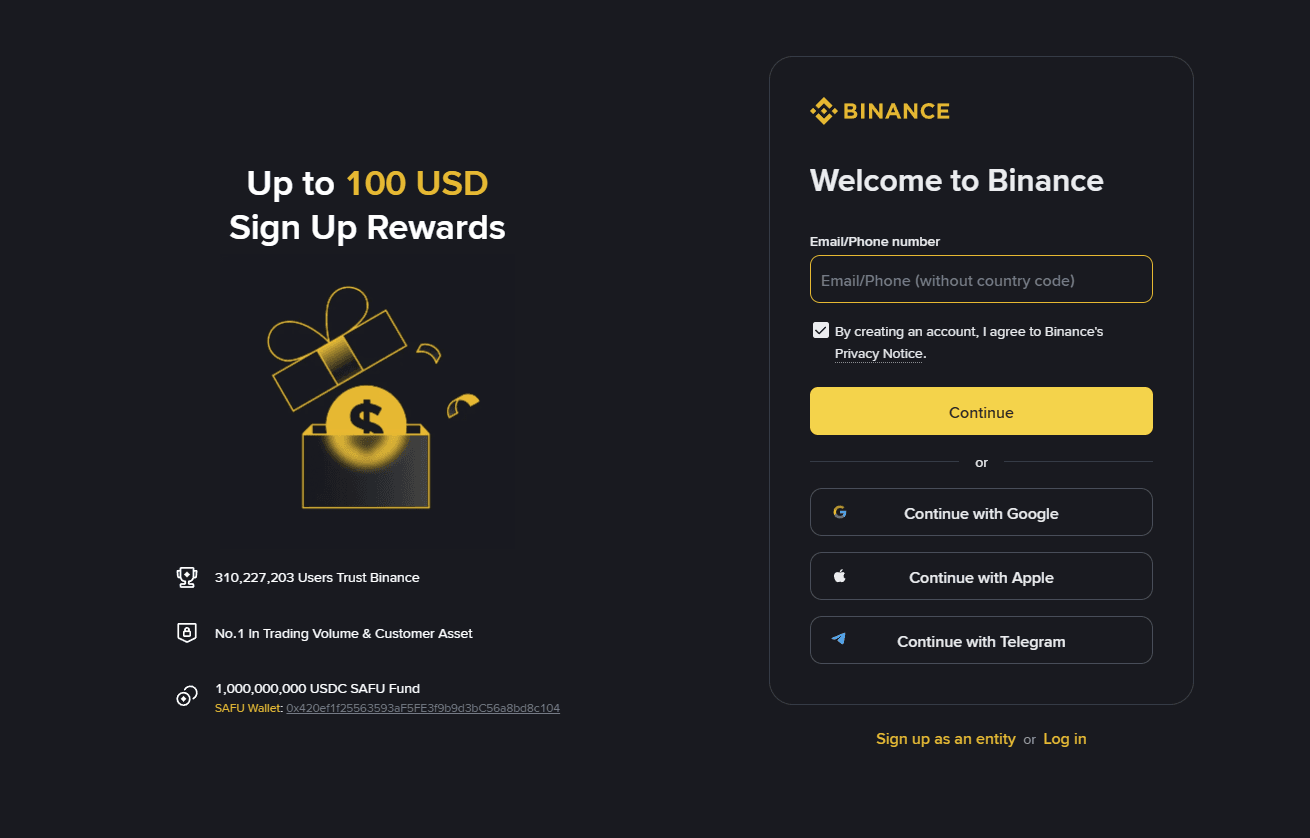 Complete Walkthrough From Account Setup To Execution. Image via Binance
Start with the basics. Binance lets you sign up using an email address or a phone number, then you set a password and confirm the account. Binance’s own Spot trading walkthrough starts from that same entry point and assumes you are logged in with a funded wallet afterward.
Password is the first line of defense, and exchange accounts are high-value targets. Use a unique password that you do not reuse anywhere else. Length matters more than cleverness. If you already use a password manager, this is the perfect use case.
Now, the region reality check.
If you are a U.S. resident, Binance.com is not the product you typically use. Binance.US is a separate platform with its own fee pages and market availability. Do not try to “work around” this with random links or mirror sites. Use the correct domain for your residency and only sign in through the official site or app store listing.
Once the account exists, you will see prompts to verify identity. That takes you to KYC.
Step 2: Complete KYC Verification
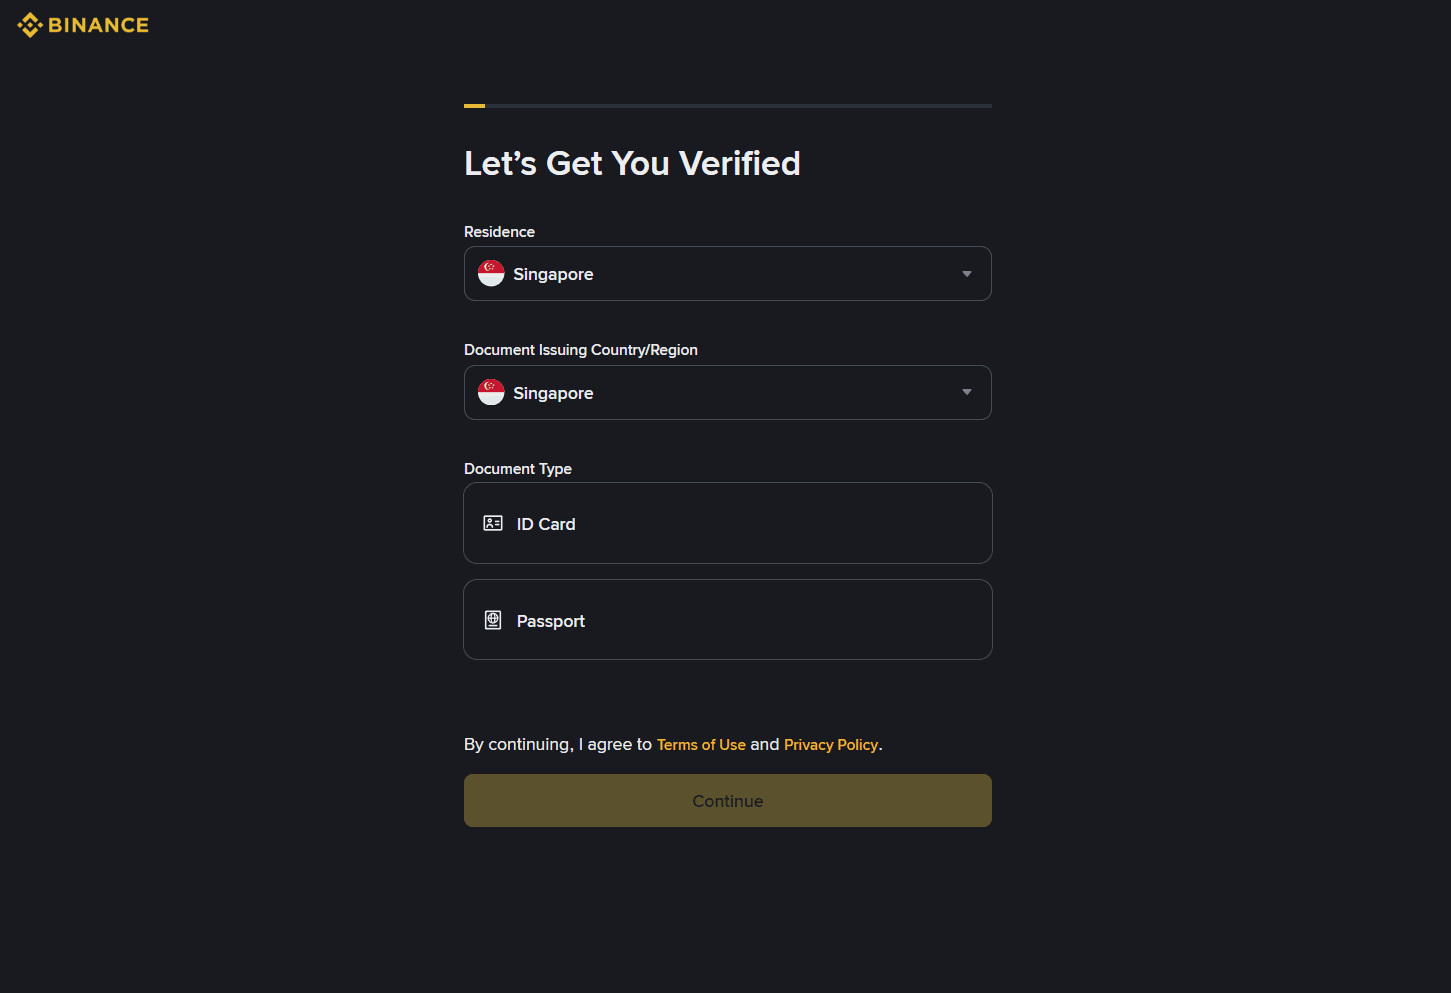 Complete KYC Verification Before You Trade
KYC is the identity check exchanges use to confirm you are a real person. It’s also what unlocks higher account permissions like higher limits and in many regions, access to more features.
What you’ll usually need is straightforward: a government-issued photo ID and a selfie or face verification step to match the document. Binance’s security and account verification flows reference these identity checks as the standard setup path.
Timing is the part that people want a clean answer for. In normal conditions, verification can be fast. In crowded periods, it can take longer because reviews queue up. Binance’s own guidance around security and account setup notes that processes can take longer at busy times, so set expectations like this in your article: minutes in typical cases, longer during peaks or when details need manual review.
Once KYC is done, most people want to deposit immediately. Don’t. Lock the doors first.
Step 3: Secure Your Account Before Funding
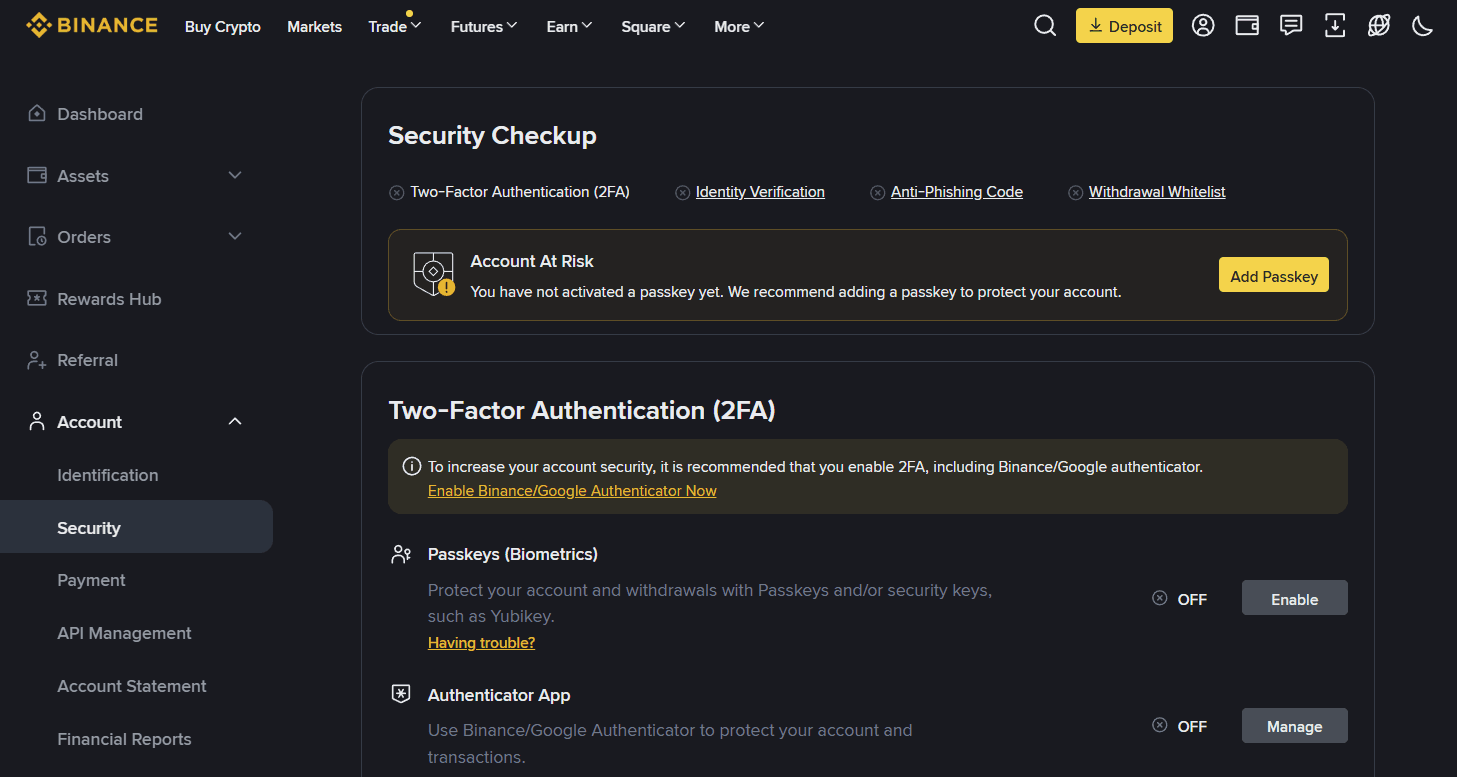 Secure Your Account Before Funding. Image via Binance
Here’s the rule that saves accounts: treat security setup as part of onboarding, not a “later” task.
Start with 2FA. An authenticator app is usually the default recommendation over SMS because SMS can be attacked through SIM swap-style takeovers. Binance’s own 2FA guidance is explicit about enabling 2FA as a core security measure.
Next, do device hygiene. Binance has Security settings that let you review devices and sessions. The goal is simple. If a device is old, shared, or unfamiliar, remove it. You do not want an old logged-in session sitting around while you trade.
Now add a control that most people skip and later regret. Set an Anti-Phishing Code.
Binance explains it as a user-set code that appears in official Binance emails so you can spot fake messages quickly. The setup path is inside your profile and security settings in the app.
Treat this as mandatory because phishing is not theoretical. Real-world scams frequently impersonate exchanges and push “urgent” messages to trick users into moving funds. The simplest protection is to never log in from random links and to verify official communications through the platform itself.
One more optional step if you plan to keep meaningful funds on Binance.
Use address whitelisting or trusted addresses if the option is available in your region and account settings. The point is to restrict withdrawals to addresses you have pre-approved. It adds friction, and that is the feature. If someone gets into your account, friction buys you time.
Once the account is secured, then you fund it. Review some real-world examples in our crypto fraud prevention and awareness article, and learn why it is more important
Step 4: Deposit Funds
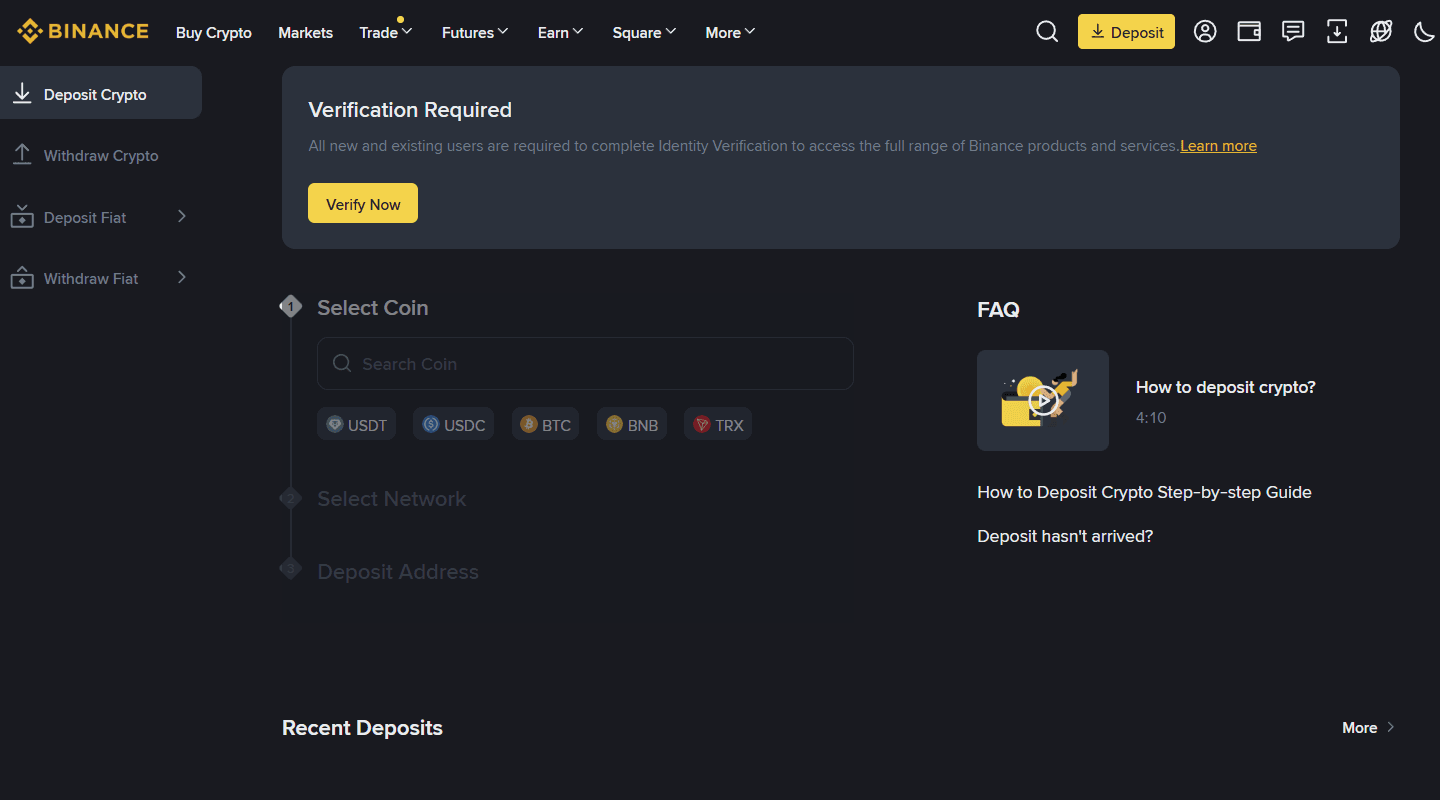 Deposit Funds and Start Trading. Image via Binance
You can fund Binance in two broad ways.
Fiat funding means using whatever methods Binance supports in your region, commonly bank transfer or card routes. Your article can stay jurisdiction-neutral here, and simply tell readers to check the funding screen because the available methods and their fees vary.
Crypto funding means transferring crypto from an external wallet or another exchange into Binance. This is where the word “network” matters.
A coin like USDT can exist on multiple networks. The “network” is the blockchain rail you are using for that transfer. When you deposit, Binance asks you to choose the network and gives you a deposit address for that network. If you pick the wrong one on either side, you can end up with missing funds or a recovery headache. Binance Academy is blunt about this risk and states that if you deposit to the wrong network, Binance may not be able to recover funds.
This is the number one beginner failure. Not bad chart reading, not picking the wrong coin. It’s sending the right asset on the wrong network.
Your guide should drill one habit.
Before sending a big transfer, send a small test amount first, confirm it lands, then send the full amount. Binance’s own incorrect deposit guidance lists wrong tags and network mismatches as common reasons deposits don’t credit properly.
With funds in, you’re ready to trade. The next choice is which interface to use.
Step 5: Place Your First Trade
 Place Your First Spot Trade on Binance. Image via Binance
Binance gives you two beginner-friendly ways to make your first swap.
Convert is designed to be simple. You pick “from” and “to,” preview the quote, then confirm. You don’t deal with charts or an order book. People use Convert when they want speed and convenience.
Spot is where you trade with full control. You choose the pair, pick an order type like Market or Limit, and decide your exact execution rules.
The clean way to explain the trade-off is pricing versus simplicity. Binance’s own fee schedule makes it easy to anchor Spot costs at the base fee level, while Convert is often described as having no visible fee but embedding cost into the spread of the quote.
So the rule of thumb for beginners looks like this.
If you’re making a small one-off swap and you value speed, Convert is fine. If you care about execution price, plan to trade regularly, or your size is meaningful, Spot is a better habit.
When you’re ready for Spot, the path is consistent: Trade → Spot, pick a pair like BTC/USDT, choose Market or Limit, enter amount, confirm. Binance’s Spot trading guide walks through this flow and is safe to cite for interface direction.
After you place an order, you need to know where it went. That’s the last step.
Step 6: Track, manage, and exit your trade
New traders panic because they click buy and then can’t “see” the trade. Binance keeps it simple, but you must know where to look.
In Spot, your active orders show under Open Orders. Filled trades show under Order History or Trade History, depending on the view. The same Spot guide that walks users into the trade also points them toward the order and trade panels for tracking.
If your order is Market, it usually fills immediately, and your updated balance appears in your wallet. If your order is a limit, it can sit waiting until the price hits your level. That is normal.
Now the exit piece. You do not need advanced strategies to act like a grown-up trader. You need one protective habit.
Learn how stop orders work on Spot so you can define your downside. Binance Academy explains stop-limit style mechanics and how triggers and limit prices function, which is exactly what beginners need before they start clicking around in volatility.
Choose Your Trading Method on Binance
By now, you know how to place a trade. The next question is structural.
Binance does not just give you one trading button. It gives you Spot, Convert, Margin, and Futures. For a new user, that menu can feel like walking into a cockpit. So instead of listing features, let’s reduce this to a decision framework. What are you trying to do? Quick swap? Buy and hold? Amplify a position? Hedge with leverage?
Start with the table. Then we narrow it down.
Spot vs Convert vs Margin vs Futures
Below is the simplified comparison beginners actually need.
| Feature | Spot | Convert | Margin | Futures |
| Complexity | Beginner to intermediate | Beginner | Intermediate to advanced | Advanced |
| Leverage | No | No | Yes (commonly 2–10x) | Yes (up to 125x on select contracts) |
| Liquidation risk | None | None | Yes | Yes, and can happen quickly |
| Typical use case | Buy, sell, hold | Instant swap | Borrow to amplify | Speculate, hedge, short |
| Fees (high level) | 0.10% base maker/taker | No visible fee, spread embedded | Spot fee + interest | Lower base fees + funding |
Spot base fees start at 0.10% maker and 0.10% taker for regular users, with BNB discounts available. Binance publishes this directly on its fee schedule. Futures fees start lower on paper than Spot, but that does not mean they are cheaper in practice. Funding rates and leverage risk change the math completely.
Margin introduces borrowed capital and interest. Futures introduces contract mechanics and liquidation thresholds. These are not cosmetic differences. They change your risk profile entirely.
Now let’s make this practical.
What Beginners Should Start With
If you are new, your progression should be intentional.
That path builds muscle memory without exposing you to liquidation mechanics.
Convert is useful because it removes the order book entirely. You focus on asset selection and confirmation. Spot trading introduces execution logic. You learn what Market and Limit actually do. You see how spreads behave. You understand how fees apply.
Only after you are comfortable managing position size and stop-loss placement should you even think about Margin or Futures. Leverage feels powerful. It is. That’s the problem.
On Margin and Futures, a bad move does not just reduce your account. It can liquidate it. Binance explicitly structures these as separate products for that reason.
So your article should be direct here.
Avoid Margin and Futures early. There is no prize for touching leverage in your first month.
Trading on Desktop vs Mobile
The interface matters because behavior changes based on screen size.
On desktop, Binance shows you everything at once. Order book on one side, chart in the middle, trade panel below, and order history at the bottom. You can see liquidity, depth, and price structure clearly.
The desktop path is:
Trade → Spot → choose Classic or Advanced view
Classic is cleaner. Advanced shows a deeper order book and layout controls.
On mobile, the app compresses this.
You tap Trade, then choose Spot or Convert. The order entry panel slides up from the bottom. Charts are simplified but still usable.
Now here’s something beginners often miss. Binance mobile has Lite mode and Pro mode.
Lite strips away the order book and most complexity. It’s designed for people who want to buy or sell without thinking about microstructure. Pro exposes full order types, order book depth, and advanced tools. If you are writing for crypto-native readers, assume they should move to Pro sooner rather than later. It builds better habits.
Security on mobile deserves one clean mention here before we move on.
Only download the app from official app stores. Never log in from a random link sent via SMS or email. Binance explicitly provides Anti-Phishing Code functionality so users can verify official communication. Use it.
How to Use Binance Convert
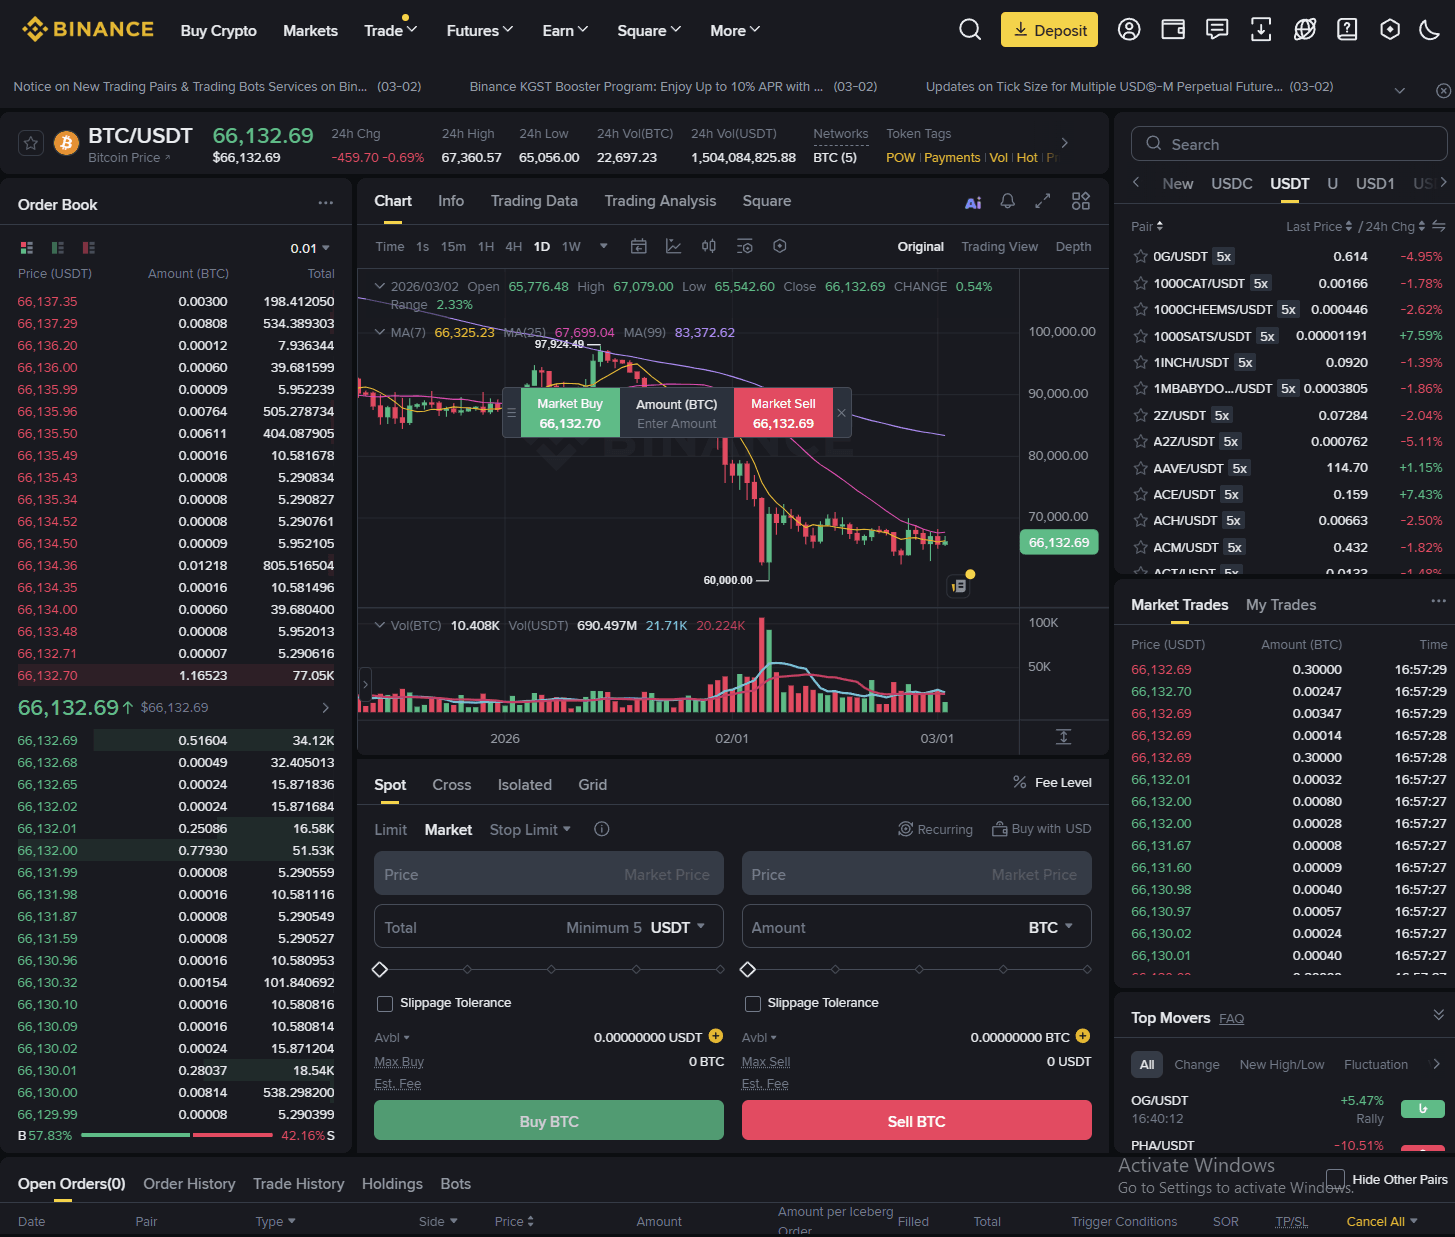
 Simple Crypto Swaps Without Order Book Complexity. Image via Binance
Most beginners land on Convert before they ever open the Spot order book. It feels cleaner, less intimidating, and far more direct. There are no flashing bid and ask columns, no depth charts, and no order types competing for attention. You choose what you have, choose what you want, review the quote, and confirm.
Step-By-Step: Convert BTC/USDT
Let’s walk through a clean example using BTC and USDT.
Inside the app or web interface, go to Trade → Convert. In the “From” field, select BTC, and in the “To” field, select USDT. Enter the amount you want to convert. Binance then generates a live quote that remains valid for a short time window.
At this stage, slow down.
The preview screen shows the rate and the final amount you will receive. That number already reflects Binance’s internal spread. There is no separate line item for trading fees. What you see is what you get.
If you confirm before the quote expires, the conversion executes almost instantly, and the USDT you receive appears in your Spot wallet within seconds.
No waiting for fills. No order resting on the book. Just execution.
Fees and Spreads on Convert
Convert is often described as “zero-fee,” which is technically accurate in the narrow sense that Binance does not display a separate commission. However, the cost is embedded in the exchange rate itself.
On Spot, you pay a visible trading fee, commonly 0.10% base for regular users, reduced by 25% if you enable BNB fee payments. The order book determines your execution price.
On Convert, the quote may be slightly less favorable than what you could achieve by placing a well-timed limit order on Spot. For small trades, this difference is usually negligible. For larger trades or during volatile conditions, the spread can exceed what you would have paid in standard Spot fees.
So the decision framework is straightforward.
- Use Convert when speed and simplicity matter more than micro-optimizing price.
- Use Spot when execution control and fee efficiency matter more than convenience.
Perfect. We’ll carry the same cadence forward.
How to Place a Market Order on Binance
Once you move from Convert to Spot, the first order type most people use is the Market order. It feels familiar. You click buy, and the trade executes immediately. No waiting. No resting orders.
That speed is the appeal. However, speed comes at a cost, and understanding that cost is what separates someone clicking buttons from someone trading deliberately.
What a Market Order Means
A market order tells Binance one thing: execute this trade immediately at the best available price in the order book.
You are not specifying the exact price. You are prioritizing execution over precision.
Behind the scenes, Binance matches your order against existing liquidity, the lowest available ask if you’re buying, or the highest available bid if you’re selling. If your size is small and the market is liquid, the fill will be very close to the current displayed price. If the market is thin or volatile, the fill can slide across multiple price levels.
That difference is called slippage.
So when you use a market order, you are effectively saying: fill me now, even if the price moves slightly during execution.
For highly liquid pairs like BTC/USDT or ETH/USDT, slippage is often minimal under normal conditions. For low-liquidity altcoins, it can be meaningful.
This is why market orders are simple yet not always optimal.
Step-by-Step: Market buy on Spot
Let’s walk through a clean example using BTC/USDT.
First, navigate to Trade → Spot. Select the trading pair, such as BTC/USDT. In the order panel, choose the Market tab instead of Limit.
You can usually enter the amount either in USDT (how much you want to spend) or in BTC (how much you want to buy). Some interfaces also allow percentage sliders like 25%, 50%, 75%, or 100% of your available balance.
Enter the amount carefully. Then click Buy BTC.
The order executes immediately at the best available market price. Within seconds, the purchased BTC appears in your Spot wallet balance, and the filled order shows up in your Trade History.
There is no resting period. No pending status. Market orders either execute instantly or fail due to insufficient balance.
Now let’s address the part beginners underestimate.
Common Market Order Mistakes
- The first mistake is ignoring volatility. During sharp news events or sudden breakouts, the price can move rapidly between the moment you click confirm and the moment the order matches liquidity.
The difference might be small, but in extreme cases it can be noticeable. If you are trading large sizes during thin liquidity windows, slippage compounds. - The second mistake is sizing errors.
Market orders execute immediately. There is no second chance if you accidentally type 1.0 instead of 0.1. Always double-check the total value before confirming. Exchanges process what you submit, not what you meant. - The third mistake is using market orders in illiquid pairs.
If the order book is thin, your trade may sweep multiple price levels, meaning part of your order fills at progressively worse prices. This is not a platform issue. It’s a liquidity issue.
This is where limit orders start to make sense. If you want execution certainty, market orders are fine. If you want price control, limit orders are the upgrade, and that’s where we go next,
How to Place a Limit Order on Binance
 Setting Precise Entry Prices For Controlled Execution
If market orders are about immediacy, limit orders are about intention.
A limit order lets you define the price at which you are willing to trade. Instead of chasing the market, you place your level and wait. Sometimes the market comes to you. Sometimes it doesn’t. That’s the trade-off.
For anyone serious about managing entries and exits, this is the order type that builds discipline.
What a Limit Order Means
A limit order allows you to set the exact price you want to buy or sell at.
If you are buying BTC and the current price is 62,000 USDT, you might place a limit buy at 60,500 USDT because you believe that level acts as support. The order will sit in the order book until the market trades at that price. If the price never drops to 60,500, your order simply remains unfilled.
This is the key difference from a market order.
- With a market order, you guarantee execution but sacrifice price precision.
- With a limit order, you guarantee price precision but sacrifice execution certainty.
Limit orders also determine whether you act as a maker or taker. If your order adds liquidity to the order book and waits, you are typically classified as a maker. If it executes immediately against existing liquidity, it becomes a taker. Binance’s fee schedule differentiates between these categories, even though base rates for regular users often start at the same level.
Understanding that structure matters when fees and volume increase.
Step-By-Step: Limit Buy Example
Let’s use BTC/USDT again.
Go to Trade → Spot and select BTC/USDT. In the order panel, choose the Limit tab instead of Market.
You will now see three main fields:
- Price – the price you want to pay per BTC
- Amount – how much BTC you want to buy
- Total – the total USDT cost (Price × Amount)
Enter your desired price first. Then enter the amount. The interface automatically calculates the total.
Review the numbers carefully. Unlike market orders, this trade will not execute unless the price reaches your specified level.
Click Buy BTC.
The order now appears under Open Orders. It sits there, visible in the order book, until either:
- The market reaches your price and fills the order
- You cancel it manually
- You modify it
That waiting period is not inactive. It’s patience codified into your trading plan.
Now, a brief but important concept.
Some Binance interfaces offer a Post-Only option. When enabled, this ensures your limit order does not immediately execute against existing liquidity. Instead, it guarantees that your order adds liquidity to the book. This is useful if you specifically want to avoid taker fees or accidental instant execution.
Not every user will need this immediately, but it’s worth understanding once you move beyond basic trading.
When Limit Orders Are Better Than Market Orders
Limit orders shine in three situations.
- First, when you are entering near technical levels like support or resistance. Instead of chasing a breakout candle, you place your order at the level you believe matters.
- Second, when volatility is high. Market orders during sharp moves can result in noticeable slippage. A limit order protects you from paying more than your predefined maximum.
- Third, when you are scaling into a position. Rather than committing full capital at once, you can layer multiple limit orders at different price levels to average in methodically.
Limit orders require patience, but they reinforce structure. You define risk before the trade, not after it.
Now that you understand Market and Limit orders, we move into the protective layer most beginners skip until they experience their first painful drawdown: stop orders and OCO.
This is where trading stops being reactive and starts becoming controlled. Now we move into the part that actually protects accounts.
Binance Order Types Explained
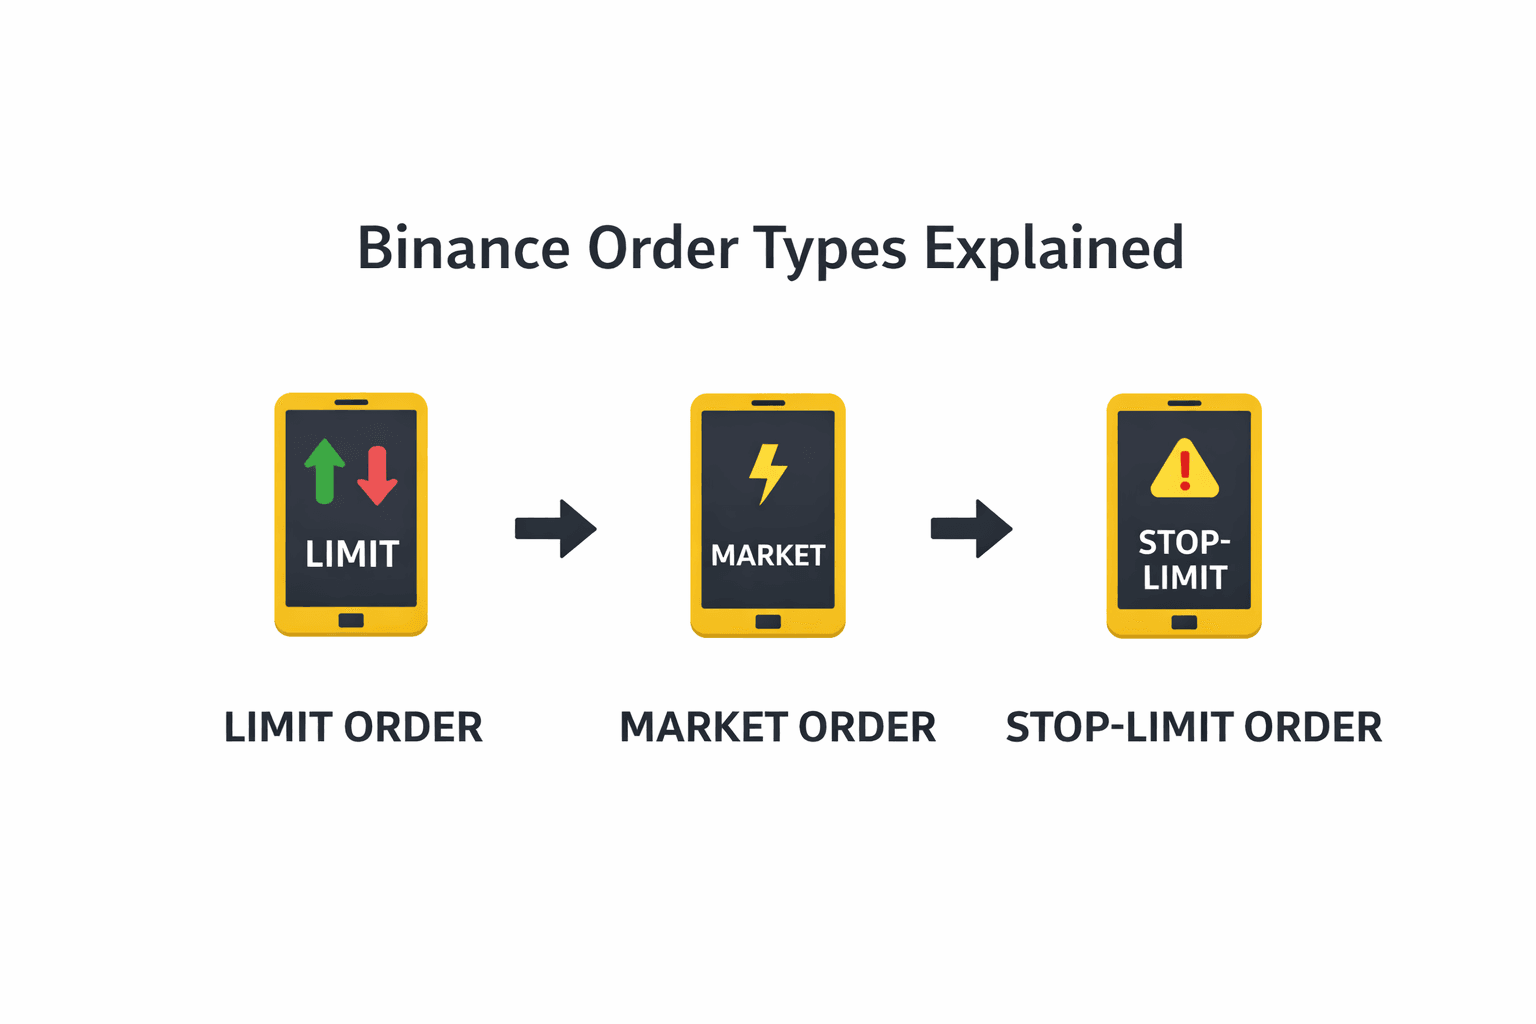 Core Order Types Every New Trader Must Understand
Up to this point, we’ve focused on entering trades. That’s where most beginners spend their energy. The mistake is thinking entry is the hard part, whereas exit management is where accounts break it or make it.
Binance offers many order types, but beginners do not need all of them. You need three core tools:
- Stop-Limit
- OCO
- Trailing Stop
Master these, and you eliminate most avoidable damage. However its best that before understanding the order types in Binance, take a look at our explanation of crypto order types and how they work.
Stop-Limit
A Stop-Limit order combines two prices: a trigger price and a limit price.
The trigger price activates the order.
The limit price defines the worst price you are willing to accept.
Let’s say you bought BTC at 62,000 USDT and you want to limit downside.
You could set:
- Trigger price: 60,000
- Limit price: 59,900
When BTC touches 60,000, the system activates a limit sell at 59,900. If liquidity exists at that level, your order fills.
This structure gives you more control than a simple market stop, but it comes with one risk. If the market drops sharply through both levels and liquidity disappears, your order might not fill.
That is the trade-off between control and certainty. Stop-Limit orders are the first step in turning risk management into automation. Without them, every exit decision becomes emotional.
OCO orders
OCO stands for One-Cancels-the-Other.
This order type lets you place a take-profit and a stop-loss at the same time. Here’s how it works in practice.
You bought BTC at 62,000.
You believe:
- If the price rises to 66,000, you want to lock in profits.
- If the price falls to 59,500, you want to cut losses.
With OCO, you set both orders simultaneously. If the take-profit executes, the stop-loss cancels automatically. If the stop-loss triggers, the take-profit disappears.
This is powerful for one reason: it removes the need to babysit charts.
You define your risk and reward boundaries upfront. The system enforces discipline. For beginners, OCO is often the difference between structured trading and reactive trading.
Trailing stop
A trailing stop is different.
Instead of fixing a specific price, you define a percentage or a value distance from the current price. As the price moves in your favor, the stop “trails” behind it. If the price reverses by your defined amount, the order triggers.
Example:
You buy BTC at 62,000 and set a 5% trailing stop.
If BTC rises to 65,000, the stop adjusts upward. If the price then drops 5% from the recent high, the order triggers.
This tool is useful in trending markets because it allows profits to run while still protecting against sharp reversals. However, trailing stops require understanding volatility. If the asset regularly swings 4–6% intraday, a tight trailing stop will trigger constantly.
So beginners should use it carefully and only after understanding how the asset moves.
Order Type Comparison Table
Let’s simplify everything into one clean view.
| Order Type | Execution Speed | Price Control | Best Used For |
| Market | Immediate | Low | Quick entries or exits |
| Limit | When price hits level | High | Precise entries and scaling |
| Stop-Limit | After trigger | Medium | Controlled stop-loss |
| OCO | Conditional | Medium-High | Predefined TP + SL together |
| Trailing Stop | After reversal | Medium | Locking gains in trends |
If you are just starting, the realistic progression is:
Market → Limit → Stop-Limit → OCO → Trailing Stop
You do not need to touch anything more complex than that for your first 20 trades.
Now that order mechanics are clear, the next logical question is cost. Because no matter how clean your execution is, fees compound over time.
Fees on Binance
The fee ecosystem on Binance shifts based on product, order role (maker/taker), volume tiers, whether you pay in BNB (Binance Coin), and which network you choose for withdrawals. Over time, these details are what add up in real P&L, not just the headline “0.10%”.
Spot Trading Fees: Base Rates and Tier Logic
At its core, Binance uses a maker/taker fee model on Spot markets:
Maker fee: Charged when you add liquidity to the book (your limit order waits).
Taker fee: Charged when you remove liquidity (via a market order or an immediately filled limit order).
For regular users at the entry (VIP 0) tier:
Spot Maker: 0.10%
Spot Taker: 0.10%
If you enable BNB 25% off, the Regular User Spot fees become: 0.07500% maker / 0.07500% taker. These base rates apply to most new traders on common Spot pairs like BTC/USDT, ETH/USDT, ADA/USDT, etc.
Now the nuance:
Binance’s fee tiers stack based on your 30-day trading volume and often your BNB balance. As volume and BNB holdings increase, maker and taker rates decrease across nine VIP levels, potentially reaching extremely low costs for high-volume traders.
Some specific pairs (e.g., FDUSD pairs) have zero maker fees on Spot, while taker fees still apply, which can attract limit-order strategies.
The effective rate you pay also changes once you factor in how Binance deducts trading fees (explained next).
BNB Fee Discounts
Binance gives a strong native incentive to use BNB for fee payment:
Spot & Margin Trades: 25% discount when paying fees in BNB.
Futures: 10% BNB discount typically applies.
Practically, this means:
A standard 0.10% maker/taker becomes 0.075% when paid in BNB.
For a $10,000 accumulated trading volume, that difference alone reduces your fee from $10 to $7.50.
Binance’s support infrastructure usually deducts this from your BNB balance automatically once you hold BNB in Spot and enable fee payments in BNB, although interface layouts change over time.
How to enable BNB fee deduction (official steps):
Website: Profile → Dashboard → Trading fees → toggle Using BNB Deduction (25% discount).
App: Profile → VIP status → toggle Use BNB to pay fees.
Futures Fees and Funding Costs
Spot isn’t the only fee you encounter if you use derivatives:
USD-M Futures (perpetual):
Maker: 0.02%
Taker: 0.05%
BNB discount: 10% off these base rates.
Lower futures fees on entry don’t tell the whole story. Perpetual contracts involve funding rates , periodic transfers between long and short holders that are not Binance revenue but part of the market mechanism to tether perpetual prices to spot. Funding can cost (or pay) you in 8-hour intervals, depending on conditions.
At higher VIP tiers, futures maker/taker fees can go even lower, though exact schedules depend on volume and product type.
Binance also confirms a 10% discount on USDⓈ-M Futures trading fees when paying fees with BNB, as long as BNB is available in the Futures wallet and the discount is correctly applied.
Deposit Fees
Crypto deposits: Binance does not charge fees to receive digital assets.
Fiat deposits: Vary by payment method and currency; many rails charge zero on Binance’s side (e.g., ACH/SEPA), but third-party fees might apply depending on region or bank/processor.
This means your inbound crypto is free on Binance, but always check the deposit screen because the network and the sending platform can incur gas or processor costs before funds land.
Withdrawal Fees and Network Costs
This is where fees become nuanced:
Binance does not add fiat percentage fees on crypto withdrawals itself; what you pay is largely the network fee tied to the blockchain you choose.
Withdrawal amounts vary by chain (Bitcoin mainnet, Ethereum network, BNB Chain, TRC-20, etc.).
For example (illustrative, not live rates):
| Asset | Network | Example Fee |
| BTC | Bitcoin mainnet | 0.0005 BTC |
| USDT | TRC-20 | 0.0000037 USDT |
| USDT | ERC-20 | 0.00031 USDT |
| ETH | ETH network | 0.005 ETH |
These are network-determined fees and can change with congestion or chain pricing. Binance surfaces all of this before you confirm the withdrawal, so you can choose the cheapest available network.
Key point: Withdrawal fees are usually fixed amounts, not percentage fees, and they are unrelated to maker/taker mechanics.
Card & Fiat Payment Fees
If you buy crypto with a credit or debit card, those charges are typically priced by the payment processor:
Card purchases often carry a 1.8%–3.5% fee or more, depending on region and card provider.
This is separate from exchange trading costs and usually appears as a line item at the point of purchase.
P2P Trading Fees
Binance’s marketplace often has:
Free trades for buyers and sellers, although some promoted payment methods might incur fees depending on local conditions.
This option can be cost-effective when fiat rails are expensive or when you want to use local payments.
Interest on Margin Trades
Margin trading costs are charged as interest on borrowed funds, separate from trading fees. That interest is calculated based on the borrowed amount and the duration you hold the position; the longer you keep it open, the more interest accumulates.
This is separate from trading commissions and usually expressed as a daily APR.
Security Checklist Before You Trade
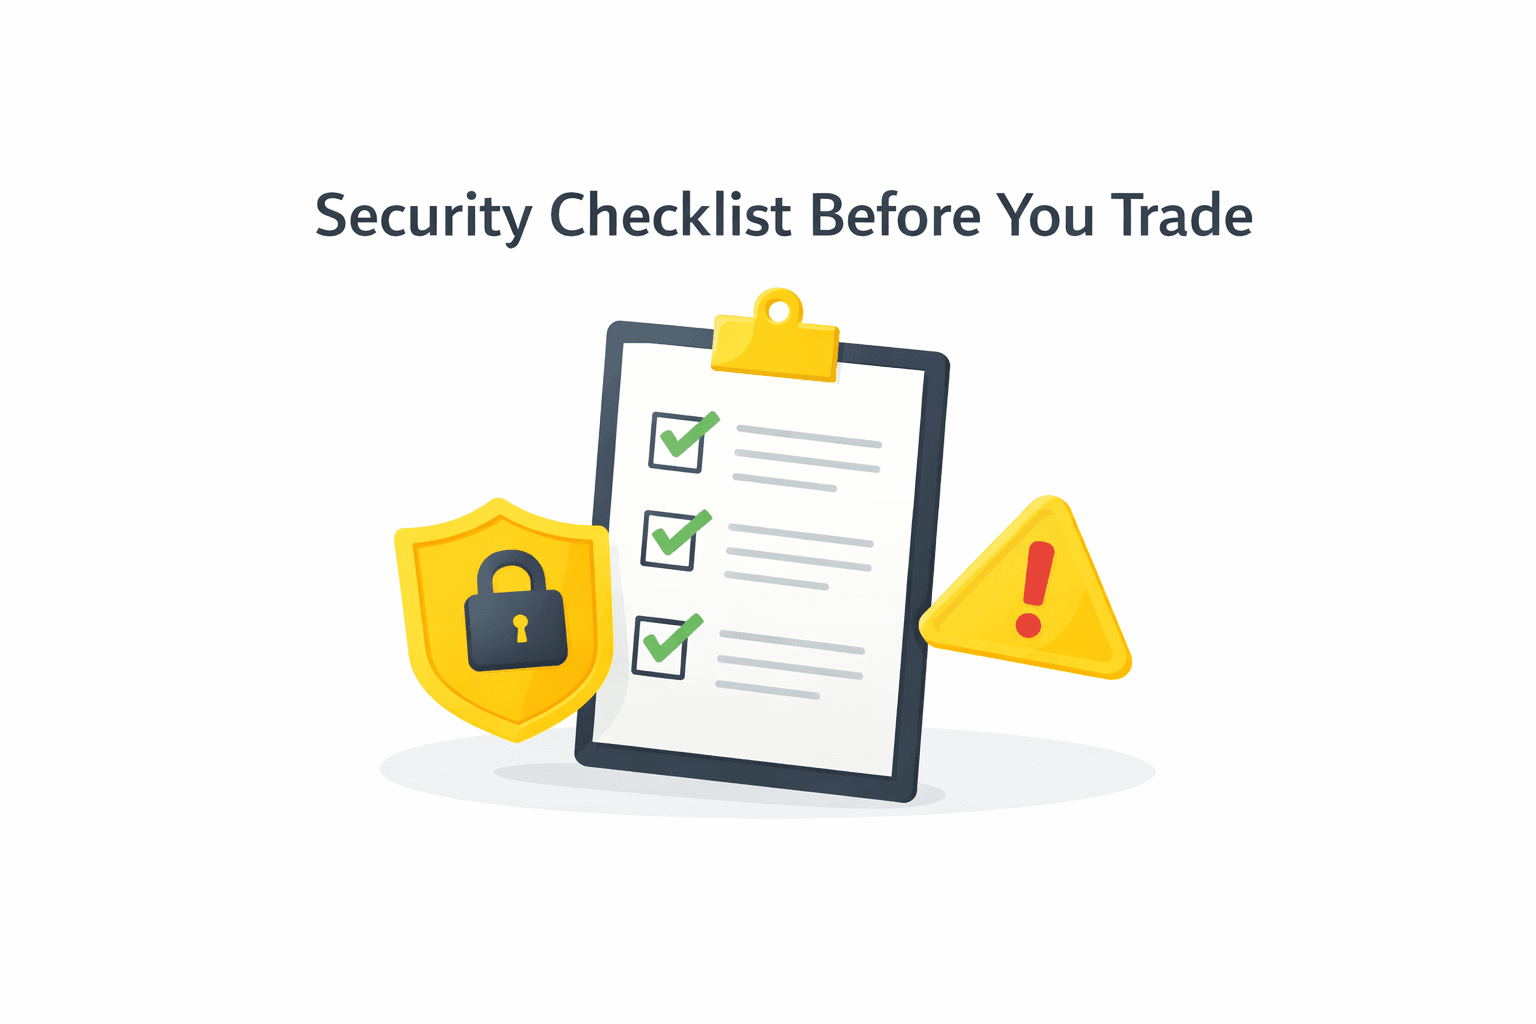 Essential Account Protection Steps Before Funding Trades
Before you think about indicators, position sizing, or which pair to trade, there is something more fundamental to address: account security.
An exchange account is not just a trading dashboard. It is a custody layer for digital assets that settles instantly and irreversibly. Crypto transactions do not have chargebacks, and once funds leave your wallet, reversing that movement is rarely straightforward.
Binance provides multiple security controls. The difference between a protected account and a vulnerable one usually comes down to whether those controls were actually configured before money was deposited.
So instead of treating security as a post-setup task, approach it as part of the trading process itself.
Anti-Phishing Code
Phishing remains one of the most common entry points for exchange compromises. Attackers replicate official branding, domain names, and login screens with unsettling accuracy. In fast-moving markets, urgency alone can cause users to act before verifying details.
Binance addresses this risk with a simple but effective feature: the Anti-Phishing Code.
Inside your account’s Security settings, you can create a custom code made up of letters and numbers. Once configured, Binance includes that exact code in every legitimate email communication it sends you. If an email claims to be from Binance but does not contain your code, it is not authentic.
What makes this powerful is not complexity, but certainty. It transforms email verification from a subjective judgment into a binary check. Either your code is present, or it isn’t.
For a feature that takes less than a minute to configure, the risk reduction is significant.
2FA Best Practices
Two-factor authentication is the second foundational layer. However, not all forms of 2FA provide the same level of protection.
SMS-based verification, while better than password-only security, introduces telecom risk. SIM-swap attacks, where an attacker convinces a mobile carrier to transfer your phone number to a new SIM, remain a documented method of bypassing SMS authentication.
Authenticator-based 2FA removes that telecom dependency. Apps like Google Authenticator or Authy generate time-based one-time codes tied to your device. Hardware security keys add another layer by requiring physical confirmation.
For traders holding meaningful balances, the hierarchy should look like this:
Strong, unique password
Authenticator-based 2FA
Backup codes stored offline
Optional hardware key or passkey if supported
Security should scale with capital. The larger the balance, the less acceptable SMS-only protection becomes.
Avoiding Phishing and Fake Applications
Not every compromise happens through brute force. Many occur through misdirection.
Users search for “Binance login” and click a paid advertisement instead of the official site. Others receive text messages claiming urgent account suspension and follow embedded links. Some download unofficial mobile apps that mimic the real interface.
These scenarios are not rare. They are predictable.
Preventing them requires a shift in behavior, not technical expertise.
Bookmark the official Binance domain and access the platform through that bookmark only. Avoid logging in through links embedded in emails or SMS messages, even if they appear legitimate. When installing the mobile app, verify the publisher details in the app store and confirm that the download count and review history align with the official product.
If any message asks for your password or 2FA code, assume it is malicious. Binance support does not require you to share authentication codes to resolve issues.
The Anti-Phishing Code exists to give you verification clarity. Use it as intended.
Network Selection Safety
Beyond phishing, one of the most common causes of permanent fund loss is incorrect network selection during deposits or withdrawals.
Many assets exist on multiple blockchains. USDT, for example, can be transferred over Ethereum (ERC-20), BNB Chain (BEP-20), Tron (TRC-20), and other supported networks. Each network uses a different technical rail.
When you deposit crypto into Binance, the platform asks you to select the network and provides a corresponding deposit address. If you send funds from another wallet using a different network than the one selected, the transaction may not credit properly.
Recovery is sometimes possible, but not guaranteed. It can require manual intervention and may involve additional fees.
The safest operational habit is simple:
Confirm the network selected on Binance.
Confirm that the same network is selected on the sending platform.
Send a small test transaction before transferring larger amounts.
Testing with a small amount introduces a minor delay, but it prevents catastrophic mistakes.
Withdrawal Whitelist and Device Management
For users who intend to keep larger balances on Binance, two additional features deserve attention.
The first is withdrawal address whitelisting. When enabled, withdrawals can only be sent to pre-approved wallet addresses. If an attacker gains access to your account, they cannot immediately redirect funds to an arbitrary address without passing additional verification layers.
It adds friction to your withdrawal process, but that friction acts as a control layer against rapid account drain.
The second is device and session management. Binance allows users to review active sessions and authorized devices. Removing unfamiliar or outdated devices reduces the risk of lingering access from shared or compromised machines.
Crypto trading should ideally be conducted from a dedicated device with updated software, strong screen lock protection, and no unnecessary browser extensions interacting with exchange pages. For more details, read our comprehensive guide to protecting your crypto assets.
Common Mistakes When Trading on Binance
If you read enough trading forums, you’ll notice a pattern. The same mistakes repeat: wrong network, no stop-loss, jumping into leverage too early, and revenge trading after a loss. None of these are complex technical failures — they’re lapses in structure. Click each mistake to expand the operational fix.
1
Mistake 1: Using the wrong deposit or withdrawal network
Mistake 1: Using the wrong deposit or withdrawal network
What happens
Funds are sent on a network that doesn’t match the receiving address. The transaction confirms on-chain but doesn’t credit properly. Recovery becomes complicated, sometimes impossible.
Why it happens
People rush and assume USDT is just USDT, ignoring whether it’s ERC-20, TRC-20, or BEP-20.
How to prevent it
Match the network on both sides. Send a small test transfer first. Slow down on the confirmation screen where Binance shows the selected network and fee.
This is the most preventable catastrophic mistake on exchanges.
2
Mistake 2: Skipping the Anti-Phishing Code and proper 2FA
Mistake 2: Skipping the Anti-Phishing Code and proper 2FA
What happens
A fake email or SMS lures the user to a clone login page. Credentials are entered, access is handed over, and funds are drained quickly.
Why it happens
The message looks convincing, markets are moving, and urgency triggers a fast, emotional click.
How to prevent it
Set an Anti-Phishing Code, use authenticator-based 2FA (not SMS), never log in from email links, and always access Binance via your own bookmark.
Security failures rarely require technical hacking. They require impatience.
3
Mistake 3: Jumping into Futures too early
Mistake 3: Jumping into Futures too early
What happens
A beginner uses high leverage. A small move triggers liquidation, and the balance drops sharply (or disappears).
Why it happens
Leverage magnifies gains and losses. New traders underestimate liquidation mechanics and funding effects.
How to prevent it
Master Spot first: position sizing, stops, and order behavior. Treat Futures as a separate product that changes your risk profile.
Leverage is not a shortcut. It is a multiplier.
4
Mistake 4: Using market orders during news spikes
Mistake 4: Using market orders during news spikes
What happens
A market order fills worse than expected due to slippage across multiple order book levels.
Why it happens
Liquidity thins during fast moves. The last traded price is not a guaranteed execution price.
How to prevent it
Use limit orders near defined levels in high volatility. If you must use a market order, reduce size and expect price variance.
Market orders are tools, not defaults.
5
Mistake 5: Overtrading and revenge trading
Mistake 5: Overtrading and revenge trading
What happens
After a loss, position size increases to “win it back.” Fees pile up, discipline breaks, and losses compound.
Why it happens
Short-term frustration overrides the plan. The goal shifts from trading well to “getting even.”
How to prevent it
Define risk per trade before entry. If you lose, step away. There’s no fee for not trading—protect capital first.
Overtrading is rarely about opportunity. It’s usually about emotion.
6
Mistake 6: Ignoring fees on small, frequent trades
Mistake 6: Ignoring fees on small, frequent trades
What happens
Dozens of small trades rack up fees that quietly reduce net gains over time.
Why it happens
Fees look tiny in isolation, so the cumulative drag is easy to underestimate.
How to prevent it
Enable BNB fee discounts, track total fees, and remember compounding applies to costs too.
Cost awareness is part of the edge.
7
Mistake 7: Keeping all funds on the exchange indefinitely
Mistake 7: Keeping all funds on the exchange indefinitely
What happens
All assets remain on Binance long-term. While there are security controls, centralized custody still carries platform risk.
Why it happens
Convenience—active traders want instant access, and leaving funds parked feels simpler.
How to prevent it
Keep only active trading capital on the exchange. For long-term holdings, consider moving a portion to a secure self-custody wallet.
Exchanges are trading venues, not permanent vaults.
What to Trade on Binance
When you open the Spot market for the first time, the number of available pairs can feel overwhelming. BTC pairs, USDT pairs, stablecoin pairs, altcoin crosses, trending tokens, newly listed assets and the list scrolls for pages.
The mistake most beginners make is selecting an asset based purely on recent price movement. A green candle becomes the selection criterion. That approach almost guarantees poor entries and emotional decision-making.
Instead of asking “Which coin is pumping?”, ask two better questions:
Is this pair liquid enough for clean execution?
Do I understand what the quote currency represents?
Once you answer those properly, selection becomes structured rather than reactive.
Start With Liquid Majors
Liquidity is the foundation of execution quality.
Highly liquid pairs like BTC/USDT and ETH/USDT consistently have deep order books, tighter spreads, and lower slippage. That means when you place a market or limit order, your execution price is usually close to expectations.
Liquidity affects three important things:
Spread (difference between bid and ask)
Slippage during market orders
Speed of order fills
On illiquid pairs, the order book can be thin. Even modest order sizes may sweep multiple price levels, leading to worse-than-expected fills. On highly liquid pairs, the depth absorbs orders more efficiently.
For beginners, there is no advantage in starting with thinly traded tokens. Liquidity reduces execution friction and simplifies the learning curve.
This is why major USDT pairs are often the safest starting point. They combine liquidity with clear pricing in stablecoin terms.
Quote Currencies Explained (USDT, USDC, BTC)
Understanding how pairs are structured removes confusion quickly.
Every trading pair has two assets:
The base currency (the asset you are buying or selling)
The quote currency (the asset you are using to value or price it)
In BTC/USDT:
BTC is the base asset.
USDT is the quote asset.
If BTC/USDT is trading at 62,000, that means 1 BTC equals 62,000 USDT.
Most beginners should start with stablecoin-quoted pairs such as:
BTC/USDT
ETH/USDT
SOL/USDT
Using stablecoins as the quote currency keeps pricing intuitive. You know what 1 USDT roughly represents in fiat value, so P&L calculations feel straightforward. BTC-quoted or ETH-quoted pairs introduce another layer of volatility because your profit and loss are measured in a fluctuating asset rather than a stable reference. That complexity is unnecessary early on.
Stablecoin pairs simplify accounting and emotional tracking.
Avoid Low-Liquidity Traps
Not all listed assets trade equally.
Some tokens have:
Wide bid-ask spreads
Thin order book depth
Sudden price gaps on relatively small volume
These characteristics increase slippage risk and make stop-loss execution less predictable.
For example, if an order book only has small clusters of liquidity at each price level, a moderate sell order may push the price down sharply before finding sufficient buyers. The result is a fall significantly below expectations.
This is not manipulation in most cases. It is structural thinness.
Before trading a pair, quickly observe:
The 24-hour trading volume
The depth of the order book
The spread between the best bid and ask
If the spread is unusually wide compared to majors, execution will be less efficient. Always remember this: liquidity is something that is invisible when it’s present. It becomes obvious when it’s missing.
Risk Management for Beginners
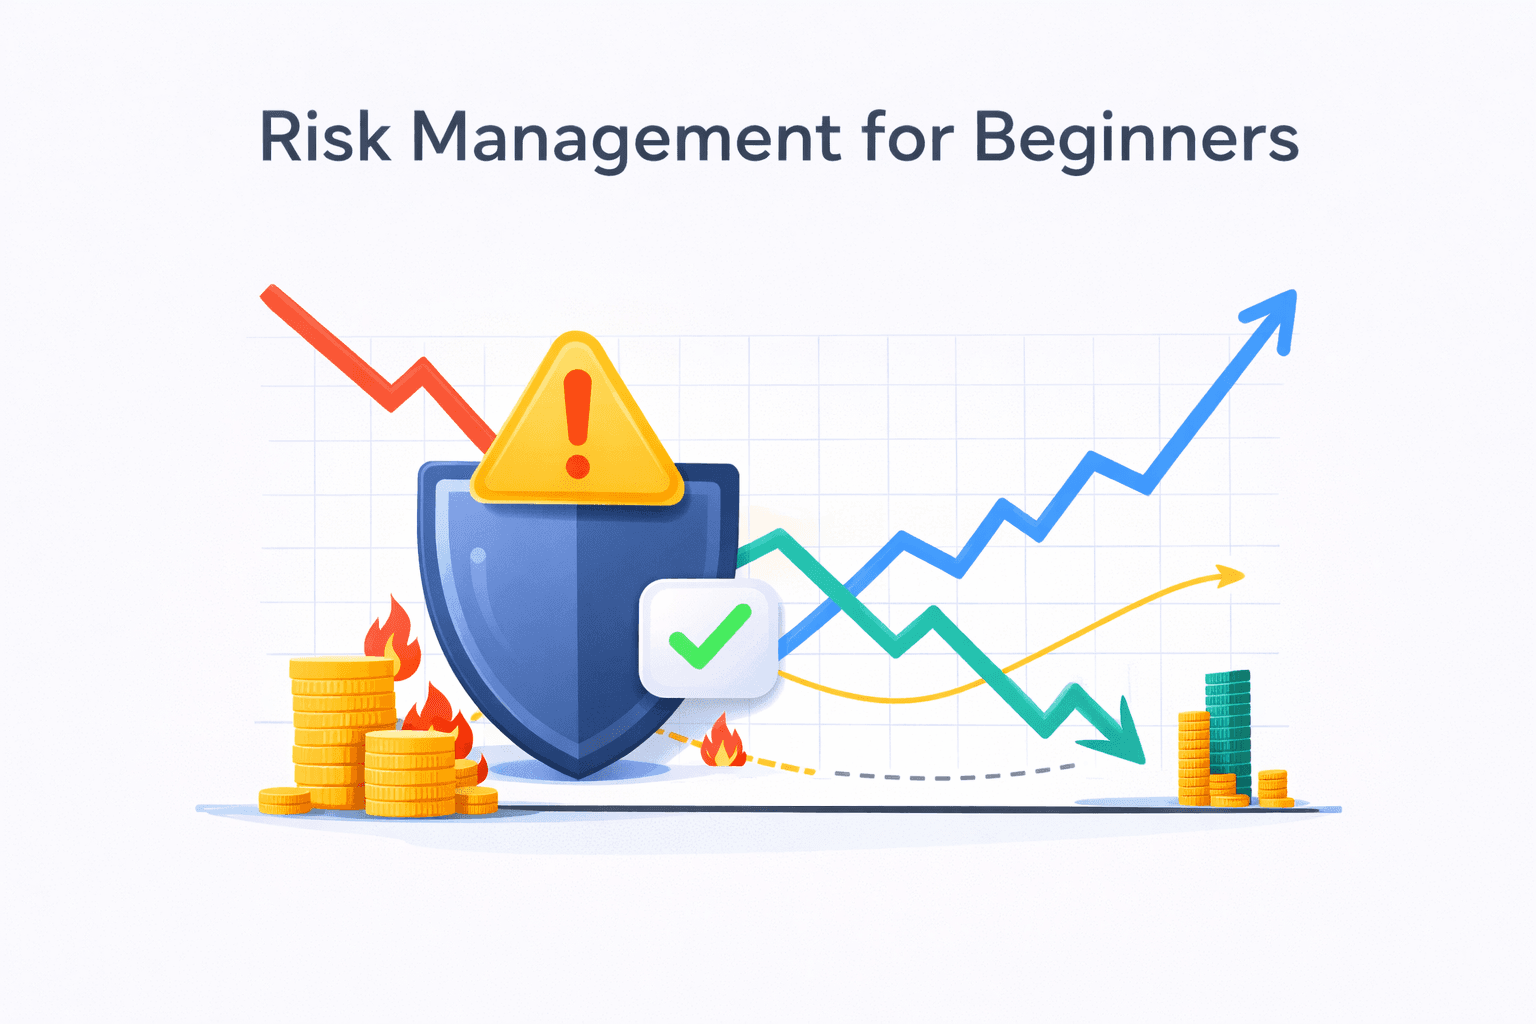 Capital Protection Principles That Preserve Trading Longevity
Most beginners spend 80% of their time thinking about entry and 5% thinking about risk. Professionals invert that ratio.
The difference between someone who survives their first year in crypto and someone who burns out often has nothing to do with prediction accuracy. It comes down to exposure control.
Binance gives you execution tools. Risk management determines how much damage a single idea can do to your account.
Position Sizing in Plain English
Position sizing is simply the amount of capital you allocate to a single trade. Beginners often size positions based on conviction rather than structure. If something “feels strong,” they increase size. That approach ties risk to emotion. A structured approach ties risk to a percentage.
A common foundational rule is risking a small, fixed percentage of your total account per trade. Many traders use 1% or 2% as a starting point, not because it is magical, but because it limits damage.
Here is what that means practically.
If your trading capital is $5,000 and you risk 2% per trade, your maximum acceptable loss is $100. That $100 is not your position size. It is your risk.
Now, suppose you are buying BTC at 62,000 USDT and placing a stop-loss at 60,000. That is a 2,000 USDT distance per BTC, roughly 3.2%.
To risk only $100, you calculate position size so that a 3.2% move equals $100, not your full account.
This forces discipline.
Instead of asking “How much can I make?”, you ask “How much am I willing to lose if I am wrong?”
On Binance Spot, this becomes a mechanical calculation:
Entry price
Stop price
Risk distance
Position size based on acceptable loss
Once you adopt that mindset, trading becomes controlled exposure rather than full-account swings.
Stop-Loss and Take-Profit Basics
A stop-loss is not an admission of defeat. It is a predefined exit point where your trade thesis is invalidated.
Without a stop, every losing trade turns into a negotiation with yourself. On Binance Spot, you can use Stop-Limit or Stop-Market orders to automate this. The principle is simple: define your invalidation level before entering the trade, not after price moves against you.
For example, if you buy ETH because you believe 3,000 USDT is support, then a break below that level invalidates your idea. Your stop should reflect that structural break, not an arbitrary percentage.
Take-profit levels serve the opposite function. They lock gains when the price reaches a predefined objective. You can combine both using OCO orders, which allow you to set both a stop-loss and take-profit simultaneously.
The benefit of this approach is psychological. Once both levels are defined, you remove mid-trade improvisation. The system executes according to your plan.
Risk-To-Reward Ratio
Position sizing limits how much you lose. Risk-to-reward determines whether your strategy makes sense over time.
If you risk $100 to make $100, your risk-to-reward ratio is 1:1. You would need to win more than 50% of your trades to stay profitable after fees.
If you risk $100 to make $200, your ratio is 1:2. Now you can be wrong more often and still remain profitable over a large sample of trades.
This does not mean every trade must target extreme upside. It means your stop and take-profit should not be arbitrary.
Before entering a trade, ask:
Where is invalidation?
Where is the realistic upside?
Does the potential reward justify the defined risk?
If the answer is unclear, the trade is unclear.
Trading Psychology
Risk management is mechanical. Psychology determines whether you follow it.
The most common psychological errors are:
Increasing position size after a loss to “win it back.”
Moving stop-losses further away to avoid being stopped out
Removing take-profits because “it looks strong.”
Each of these actions breaks the predefined structure.
On Binance, execution is fast. That speed amplifies emotional impulses. The solution is not suppressing emotion. It is predefining rules before entering the market.
A simple discipline checklist before every trade:
Is position size calculated based on risk percentage?
Is stop-loss defined before entry?
Is risk-to-reward acceptable?
Would I still take this trade if I lost the last one?
If the answer to the final question is no, emotion is driving the decision. Before scaling position sizes any further, explore our practical risk mitigation tactics for crypto markets.
Technical Analysis Basics
Technical analysis can easily become a rabbit hole. Indicators stack on top of indicators, charts fill with colored lines, and the illusion of control replaces clarity.
For your first ten trades on Binance, you do not need advanced harmonic patterns, order-flow models, or proprietary oscillators. You need a working understanding of structure, momentum, and confirmation, nothing more.
The purpose of this section is not to turn you into a full-time chart analyst. It is to give you just enough context to avoid random entries.
Price Structure
Start with structure, because everything else sits on top of it.
Markets move in trends and ranges. A trend is simply a sequence of higher highs and higher lows (uptrend) or lower highs and lower lows (downtrend). A range is a horizontal channel where price oscillates between defined boundaries.
If BTC is making consistently higher highs and holding higher lows on the 4-hour chart, buying pullbacks makes more structural sense than shorting random spikes. If price is printing lower highs and breaking previous support, blindly buying dips is structurally weaker.
Support and resistance are not mystical lines. They are price areas where buyers or sellers previously stepped in with size.
Support: An area where price previously stopped falling and reversed upward.
Resistance: An area where price previously stopped rising and reversed downward.
On Binance’s chart interface, you can draw horizontal levels where the price reacted multiple times. These zones matter more than single candles.
For your first trades, focus on this:
Is price trending or ranging?
Am I buying into resistance?
Am I selling into support?
Structure prevents emotional chasing.
Candlesticks That Matter
You do not need to memorize every candlestick pattern ever named. Most of them overlap conceptually.
Two patterns are sufficient for early-stage trading: engulfing candles and pin bars (long wicks).
An engulfing candle occurs when a strong candle fully covers the body of the previous candle. In an uptrend, a bullish engulfing near support can indicate buyers stepping in aggressively. In a downtrend, a bearish engulfing near resistance can show sellers regaining control.
A pin bar, or long-wick candle, shows rejection. For example, if ETH drops sharply below support but closes back above it, leaving a long lower wick, that wick represents failed selling pressure.
The key is context.
A bullish engulfing candle in the middle of nowhere means little. The same candle at a well-defined support level carries more weight.
Candlesticks are confirmation tools, not entry signals by themselves.
Indicators - Use Sparingly
Indicators are derivatives of price. They do not predict the future. They summarize past movement mathematically.
For beginners, two are sufficient: RSI and MACD.
RSI (Relative Strength Index) measures momentum and can highlight overbought or oversold conditions. However, in strong trends, RSI can remain overbought or oversold for extended periods. Treat it as context, not a trigger.
MACD (Moving Average Convergence Divergence) shows momentum shifts and crossovers between moving averages. It can confirm trend continuation or weakening momentum.
The mistake beginners make is stacking five indicators and waiting for all of them to align perfectly. That rarely happens. Worse, it creates paralysis.
A cleaner approach looks like this:
Identify structure (trend or range).
Mark support and resistance.
Wait for price reaction at those levels.
Use RSI or MACD to confirm momentum alignment.
Indicators confirm. They do not initiate.
Timeframes and Overcomplication
One final point.
Do not analyze five timeframes for your first trades. Pick one primary timeframe, such as 4-hour or 1-hour, and stay consistent. Jumping between timeframes often creates conflicting signals that confuse rather than clarify.
Your early goal is consistency, not precision.
Once you combine:
Clear structure
Defined support/resistance
Basic candlestick confirmation
Simple momentum indicator
You already have more than enough information for your first ten trades. Anything beyond that at this stage increases noise more than it increases edge.
Now that you understand entry context and risk control, there is one final operational piece left. It is not enough to know how to buy. You must also know how to withdraw.
How to Withdraw From Binance
Buying is easy. Selling is mechanical. Withdrawing is where discipline shows up. Many beginners focus heavily on entries and forget to plan exits beyond closing the trade. But profits inside an exchange wallet are not the same as realized capital in your bank or in self-custody. Withdrawal is not complicated, but it is the stage where mistakes are most expensive. So instead of rushing through it, treat withdrawals as a controlled operation.
Withdraw crypto
Withdraw crypto
Withdrawing crypto from Binance follows a structured flow. The logic is consistent whether you use a desktop or a mobile.
Path: Wallet → Withdraw → Crypto
Key inputs
Recipient address, Network selection, Amount.
Where mistakes happen
Wrong network, wrong address, or skipping memo/tag fields on assets that require them.
Wallet selection
When picking the right wallet, read our guide to the best crypto wallet features and rankings.
Step 1: Enter the correct address
Step 1: Enter the correct address
Rule
The recipient address must match the blockchain network you intend to use.
Best practice
Copy/paste addresses. Never type manually. Verify the first and last few characters after pasting.
Why it matters
Clipboard malware can silently replace copied addresses, sending funds to an attacker.
Treat the address field like a bank account number: precision beats speed.
Step 2: Choose the correct network
Step 2: Choose the correct network
This is where many users make mistakes. Assets like USDT and USDC exist on multiple networks (ERC-20, TRC-20, BNB Chain, and others). The network selected on Binance must match the network supported by the receiving wallet or exchange.
What can go wrong
If you select ERC-20 on Binance but the receiving wallet only supports TRC-20, funds may not credit properly. Recovery is not guaranteed.
What to review
Before confirming, Binance shows the selected network, withdrawal fee, and estimated arrival amount. Read that screen carefully.
Decision rule
Compatibility first. Lower fees do not matter if the destination can’t receive on that network.
If you only slow down once, slow down on the network selection screen.
Step 3: Check for memo or tag requirements
Step 3: Check for memo or tag requirements
Certain assets (for example, XRP) and some exchange deposit setups require a memo or tag in addition to the wallet address.
What happens
A missing memo/tag can cause delayed credits or failed deposits on the receiving platform.
Why it happens
Users assume the address alone is enough and skip the memo field as “optional.”
How to prevent it
If the receiving platform provides a memo/tag, include it exactly as shown—no edits, no shortcuts.
If a memo/tag is provided, it is not optional—it's routing information.
Step 4: Confirm and authorize
Step 4: Confirm and authorize
After reviewing all details, confirm the withdrawal. Binance will require 2FA verification. Authenticator-based 2FA adds a stronger layer than SMS.
What happens next
The withdrawal moves to processing and then to blockchain confirmation.
Why timing varies
Processing times depend on network congestion and the chain you’re using.
Operational mindset
Don’t multitask during confirmation. Treat this as a final checklist step.
The Test Withdrawal Principle
The Test Withdrawal Principle
When withdrawing to a new address for the first time, send a small test amount first. Even experienced traders follow this habit.
Why it works
It removes uncertainty before moving larger sums.
What it prevents
Permanent loss from wrong address/network/memo mistakes.
How to use it
Test → confirm receipt → repeat the same settings for the full transfer.
A small test transaction is cheap insurance.
Withdraw fiat, fees, and operational discipline
Withdraw fiat, fees, and operational discipline
Fiat withdrawals depend on your jurisdiction and payment rails. Availability, fees, and processing times vary by country, and details are shown before you confirm.
Fiat flow
Wallet → Withdraw → Fiat
Select currency → Choose method → Enter amount → Review fees/timeline → Confirm.
Fees and network awareness
Crypto withdrawal fees are usually flat per network. Small withdrawals can be proportionally expensive. Compare networks, but never choose a cheaper option if the destination doesn’t support it.
Profit routine
Close Spot trade → Confirm funds → Double-check address → Verify network → Send test amount → Complete withdrawal.
Profits become real when they’re secured according to your plan. Next: how all of this looks on mobile.
Binance on Mobile: Quick Walkthrough
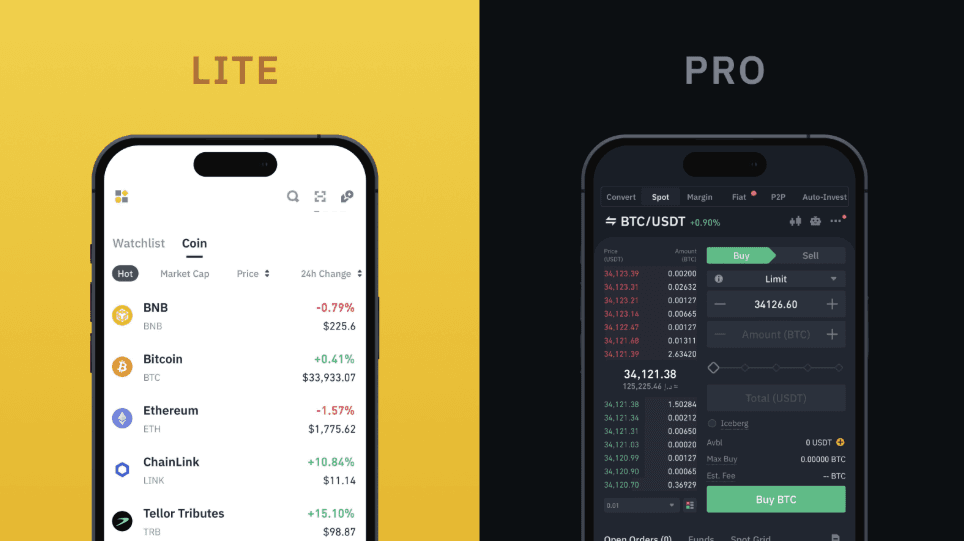 The Binance Mobile App Has Lite and Pro Mode For Smooth Execution. Image via Binance
A large percentage of Binance users execute trades from their phones. The mobile app, which is available on both iOS and Android, is not a stripped-down version of the exchange. It is a compressed interface built around the same infrastructure as a desktop.
That compression is convenient, but it also increases the chance of accidental taps, rushed confirmations, and skipped verification screens. If you understand where key functions sit inside the app, execution becomes clean and predictable.
This walkthrough assumes the standard Binance app interface.
Finding Spot and Convert on the app
After logging in, the bottom navigation bar contains the core sections: Home, Markets, Trade, Futures, and Wallets.
Tap Trade. From there, you will see tabs for:
Spot
Futures
Convert
If your app is in Lite mode, the interface is simplified. Lite hides advanced order book data and most derivative tools. It is designed for basic buy/sell activity.
To access full charting tools and advanced order types, switch to Pro mode. You can toggle this inside your profile menu. Inside Spot, you can search pairs at the top (e.g., BTC/USDT). Tapping the pair opens the trading screen, which includes:
Chart
Order book
Trade history
Order entry panel
Inside Convert, the interface is minimal. You select “From” and “To” assets, enter the amount, preview the rate, and confirm. Convert is ideal when you do not need chart context. Spot is where structured trading happens.
Placing a Market or Limit Order on Mobile
The execution logic on mobile mirrors desktop, but the layout is vertical instead of horizontal.
Market order on mobile
Tap Trade → Spot
Select your trading pair (e.g., ETH/USDT)
Choose Buy or Sell
Select Market order type
Enter amount (either in quote currency or base asset)
Review the total and confirm
The trade executes instantly at the best available price. After execution, your balance updates in your Spot wallet immediately. You can view it under Wallets → Spot.
Limit Order on Mobile
Open Trade → Spot
Select pair
Choose Limit
Enter desired price
Enter amount
Confirm
The order appears under Open Orders until filled or canceled. You can access open orders by scrolling down within the trading interface or via Orders → Spot Orders.
Mobile Security Basics
Mobile trading introduces a different risk profile compared to desktop. Phones are portable, plus they if connect to public WiFi. The data can be easily stolen.
Before actively trading from your phone, make sure the following are in place:
App authenticity: Download the Binance app only from the official App Store or Google Play Store. Avoid installing apps through direct links in emails or ads. Fake clones do exist.
Device-level lock: Use a biometric lock (Face ID, fingerprint) and strong device passcodes. If your phone is unlocked, your trading account is exposed.
App lock inside Binance: Enable app-level lock within Binance settings so even if your device is unlocked, the trading interface requires authentication.
No public WiFi for execution: Avoid placing trades or initiating withdrawals on public WiFi networks. If unavoidable, use a secure VPN and confirm the domain inside the app environment.
2FA always active: Every withdrawal request from mobile should require 2FA confirmation. If it does not, revisit your security settings immediately.

Final Verdict
Trading on Binance is not technically difficult. The platform is structured, the flow is logical, and a basic Spot trade can be placed in under a minute once your account is funded. The real difference between someone who succeeds and someone who burns out has little to do with clicking the right buttons. It comes down to sequencing: secure first, fund second, size positions rationally, and use order types deliberately.
If you treat Binance as a tool rather than a casino, it becomes powerful. Start with Convert or simple Market orders, move into Limit and Stop-Limit once you understand the structure, and avoid leverage until you’ve proven consistency on Spot.