Running a Bitcoin node gives you a direct way to verify transactions and blocks without relying entirely on third-party servers.
This guide explains what a Bitcoin node does, how much it costs, which setup suits different users and how to install, secure and connect one to your wallet.
Editor's Note (July 25, 2026): We fully updated this guide in July 2026 to reflect the latest Bitcoin Core release, current blockchain size, hardware costs and node requirements. We also added step-by-step installation instructions, wallet and hardware-wallet connections, security guidance, maintenance procedures and expanded troubleshooting.
Quick Verdict: Should You Run a Bitcoin Node?
A Bitcoin node is worth running if you self-custody Bitcoin and want to verify your balances, transactions and Bitcoin’s consensus rules without relying entirely on a public wallet server.
The practical benefits appear when you connect your wallet to the node. Your wallet can then use blockchain data that Bitcoin Core has checked independently, while your private keys remain inside the wallet or hardware signing device. This can also reduce the amount of wallet information shared with third-party servers.
A pruned node is sufficient for many users, and the machine does not need to remain online continuously. However, running a node does not generate mining rewards, staking income or passive yield. Users who keep all their Bitcoin with a custodian will usually gain fewer direct benefits because they do not control the wallet being verified.
A Bitcoin node does not earn block rewards.
Who Should Run a Bitcoin Node?
| Run a Node If | You Can Probably Skip It If |
|---|---|
| You self-custody meaningful BTC. | You hold everything with a custodian. |
| You want your wallet to use private infrastructure. | You are comfortable using public wallet servers. |
| You operate a merchant, wallet or Bitcoin service. | You have severe data or hardware constraints. |
| You want to learn how Bitcoin validates transactions. | You expect the node itself to generate income. |
For most first-time operators, a pruned Bitcoin Core node on an existing computer or inexpensive mini PC offers the best balance of verification, SSD storage and maintenance.
Disclaimer
This guide is for educational purposes only and is not financial, investment or technical security advice. Running a Bitcoin node does not eliminate custody, privacy, hardware or operational risks. Back up wallet recovery information separately and verify software before installation.
Disclosure
Some links in this guide may be affiliate links. If you choose to purchase hardware or use a service through these links, we may earn a commission at no additional cost to you.

What Is a Bitcoin Node and What Does It Actually Do?
A Bitcoin node is software that receives blockchain data, validates it against Bitcoin's consensus rules and relays acceptable information to other participants. Each node independently decides which transactions and blocks it will accept.
A node is not a mining machine.
The wider Bitcoin network contains miners, validating nodes, wallets and other services with different responsibilities.
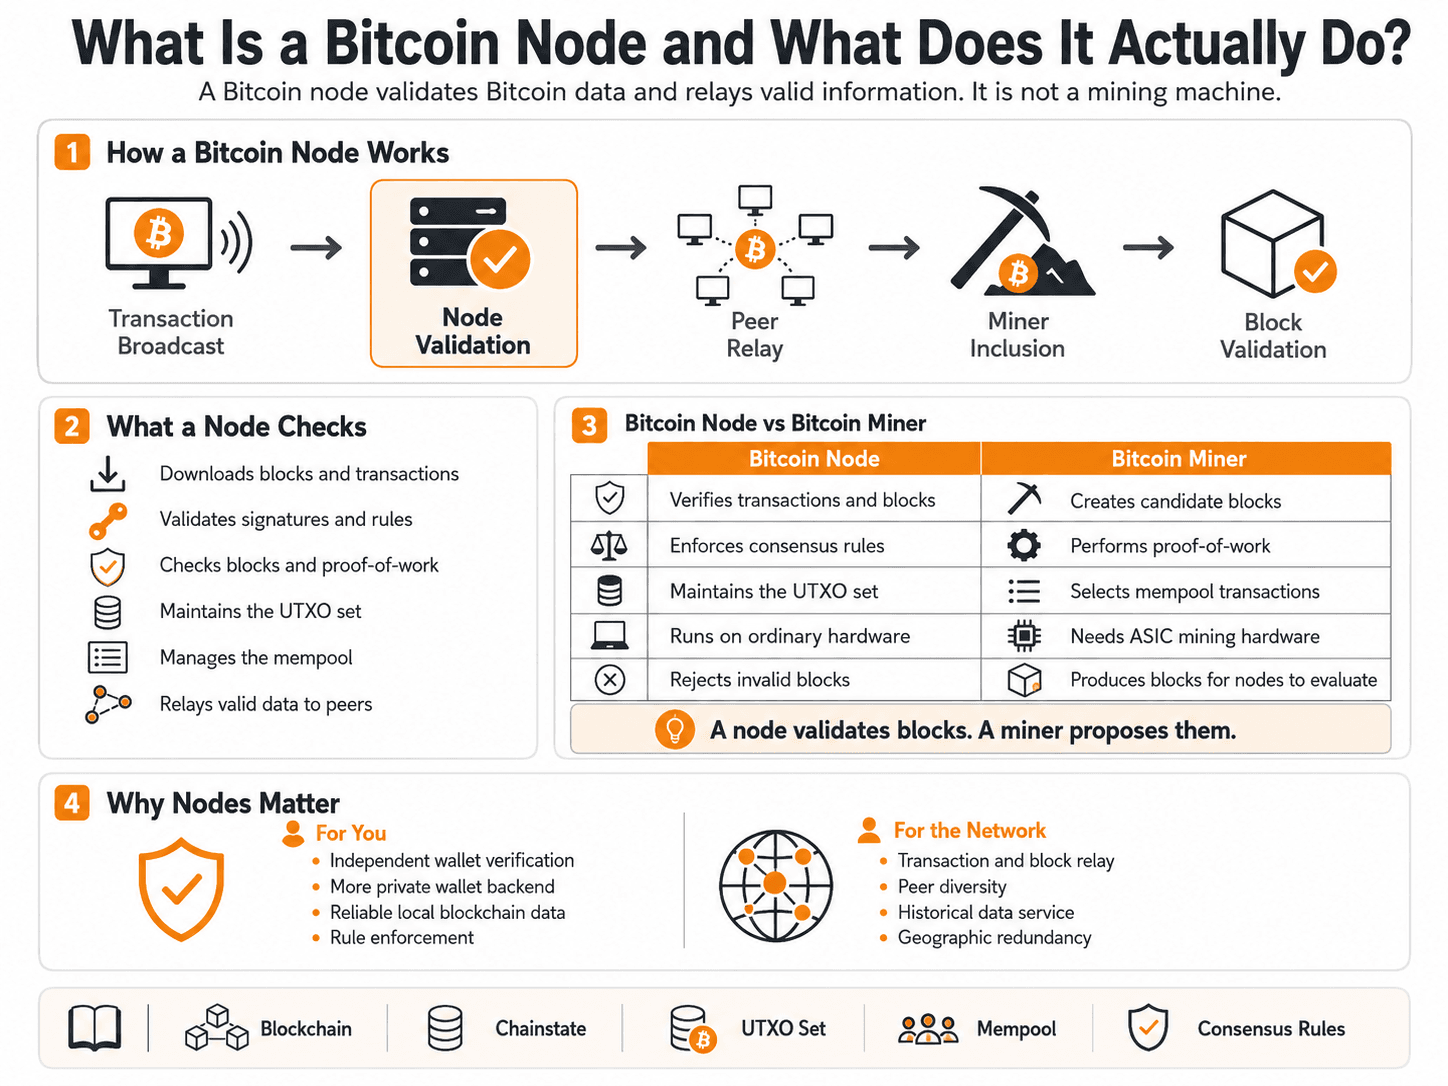 How Bitcoin Nodes Validate Transactions And Enforce Network Rules
How Bitcoin Nodes Validate the Network
A Bitcoin node validates transactions and blocks before treating them as part of the accepted blockchain.
Its core jobs are:
- Block and transaction download: The node requests block headers, full blocks and unconfirmed transactions from connected peers.
- Transaction validation: It checks digital signatures, available inputs, output values, scripts and other transaction rules.
- Block validation: It checks proof-of-work, block structure, transaction validity and compliance with consensus limits.
- UTXO maintenance: It updates the record of unspent transaction outputs that remain available to spend.
- Mempool management: It may hold valid unconfirmed transactions before miners include them in blocks.
- Peer relay: It forwards valid blocks and eligible transactions to other connected nodes.
Several related terms describe different parts of this process:
- Blockchain: The ordered history of accepted Bitcoin blocks.
- Block files: The raw block and transaction data stored on disk.
- Chainstate: The database Bitcoin Core uses to track the current UTXO set.
- UTXO set: The collection of valid transaction outputs that have not yet been spent.
- Mempool: A node’s local collection of valid unconfirmed transactions.
- Consensus rules: The conditions a block or transaction must satisfy before the node accepts it.
- Digital signature: Cryptographic proof that a transaction was authorized by the relevant private key.
Each node performs these checks independently. Nodes do not automatically vote on protocol changes. The operator chooses software that applies a particular rule set, and the node rejects data that violates those rules.
The transaction flow is:
Transaction Broadcast → Node Validation → Peer Relay → Miner Inclusion → Block Validation
A miner can include a transaction in a candidate block. Inclusion alone does not establish validity. Every receiving node checks the completed block before adding it to its accepted chain.
Bitcoin Node vs Bitcoin Miner
A Bitcoin node validates blocks. A Bitcoin miner proposes blocks.
| Bitcoin Node | Bitcoin Miner |
|---|---|
| Verifies transactions and blocks | Creates candidate blocks |
| Enforces consensus rules | Performs proof-of-work |
| Maintains the UTXO set | Orders selected mempool transactions |
| Does not receive a protocol reward | Can receive the block subsidy and transaction fees |
| Can run on ordinary consumer hardware | Requires specialized mining hardware to compete |
| Rejects invalid miner output | Produces blocks for nodes to evaluate |
Mining hardware normally connects to node infrastructure, but the two functions remain separate. Bitcoin mining uses ASIC hardware to compete for block rewards. A validating node checks whether the resulting block follows the rules.
What a Node Does for You and for Other Users
For the operator, a node supplies independently verified balances, transaction history and blockchain data. Connecting a wallet to it reduces reliance on public wallet servers, which may otherwise receive the addresses or extended public keys being queried.
The operator receives four practical benefits:
- Independent wallet verification: Balances and transactions come from a blockchain history the node checked itself.
- Private wallet backend: The wallet no longer needs to reveal its address set to a public server.
- Reliable blockchain data: Applications can query a local source instead of depending on a third-party API.
- Rule enforcement: The node accepts blocks that satisfy the operator’s selected consensus rules.
The network receives a different set of benefits:
- Transaction relay: Valid transactions can propagate through another peer.
- Block relay: Newly accepted blocks can reach other nodes through additional routes.
- Peer diversity: More operators reduce reliance on a small group of infrastructure providers.
- Historical-block service: An archival and publicly reachable node can serve older blocks.
- Geographic redundancy: Nodes in different locations and networks expand the available connection routes.
A pruned or outbound-only node provides less historical data to strangers. It still validates Bitcoin independently and can support local wallets.
Choose the Right Bitcoin Node Setup
Most personal users should choose a pruned Bitcoin Core node on an existing computer or dedicated mini PC. An archival node becomes useful when complete block history, historical rescans or additional indexes are required.
The correct setup depends on three questions:
- How much blockchain history must the machine retain?
- Will it run Bitcoin Core alone or several Bitcoin services?
- Do you want direct administration or a managed dashboard?
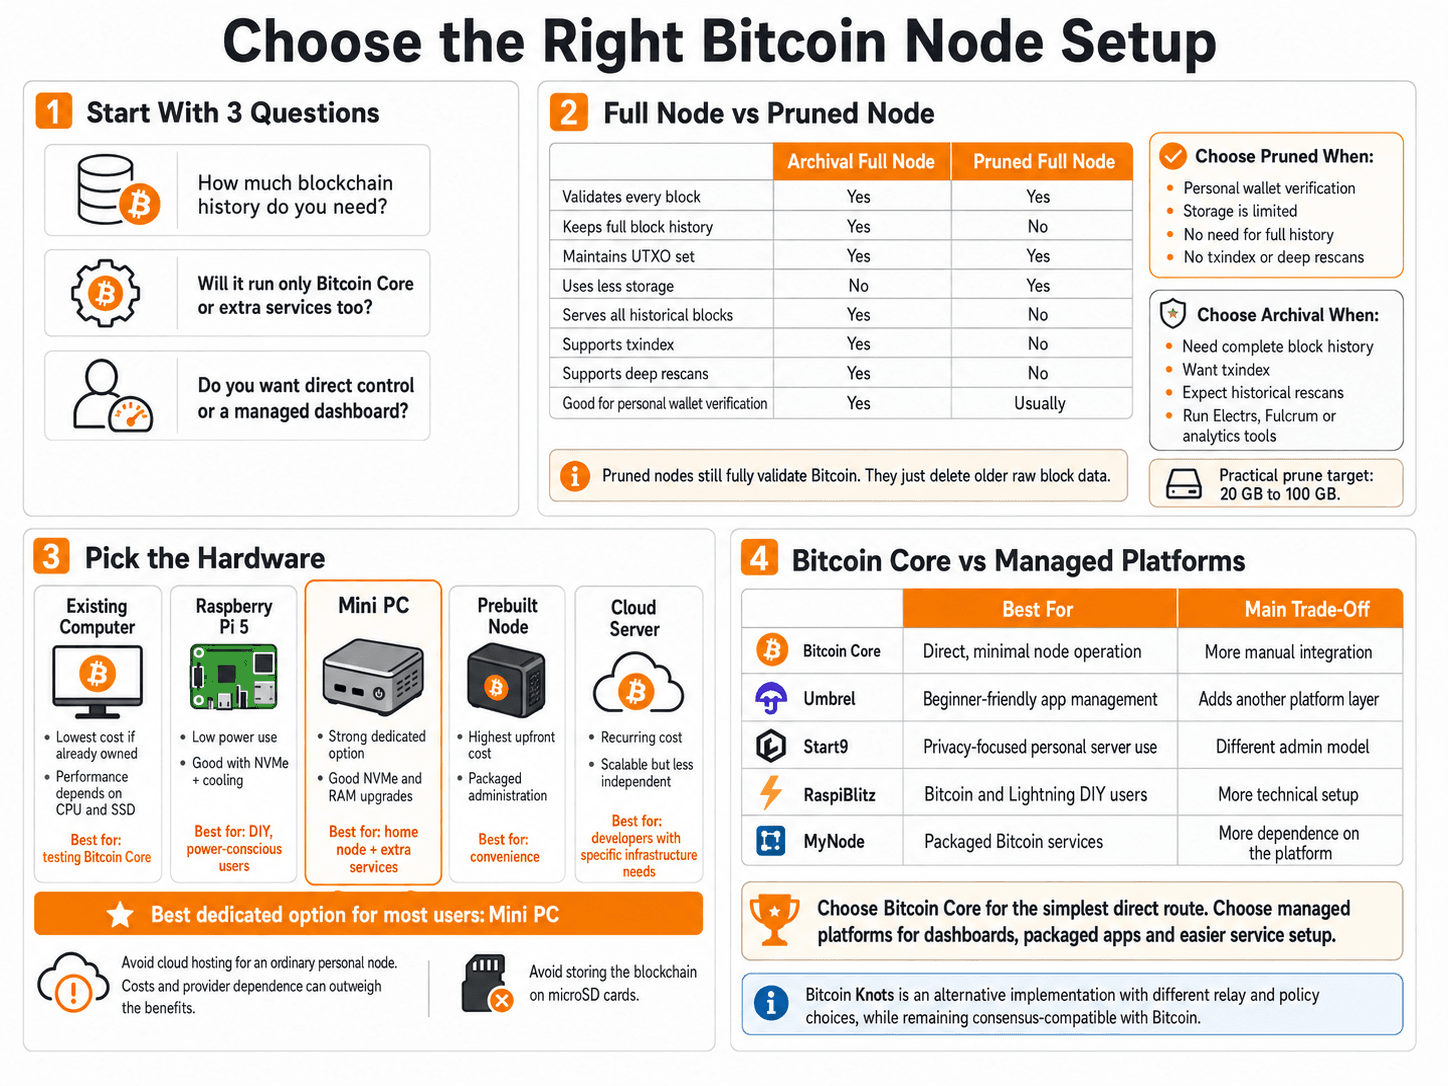 Choosing Between Pruned, Archival And Managed Node Setups
Full Node vs Pruned Node
A pruned node is still a fully validating node. It downloads and verifies every block before deleting older raw block data.
Pruning changes storage and historical access. Consensus validation remains intact.
| Feature | Archival Full Node | Pruned Full Node |
|---|---|---|
| Validates every downloaded block | Yes | Yes |
| Retains complete block history | Yes | No |
| Maintains the current UTXO set | Yes | Yes |
| Uses less storage | No | Yes |
| Serves all historical blocks | Yes | No |
Supports txindex | Yes | No |
| Supports unrestricted historical rescans | Yes | No |
| Suitable for personal wallet verification | Yes | Usually |
Bitcoin Core measures the prune target in MiB. Automatic pruning requires a target of at least 550 MiB, although that minimum leaves little recent block history. Pruning is incompatible with txindex, and returning to archival operation requires downloading the missing blockchain data again.
Choose a pruned node when:
- Your main goal is personal wallet verification.
- Storage is limited.
- You do not need complete historical blocks.
- You are unlikely to import old wallets requiring deep rescans.
- Connected applications do not require
txindex.
Choose an archival node when:
- You need complete block history.
- You want to serve old blocks to peers or applications.
- You expect to import older wallets and run historical rescans.
- You need
txindex. - Electrs, Fulcrum, analytics software or other services require broader historical access.
A practical prune target of 20GB to 100GB provides more breathing room than the minimum. The machine still needs extra capacity for chainstate, logs, indexes, wallet files and operating-system updates.
Existing Computer vs Raspberry Pi vs Mini PC
An existing computer is the cheapest way to test Bitcoin Core. A mini PC is the strongest dedicated option for most users. A Raspberry Pi 5 suits people who value low power use and enjoy assembling DIY hardware.
| Setup | Purchase Cost | IBD Performance | Power Use | Storage and Repair | Multi-Service Capacity | Best Use |
|---|---|---|---|---|---|---|
| Existing computer | Lowest if already owned | Depends on CPU and SSD | Often higher | Usually easy | Varies | Testing Bitcoin Core before buying hardware |
| Raspberry Pi 5 | Moderate after accessories | Good with NVMe and cooling | Low | Modular but ARM-based | Moderate | DIY and power-conscious users |
| Mini PC | Moderate | Usually strong | Low to moderate | Good NVMe and RAM options | Strong | Dedicated home node |
| Prebuilt node | Highest upfront | Hardware-dependent | Usually low | Vendor-dependent | Usually strong | Packaged administration |
| Cloud server | Recurring cost | Scalable | Included in hosting bill | Easy to resize | Strong | Developers with defined infrastructure needs |
Choose an existing computer when you want to try Bitcoin Core without buying another machine. Add an SSD if the system still relies on a hard disk.
Choose a mini PC when the node will remain online regularly or run Electrs, Fulcrum, Mempool or the Lightning Network. An x86 machine with replaceable NVMe storage usually offers broader application compatibility and a cleaner upgrade path.
Choose a Raspberry Pi 5 when low power consumption and DIY assembly are priorities. The current RaspiBlitz hardware configuration favors an 8GB Raspberry Pi 5 with active cooling and direct NVMe boot. MicroSD storage is a poor location for the blockchain because database activity places sustained pressure on its performance and endurance.
Avoid cloud hosting for an ordinary personal node. Recurring storage and data-transfer charges can exceed local electricity costs. Hosting the machine inside one provider’s infrastructure also reduces the infrastructure independence gained from running it at home.
Bitcoin Core vs Managed Node Platforms
Bitcoin Core offers the most direct route. Managed node platforms add dashboards, application stores, update tools and packaged service integrations.
| Setup Route | Best For | Main Trade-Off |
|---|---|---|
| Bitcoin Core | Direct and minimal node operation | More manual wallet and service integration |
| Umbrel | Beginner-friendly application management | Adds another platform layer |
| Start9 | Privacy-focused personal-server users | Different administration model |
| RaspiBlitz | Bitcoin and Lightning DIY users | More technical setup |
| MyNode | Packaged Bitcoin services | Some software or support options may be paid |
Choose Bitcoin Core when the machine mainly needs to validate Bitcoin and support a limited number of local applications. There are fewer moving parts to diagnose.
Choose Umbrel when browser-based administration and packaged applications outweigh the added software layer. Umbrel combines its Bitcoin Node application with an app store containing Mempool, Lightning and other self-hosted services.
Choose Start9 when private-service administration and personal-server functionality are priorities.
Choose RaspiBlitz when you want a hands-on Bitcoin and Lightning build with greater access to the underlying configuration.
Choose MyNode when you want Bitcoin Core, an Electrum server, Lightning and related services assembled inside one environment. Its packaged route saves setup time but increases dependence on the platform’s administration and update process.
Bitcoin Knots is an alternative implementation with different transaction-relay and policy choices. It remains consensus-compatible with Bitcoin, while local mempool and relay behavior can differ from Bitcoin Core.
Bitcoin Node Requirements and Costs in 2026
A practical Bitcoin node needs a modern processor, adequate RAM, reliable broadband and SSD storage. The storage decision creates most of the upfront cost.
A pruned Bitcoin Core node can run on modest hardware. An archival or multi-service node benefits from a stronger x86 processor, additional memory and at least 2TB of SSD capacity.
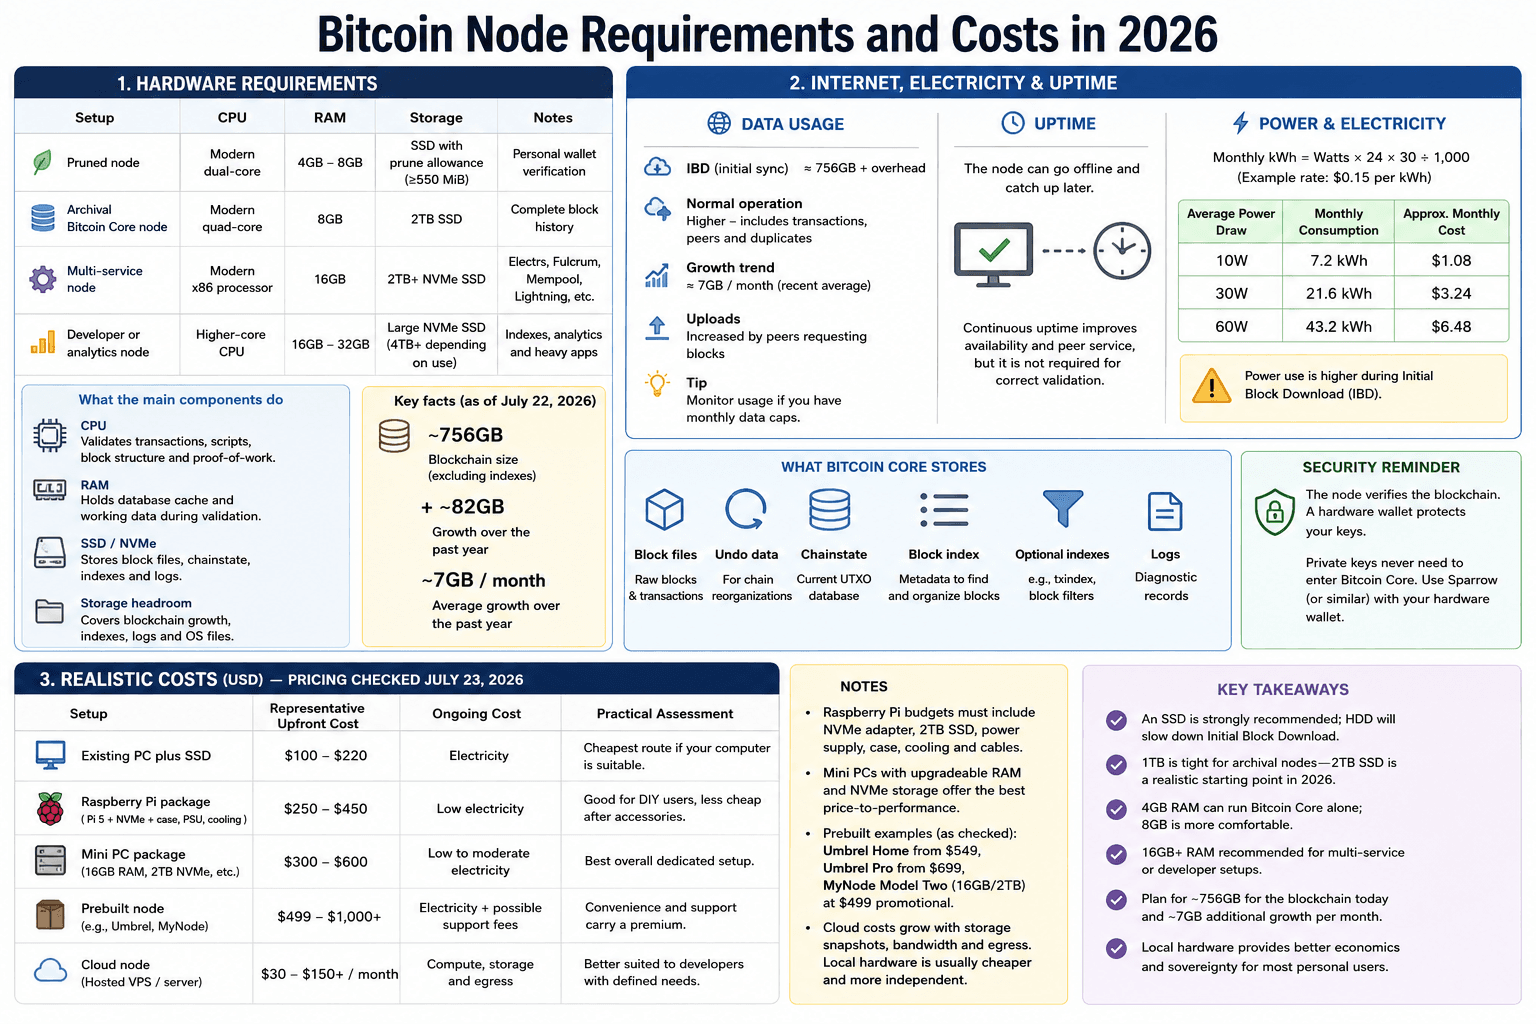 Hardware, Storage, Bandwidth And Cost Requirements Explained Clearly
Processor, Memory and Storage
Ordinary node operation is relatively light once the machine has synchronized. Initial Block Download places heavier and sustained load on the CPU, storage and internet connection.
| Setup | Practical Specification |
|---|---|
| Pruned node | Modern dual-core CPU, 4GB to 8GB RAM, SSD with the selected prune allowance and system headroom |
| Archival Bitcoin Core node | Modern quad-core CPU, 8GB RAM, 2TB SSD |
| Multi-service node | Modern x86 processor, 16GB RAM, 2TB or larger NVMe SSD |
| Developer or analytics node | Higher-core CPU, 16GB to 32GB RAM, larger NVMe storage based on indexes and applications |
The main components perform different jobs:
- CPU: Validates transactions, scripts, block structure and proof-of-work.
- RAM: Holds database cache and working data during validation.
- SSD: Stores block files, chainstate, indexes and logs.
- NVMe: Offers higher throughput and lower latency than SATA in most systems.
- SATA SSD: Remains suitable for Bitcoin Core when the drive is reliable.
- External SSD: Works through a stable USB 3 connection with reliable power and cabling.
- Storage headroom: Covers blockchain growth, database compaction, indexes and operating-system files.
Four gigabytes of RAM can support Bitcoin Core alone, although 8GB provides more room for the operating system and database cache. Electrs, Fulcrum, Mempool and Lightning services raise memory demand. A multi-service home node should start around 16GB rather than forcing several databases into a constrained system.
An SSD is strongly recommended. Initial Block Download produces frequent reads and writes while Bitcoin Core validates transactions and constructs chainstate. An HDD can complete the process, but slow random access may stretch synchronization considerably.
As of July 25, 2026, the Bitcoin blockchain occupied approximately 756GB, excluding database indexes. It had grown from 673.56GB one year earlier, adding roughly 82GB.
A 1TB drive is therefore a cramped archival choice. The operating system, chainstate, logs and optional indexes leave less usable capacity than the drive’s advertised figure. A 2TB SSD offers a more realistic starting point, although no fixed capacity can be treated as permanently sufficient.
Bitcoin Core stores several related datasets:
- Block files: Raw blocks and transactions.
- Undo data: Information used when blocks must be disconnected during a chain reorganization.
- Chainstate: The current UTXO database.
- Block index: Metadata used to locate and organize block records.
- Optional indexes: Additional databases such as
txindexor block-filter indexes. - Logs: Diagnostic records, including
debug.log.
Node hardware and signing hardware serve different purposes. The node verifies the blockchain, while a hardware wallet protects the keys used to authorize spending.
Those private keys never need to enter Bitcoin Core when the node is paired with a hardware wallet through Sparrow.
Internet, Electricity and Uptime
The Initial Block Download consumes the largest burst of data because the node must obtain historical blocks even when it will later prune them. A new archival setup should plan for the current 756GB chain, protocol overhead and additional data exchanged with peers.
Normal network use includes:
- Block download: New blocks arriving after synchronization.
- Transaction download: Unconfirmed transactions received from peers.
- Peer upload: Blocks and transactions sent to other nodes.
- Historical serving: Older blocks requested from an archival node.
- Wallet traffic: Local or LAN requests from connected applications.
Recent blockchain growth averaged close to 7GB per month over the year. Normal traffic will be higher because nodes also exchange unconfirmed transactions, peer information and duplicate data. Inbound peers can increase uploads further by requesting blocks.
Operators with monthly data caps should monitor traffic and apply an upload target where necessary.
The machine does not need to stay online continuously. Bitcoin Core can shut down, restart later and download the blocks missed during the outage. Continuous uptime improves wallet availability and peer service, but it is not a condition for validating the blockchain correctly.
Electricity costs can be estimated with this formula:
Average watts × 24 hours × 30 days ÷ 1,000 = monthly kilowatt-hours
At an illustrative electricity rate of $0.15 per kWh:
| Average Power Draw | Monthly Consumption | Approximate Monthly Cost |
|---|---|---|
| 10W | 7.2 kWh | $1.08 |
| 30W | 21.6 kWh | $3.24 |
| 60W | 43.2 kWh | $6.48 |
Power use rises during IBD because the processor and drive remain active. A desktop computer may consume several times more power than a mini PC or Raspberry Pi after synchronization.
Realistic Upfront and Monthly Costs
Representative US pricing was checked on July, 2026. Local taxes, SSD brands, memory capacity and regional hardware prices can move the total considerably.
| Setup | Representative Upfront Cost | Ongoing Cost | Practical Assessment |
|---|---|---|---|
| Existing PC plus SSD | $100 to $220 | Electricity | Cheapest route when the computer is suitable |
| Raspberry Pi package | $250 to $450 | Low electricity | Good for DIY users, less cheap after accessories |
| Mini PC package | $300 to $600 | Low to moderate electricity | Best overall dedicated setup |
| Prebuilt node | $499 to $1,000+ | Electricity and possible support fees | Convenience carries a premium |
| Cloud node | $30 to $150+ monthly | Compute, storage and egress | Better suited to developers |
A Raspberry Pi build needs more than the board. The complete budget includes an NVMe adapter, 2TB SSD, power supply, case, cooling and any required cables.
A mini PC typically provides the strongest price-to-performance balance. Models with upgradeable RAM and NVMe storage are easier to repair and expand than sealed systems.
Prebuilt nodes reduce installation work. Umbrel Home starts at $549, while Umbrel Pro starts at $699. MyNode listed its 16GB RAM and 2TB NVMe Model Two at a promotional $499 as of July 25, 2026.
Cloud pricing appears manageable until storage snapshots, bandwidth and egress are included. Developers may accept that cost for remote uptime or automated infrastructure. Personal wallet users usually receive better economics and greater control from local hardware.
How to Install Bitcoin Core and Start Your Node
Installing Bitcoin Core involves four stages: downloading verified software, selecting the data directory, choosing archival or pruned storage and completing Initial Block Download.
The instructions below use Bitcoin Core 31.1. Confirm that the latest stable Bitcoin Core version remains 31.1 before following version-specific commands.
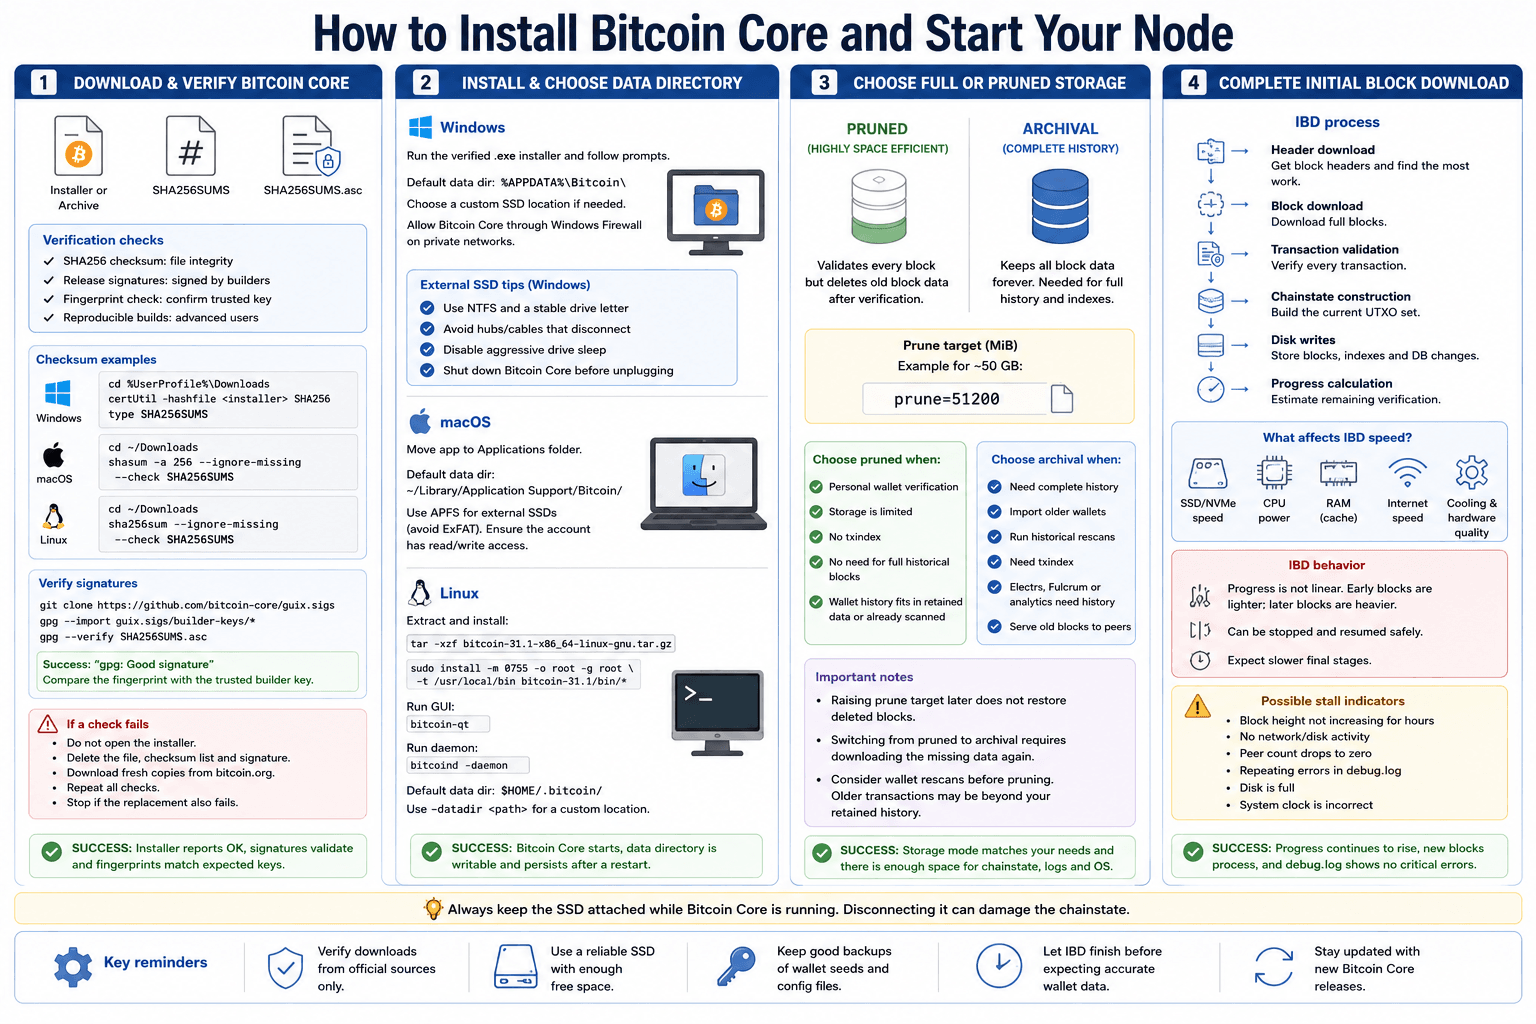 Installing Bitcoin Core And Completing Initial Blockchain Synchronization
Step 1: Download and Verify Bitcoin Core
Download Bitcoin Core through its official release page and match the file to Windows, macOS Intel, macOS Apple Silicon, Linux x86 or Linux ARM.
Use three files:
- The Bitcoin Core installer or archive
SHA256SUMSSHA256SUMS.asc
The checks perform different jobs:
- SHA256 checksum: Confirms that the downloaded installer matches the published file.
- Release signatures: Confirm that Bitcoin Core builders signed the checksum list.
- Fingerprint check: Confirms that a signature came from the public key you intended to trust.
- Reproducible builds: Allow advanced users to compare independently built binaries.
A modified installer can compromise the machine or any Bitcoin Core wallet stored on it. Crypto safety starts with obtaining wallet and node software through authentic sources rather than search ads, mirrors or third-party bundles.
For Windows, open Command Prompt inside the Downloads folder:
cd %UserProfile%\Downloads
certUtil -hashfile bitcoin-31.1-win64-setup.exe SHA256
type SHA256SUMS
Replace bitcoin-31.1-win64-setup.exe with the exact filename you downloaded. Compare every character of the generated checksum with the matching entry in SHA256SUMS.
For macOS:
cd ~/Downloads
shasum -a 256 --ignore-missing --check SHA256SUMS
For Linux:
cd ~/Downloads
sha256sum --ignore-missing --check SHA256SUMS
Successful checksum output should resemble:
bitcoin-31.1-x86_64-linux-gnu.tar.gz: OK
The filename will differ by operating system and architecture.
Next, import Bitcoin Core builder keys and verify the signed checksum file:
git clone https://github.com/bitcoin-core/guix.sigs
gpg --import guix.sigs/builder-keys/*
gpg --verify SHA256SUMS.asc
Valid output includes:
gpg: Good signature
Primary key fingerprint: ...
"Good signature" confirms that the signature matches the imported key. Compare the displayed fingerprint with the expected fingerprint for a builder you trust. A message stating that the key is not locally certified concerns GPG’s trust database and does not automatically invalidate the signature.
When a checksum fails:
- Do not open the installer.
- Delete the installer, checksum list and signature file.
- Download fresh copies through the Bitcoin Core page.
- Repeat the checksum and signature checks.
- Stop if the replacement also fails.
Success condition: The installer reports OK, the selected signatures validate and the fingerprints match the expected keys.
Step 2: Install Bitcoin Core and Choose the Data Directory
Install the application only after the download passes verification. Bitcoin Core’s program files can remain on the system drive while blockchain data sits on another SSD.
Windows
Run the verified .exe installer and follow the setup prompts. Bitcoin Core asks where blockchain data should be stored during the first launch.
The default Windows data directory is %APPDATA%\Bitcoin\.
Choose a custom SSD location when the system drive lacks space. If Windows Firewall requests network access, allow Bitcoin Core on trusted private networks. Public-network access is unnecessary for most home setups.
For an external SSD:
- File system: Use a reliable NTFS-formatted drive.
- Drive letter: Assign a stable letter so the path survives restarts.
- Connection: Avoid hubs or cables that disconnect under sustained load.
- Power settings: Disable aggressive drive sleep.
- Removal: Shut Bitcoin Core down before unplugging the drive.
macOS
Move the verified Bitcoin Core application into the Applications folder. macOS may ask for confirmation because the program was downloaded from the internet.
The default macOS data directory is ~/Library/Application Support/Bitcoin/.
Use APFS for a macOS-only external SSD. Bitcoin Core users have reported corruption and data loss with ExFAT, making cross-platform portability a poor trade for this workload.
Check that the logged-in macOS account can read and write the selected directory. Bitcoin Core cannot maintain chainstate on a read-only or intermittently mounted volume.
Linux
Extract the verified Linux archive:
tar -xzf bitcoin-31.1-x86_64-linux-gnu.tar.gz
Replace the archive name when using an ARM or another architecture build.
Install the binaries:
sudo install -m 0755 -o root -g root \
  -t /usr/local/bin bitcoin-31.1/bin/*
Run the graphical application with:
bitcoin-qt
Run the background daemon with:
bitcoind -daemon
The default Linux data directory is $HOME/.bitcoin/.
A custom directory can be passed through the -datadir option. The Linux user running Bitcoin Core must own the directory and have read/write permissions.
A headless server can run Bitcoin Core through a system service after the initial configuration works. Starting from the terminal makes early permission and storage errors easier to identify.
Across all operating systems, keep the SSD attached while Bitcoin Core is running. Disconnecting it during a chainstate write can damage the database.
Success condition: Bitcoin Core opens without a critical error, the data directory is writable and the same directory remains available after a restart.
Step 3: Choose Full or Pruned Storage
Choose pruned mode when the node mainly supports personal wallet verification and disk capacity is limited. Choose archival mode when complete historical blocks or indexes are required.
Bitcoin Core may label pruning as Limit blockchain storage during the initial setup. The target controls retained raw block files. It does not include every byte used by chainstate, logs, wallet files or the operating system.
A target near 50GB can be set in bitcoin.conf as follows:
prune=51200
The number is measured in MiB.
Choose pruned mode when:
- You want independent wallet verification.
- Storage is limited.
- You do not need
txindex. - Complete historical-block serving is unnecessary.
- Your wallet history fits within retained data or has already been scanned.
Choose archival mode when:
- You need complete block history.
- You expect to import older wallets.
- Applications require deep historical rescans.
- You need
txindex. - Electrs, Fulcrum or analytics tools require historical data.
- You want to serve old blocks to peers.
Increasing the prune target later does not restore blocks Bitcoin Core already deleted. The node will retain more block data from that point forward.
Switching from pruned to archival mode requires obtaining the missing block data again. In most cases, that means downloading and validating the blockchain from the beginning.
Wallet rescans deserve attention before pruning. A newly imported wallet may contain transactions older than the earliest retained block. Bitcoin Core cannot reconstruct that history from files it no longer holds.
Success condition: The first-launch screen or bitcoin.conf reflects the intended storage mode and leaves sufficient space for chainstate, logs and operating-system files.
Step 4: Complete Initial Block Download
Initial Block Download, or IBD, is the process of obtaining and validating Bitcoin’s history.
The node performs several tasks during IBD:
- Header download: It obtains block headers and identifies the chain with the most valid proof-of-work.
- Block download: It requests the corresponding full block data.
- Transaction validation: It checks every transaction against applicable rules.
- Chainstate construction: It builds the current UTXO set.
- Disk writes: It stores block files, indexes and database changes.
- Progress calculation: It estimates how much historical verification remains.
Progress rarely moves at a constant rate. Early Bitcoin blocks contain fewer and simpler transactions. Later blocks carry more data and demand heavier script and database work. The final portion can therefore advance more slowly than the early download.
Performance depends on:
- SSD type: NVMe generally processes random database operations faster than an HDD or weak USB drive.
- CPU: Faster cores improve transaction and script verification.
- RAM: More database cache can reduce disk access.
- Internet connection: The node cannot validate blocks it has not received.
- Cooling: Compact systems may slow down when heat builds.
- External-drive quality: Weak cables, controllers and power supplies can interrupt writes.
- Antivirus scanning: Continuous inspection of block files can slow the process.
- Other applications: Electrs or Mempool indexing during IBD adds competing load.
Universal synchronization estimates are unreliable. MyNode’s published hardware test measured one to two days on its mini PC and six to seven days on a Raspberry Pi 4 under an optimal clearnet connection in Q4 2022. Current chain size is larger, while newer Pi 5 and NVMe builds are faster than the tested Pi 4. Treat those figures as hardware comparisons rather than promises.
Bitcoin Core can be shut down cleanly during IBD and resumed later. Wait for the process to finish closing before turning off the machine or disconnecting storage.
An uneven progress bar is normal. A node is more likely to be genuinely stalled when:
- Block height stops increasing for several hours.
- No network or disk activity appears.
- Peer count falls to zero.
debug.logrepeats the same database or network error.- The drive has no remaining free space.
- The system clock is incorrect.
Success condition: Verification progress continues to rise, new blocks are being processed and debug.log shows no repeating critical error.
How to Confirm Your Bitcoin Node Is Working
A healthy node is synchronized, connected to peers and free from persistent database or network errors. Inbound connections are optional.
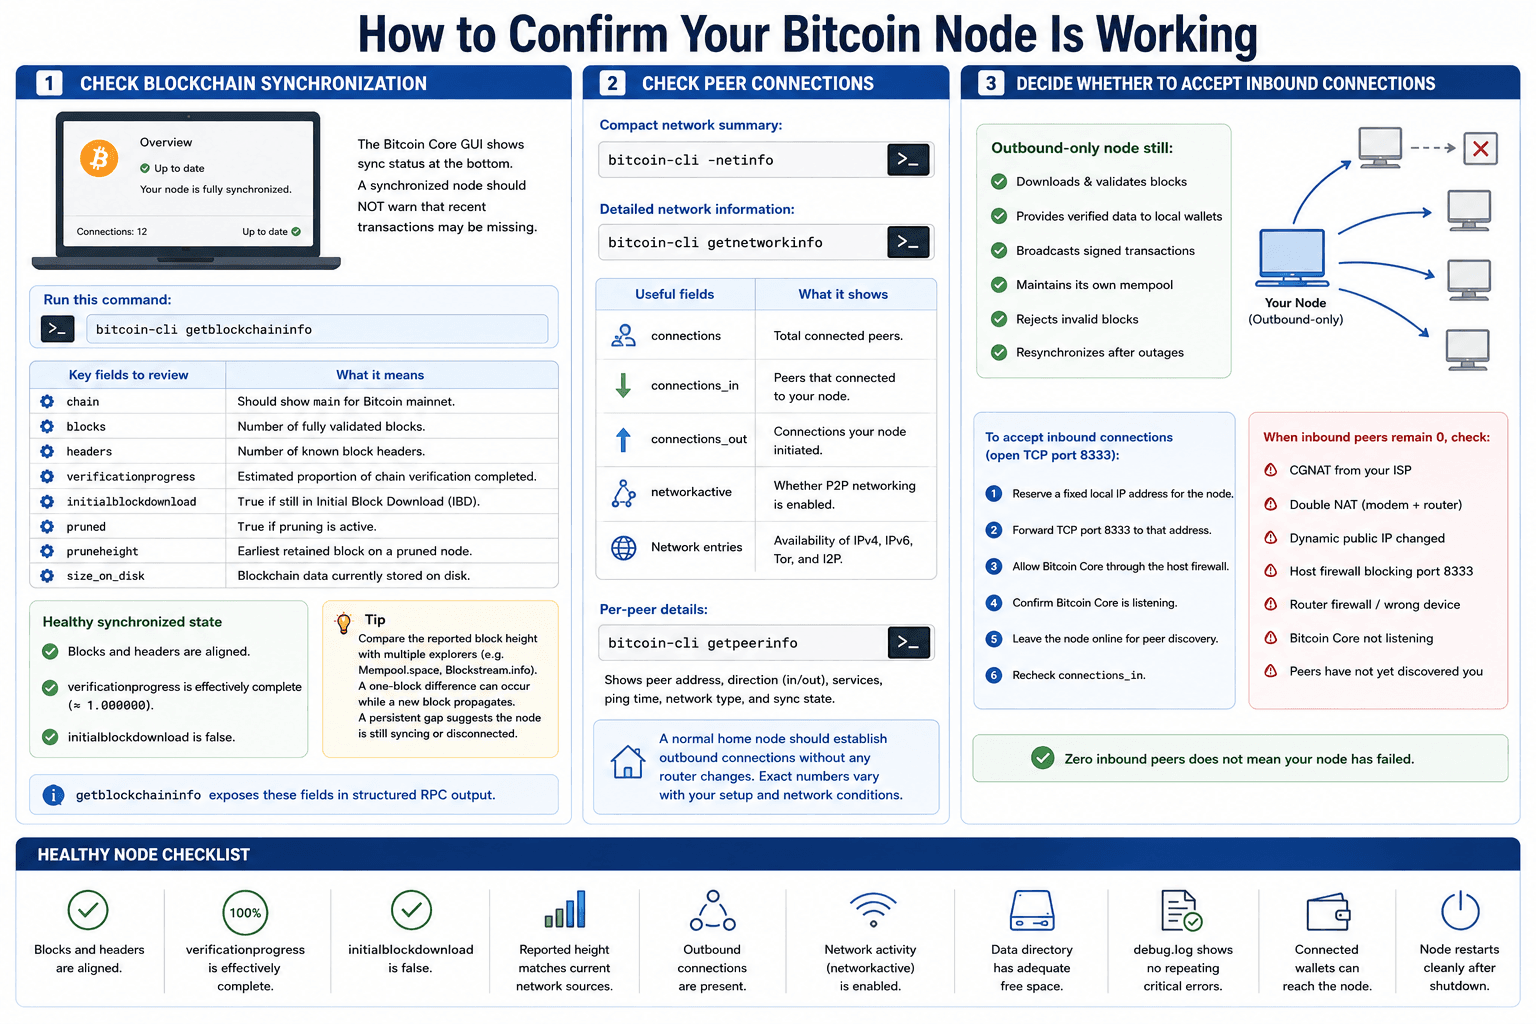 Checking Synchronization, Peer Connections And Node Health Status
Check Blockchain Synchronization
The Bitcoin Core GUI shows synchronization status near the bottom of the application. A synchronized node should no longer display a message that recent transactions may be missing.
For a more precise check, run:
bitcoin-cli getblockchaininfo
Review these fields:
chain: Should showmainfor Bitcoin mainnet.blocks: The number of fully validated blocks.headers: The number of known block headers.verificationprogress: The estimated proportion of chain verification completed.initialblockdownload: Shows whether Bitcoin Core still considers the node to be in IBD.pruned: Confirms whether pruning is active.pruneheight: Shows the earliest retained block on a pruned node.size_on_disk: Reports the blockchain data currently stored.
A healthy synchronized state has three clear signals:
- Blocks and headers are aligned.
verificationprogressis effectively complete.initialblockdownloadisfalse.
The getblockchaininfo RPC exposes these fields in structured output.
Compare the reported block height with more than one reputable source. Our directory of Bitcoin blockchain explorers provides several options for checking the chain tip.
A one-block difference may occur while a new block propagates. A persistent gap suggests the node is still synchronizing or has lost connectivity.
Check Peer Connections
Run the compact network summary:
bitcoin-cli -netinfo
For structured network information:
bitcoin-cli getnetworkinfo
Useful fields include:
connections: Total connected peers.connections_in: Peers that initiated connections to your node.connections_out: Connections your node initiated.networkactive: Whether peer-to-peer networking is enabled.- Network entries: Availability of IPv4, IPv6, Tor and I2P routes.
For individual peer details:
bitcoin-cli getpeerinfo
This command shows peer addresses, connection direction, services, ping times, network type and synchronization state.
A normal home node should establish outbound connections without router changes. The exact total varies with configuration and network conditions.
Decide Whether to Accept Inbound Connections
An outbound-only node still downloads blocks, verifies transactions and follows Bitcoin independently.
It can also:
- Provide verified data to local wallets.
- Broadcast signed transactions.
- Maintain its own mempool.
- Reject blocks that violate its selected consensus rules.
- Resynchronize after an outage.
Opening TCP port 8333 allows unrelated Bitcoin peers to initiate connections. This increases the node’s network service, but it is not required for validation. Bitcoin Core ordinarily establishes 10 outbound connections, which are sufficient when the node is mainly used as a wallet backend.
To accept inbound connections:
- Reserve a fixed local IP address for the node.
- Forward TCP port 8333 to that address.
- Allow Bitcoin Core through the host firewall.
- Confirm Bitcoin Core is listening.
- Leave the node online for peer discovery.
- Recheck
connections_in.
When the node remains unreachable, diagnose:
- CGNAT: The ISP shares one public IP among multiple customers.
- Double NAT: Both the modem and home router perform address translation.
- Dynamic public IP: The external address changed after configuration.
- Host firewall: The operating system blocks incoming traffic.
- Router firewall: The forwarding rule points to the wrong local machine.
- Listening disabled: Bitcoin Core is not accepting inbound peers.
- Discovery delay: Other nodes have not yet found the address.
Zero inbound peers does not mean the node has failed.
Healthy Node Checklist
- Blocks and headers are aligned.
verificationprogressis effectively complete.initialblockdownloadisfalse.- The reported height agrees with current network sources.
- Outbound connections are present.
- Network activity is enabled.
- The data directory has adequate free space.
debug.logshows no repeating critical errors.- Connected wallets can reach the node.
- The node restarts cleanly after shutdown.
Connect Your Wallet to Your Bitcoin Node
Running a node improves wallet verification only when the wallet is configured to use that node.
The wallet manages addresses and transaction construction. The node supplies validated blockchain information and broadcasts signed transactions.
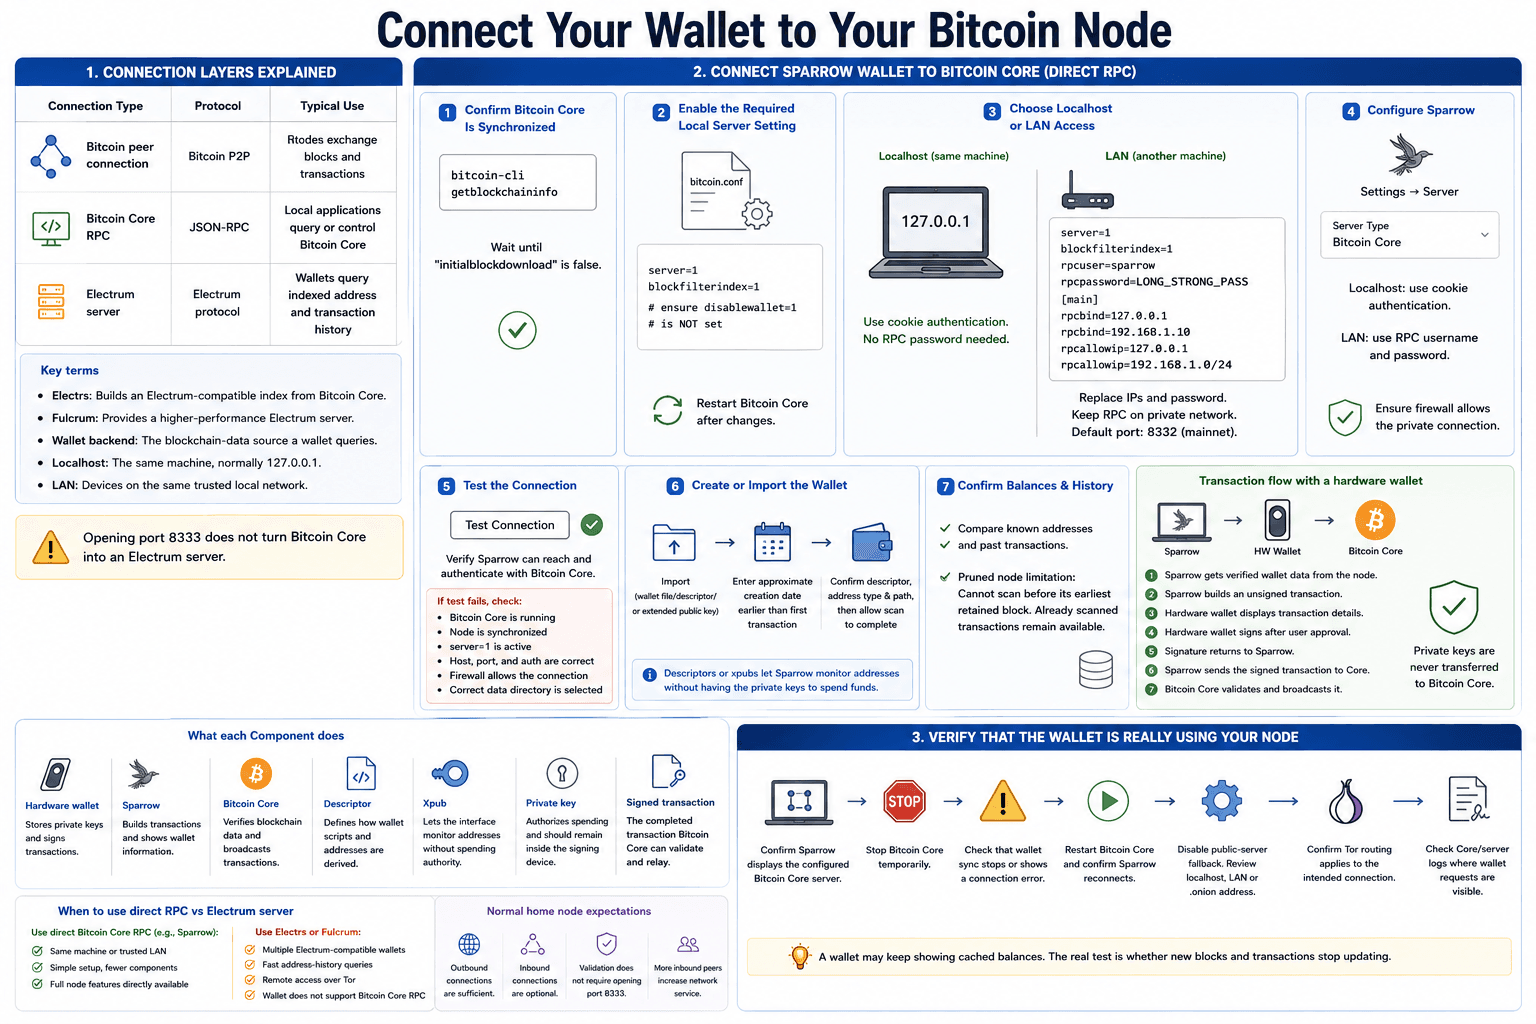 Connecting Sparrow And Hardware Wallets To Bitcoin Core
Direct Bitcoin Core Connection vs Electrum Server
Bitcoin peer traffic, Bitcoin Core RPC and the Electrum protocol are separate connection layers.
| Connection Type | Protocol | Typical Use |
|---|---|---|
| Bitcoin peer connection | Bitcoin P2P | Nodes exchange blocks and transactions |
| Bitcoin Core RPC | JSON-RPC | Local applications query or control Bitcoin Core |
| Electrum server | Electrum protocol | Wallets query indexed address and transaction history |
Their roles differ:
- Bitcoin P2P: Connects one Bitcoin node to another.
- Bitcoin Core RPC: Lets trusted software request blockchain or wallet information.
- Electrum protocol: Gives compatible wallets efficient access to address histories.
- Electrs: Builds an Electrum-compatible index from Bitcoin Core.
- Fulcrum: Provides a higher-performance Electrum server implementation.
- Wallet backend: The blockchain-data source a wallet queries.
- Localhost: The same machine, normally represented by 127.0.0.1.
- LAN: Devices connected through the same trusted local network.
Opening port 8333 does not turn Bitcoin Core into an Electrum server.
A wallet can connect directly when it supports Bitcoin Core RPC. Sparrow supports this route. Many Electrum-compatible wallets instead require Electrs, Fulcrum or another Electrum server.
Choose direct Bitcoin Core RPC when Sparrow and Bitcoin Core run on the same machine or trusted LAN.
Choose Electrs or Fulcrum when:
- Several Electrum-compatible wallets need access.
- Fast address-history queries are required.
- Remote access over Tor is needed.
- Applications expect the Electrum protocol.
- Bitcoin Core RPC is not supported by the wallet.
Connect Sparrow Wallet to Bitcoin Core
Sparrow can connect directly to Bitcoin Core and act as the interface for software or hardware wallets.
1. Confirm Bitcoin Core Is Synchronized
Run:
bitcoin-cli getblockchaininfo
Wait until initialblockdownload is false.
2. Enable the Required Local Server Setting
Open or create bitcoin.conf inside the Bitcoin Core data directory.
For a local Bitcoin Core graphical installation, add:
server=1
Bitcoin Core v25 and later can also use a block-filter index to accelerate some rescans:
server=1
blockfilterindex=1
Make sure disablewallet=1 is absent when using Sparrow’s direct Bitcoin Core connection. Restart Bitcoin Core after changing the file.
3. Choose Localhost or LAN Access
When Sparrow and Bitcoin Core run on the same machine, use localhost. Sparrow can authenticate through Bitcoin Core’s cookie file, avoiding a manually stored RPC password.
When Sparrow runs on another machine, Bitcoin Core must bind RPC to the node’s private LAN address. A basic configuration may resemble:
server=1 blockfilterindex=1rpcuser=sparrow rpcpassword=REPLACE_WITH_A_LONG_UNIQUE_PASSWORD
[main] rpcbind=127.0.0.1 rpcbind=192.168.1.10 rpcallowip=127.0.0.1 rpcallowip=192.168.1.0/24
Replace the IP addresses with the actual node address and LAN subnet. Replace the password with a long, unique value.
For a stronger long-term configuration, use rpcauth, which stores a salted password representation inside bitcoin.conf. RPC should remain on localhost or a trusted private network. Port 8332 is the common mainnet RPC port.
4. Configure Sparrow
Open Sparrow and go to:
Settings → Server
Choose Bitcoin Core as the server type.
For a local setup:
- Select localhost.
- Confirm the Bitcoin Core data directory.
- Use cookie authentication.
For a LAN setup:
- Enter the node’s private IP address.
- Use the configured RPC username and password.
- Confirm that the host firewall allows the private connection.
5. Test the Connection
Select Test Connection.
A successful test confirms that Sparrow can reach Bitcoin Core and authenticate. If the test fails, check:
- Bitcoin Core is running.
- The node has synchronized.
server=1is active.- The host and port are correct.
- The firewall permits the connection.
- The authentication method matches.
- Sparrow points to the correct data directory.
The Sparrow connection flow supports local cookie authentication and private-LAN RPC connections.
6. Create or Import the Wallet
Create a new wallet or import the appropriate wallet information.
For an existing wallet:
- Enter an approximate creation date.
- Choose a date earlier than the first expected transaction.
- Supply the correct descriptor or extended public key.
- Confirm the address type and derivation path.
- Allow Sparrow to complete the scan.
A descriptor wallet records how addresses and scripts are derived. An xpub allows Sparrow to generate and monitor public addresses without gaining the private keys required to spend funds.
7. Confirm Balances and Transaction History
Compare known receiving addresses and previous transactions with the imported wallet history.
A pruned node works with Sparrow, but it cannot scan transactions older than its earliest retained block. Transactions that were already scanned remain available. Reversing pruning requires another complete blockchain synchronization.
Use a Hardware Wallet With Your Node
A hardware wallet stores and uses the private keys. Sparrow provides the interface. Bitcoin Core validates blockchain data and broadcasts the signed transaction.
The transaction flow is:
- Sparrow obtains verified wallet data from the node.
- Sparrow constructs an unsigned transaction.
- The hardware wallet displays transaction details.
- The hardware wallet signs after user approval.
- The signature returns to Sparrow.
- Sparrow sends the signed transaction to Bitcoin Core.
- Bitcoin Core validates and broadcasts it.
Private keys are not transferred to Bitcoin Core.
The components perform separate jobs:
- Hardware wallet: Stores keys and signs transactions.
- Sparrow: Builds transactions and displays wallet information.
- Bitcoin Core: Verifies blockchain data and broadcasts transactions.
- Descriptor: Defines how wallet scripts and addresses are derived.
- Xpub: Lets the interface monitor addresses without spending authority.
- Private key: Authorizes spending and should remain inside the signing device.
- Signed transaction: The completed transaction Bitcoin Core can validate and relay.
Coldcard, Trezor and Ledger can all work with compatible Bitcoin wallet interfaces. The connection route varies by device. Some use USB, while air-gapped Coldcard setups can move partially signed Bitcoin transactions through a microSD card.
Verify That the Wallet Is Really Using Your Node
The wallet should identify the private node as its active server and stop receiving new data when that node goes offline.
Use these checks:
- Confirm Sparrow displays the configured Bitcoin Core server.
- Stop Bitcoin Core temporarily.
- Check that wallet synchronization stops or reports a connection failure.
- Restart Bitcoin Core and confirm Sparrow reconnects.
- Disable public-server fallback.
- Review the configured localhost, LAN or onion address.
- Confirm Tor routing applies to the intended connection.
- Check Bitcoin Core or server logs where wallet requests are visible.
A wallet may continue displaying cached balances after the node stops. The stronger test is whether new blocks and transactions stop updating.
How To Secure Your Bitcoin Node?
A private node reduces wallet-query leakage to third-party servers. It does not make public Bitcoin transactions anonymous.
Wallet privacy, network privacy and blockchain privacy require separate controls.
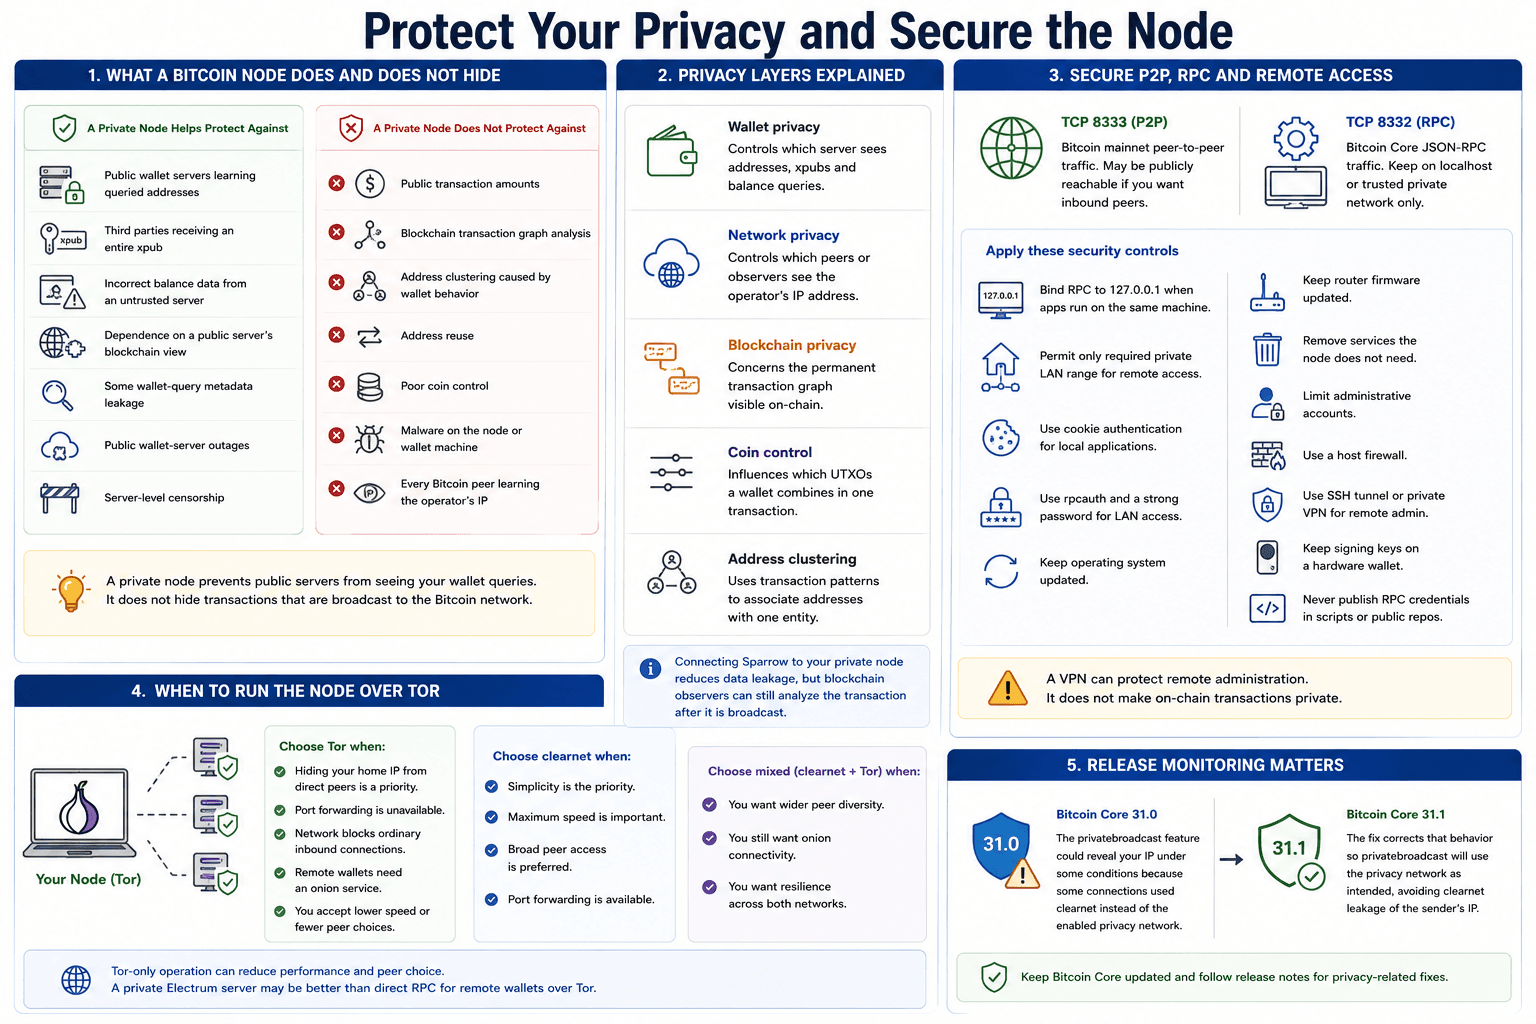 Strengthening Node Privacy, RPC Security And Remote Access
What a Bitcoin Node Does and Does Not Hide
| A Private Node Helps Protect Against | A Private Node Does Not Protect Against |
|---|---|
| Public wallet servers learning queried addresses | Public transaction amounts |
| Third parties receiving an entire xpub | Blockchain transaction graph analysis |
| Incorrect balance data from an untrusted server | Address clustering caused by wallet behavior |
| Dependence on a public server’s blockchain view | Address reuse |
| Some wallet-query metadata leakage | Poor coin control |
| Public wallet-server outages | Malware on the node or wallet machine |
| Server-level censorship | Every Bitcoin peer learning the operator’s IP |
The privacy layers work differently:
- Wallet privacy: Controls which server sees addresses, xpubs and balance queries.
- Network privacy: Controls which peers or observers see the operator’s IP address.
- Blockchain privacy: Concerns the permanent transaction graph visible on-chain.
- Coin control: Influences which UTXOs a wallet combines in one transaction.
- Address clustering: Uses transaction patterns to associate addresses with one entity.
Connecting Sparrow to a private node prevents a public Electrum server from receiving the same wallet queries. Blockchain observers can still analyze the transaction after it is broadcast.
Our analysis of on-chain privacy explains why private infrastructure reduces data leakage without removing Bitcoin’s public transaction history.
For users comparing wallet-level privacy tools, the anonymous crypto wallets guide separates server privacy, address-management features and actual on-chain concealment.
Secure P2P, RPC and Remote Access
Bitcoin Core’s peer and RPC ports have different security requirements:
- TCP 8333: Default Bitcoin mainnet peer-to-peer traffic.
- TCP 8332: Common Bitcoin Core mainnet JSON-RPC traffic.
Port 8333 may be publicly reachable when the operator wants inbound Bitcoin peers.
Port 8332 should stay on localhost or a trusted private network. Bitcoin Core binds RPC to localhost by default, and rpcallowip should be limited to the private addresses that genuinely need access.
Apply these controls:
- Bind RPC to 127.0.0.1 when applications run on the same machine.
- Permit only the required private LAN range for remote local access.
- Use cookie authentication for local applications.
- Use
rpcauthand a strong password for LAN access. - Keep the operating system updated.
- Keep router firmware updated.
- Remove services the node does not need.
- Limit administrative accounts.
- Use a host firewall.
- Use an SSH tunnel or private VPN for remote administration.
- Keep signing keys on a hardware wallet.
- Never publish RPC credentials inside scripts or public repositories.
A VPN can protect remote administration. It does not make on-chain transactions private.
When to Run the Node Over Tor
Tor hides the operator’s public IP from direct Bitcoin peers by routing connections through the Tor network.
Choose Tor when:
- Hiding the home IP from direct peers is a priority.
- Port forwarding is unavailable.
- The network blocks ordinary inbound connections.
- Remote wallets need an onion service.
- The operator accepts lower speed or fewer peer choices.
Choose clearnet when simplicity, speed and broad peer access take priority.
Choose mixed clearnet and Tor operation when you want wider peer diversity while retaining onion connectivity.
Tor-only operation can reduce performance and peer choice. A private Electrum server may be more practical than direct Bitcoin Core RPC when a wallet must connect remotely over Tor.
Release monitoring belongs in the privacy setup. Bitcoin Core 31.0’s privatebroadcast feature could reveal a sender’s IP under specific conditions because some connections used clearnet instead of the enabled privacy network. The Bitcoin Core 31.1 fix corrected that behavior.
Reduce Storage and Bandwidth Usage
Pruning reduces retained blockchain history. Upload targets and relay settings control network use.
Each setting solves a specific constraint and removes a specific capability.
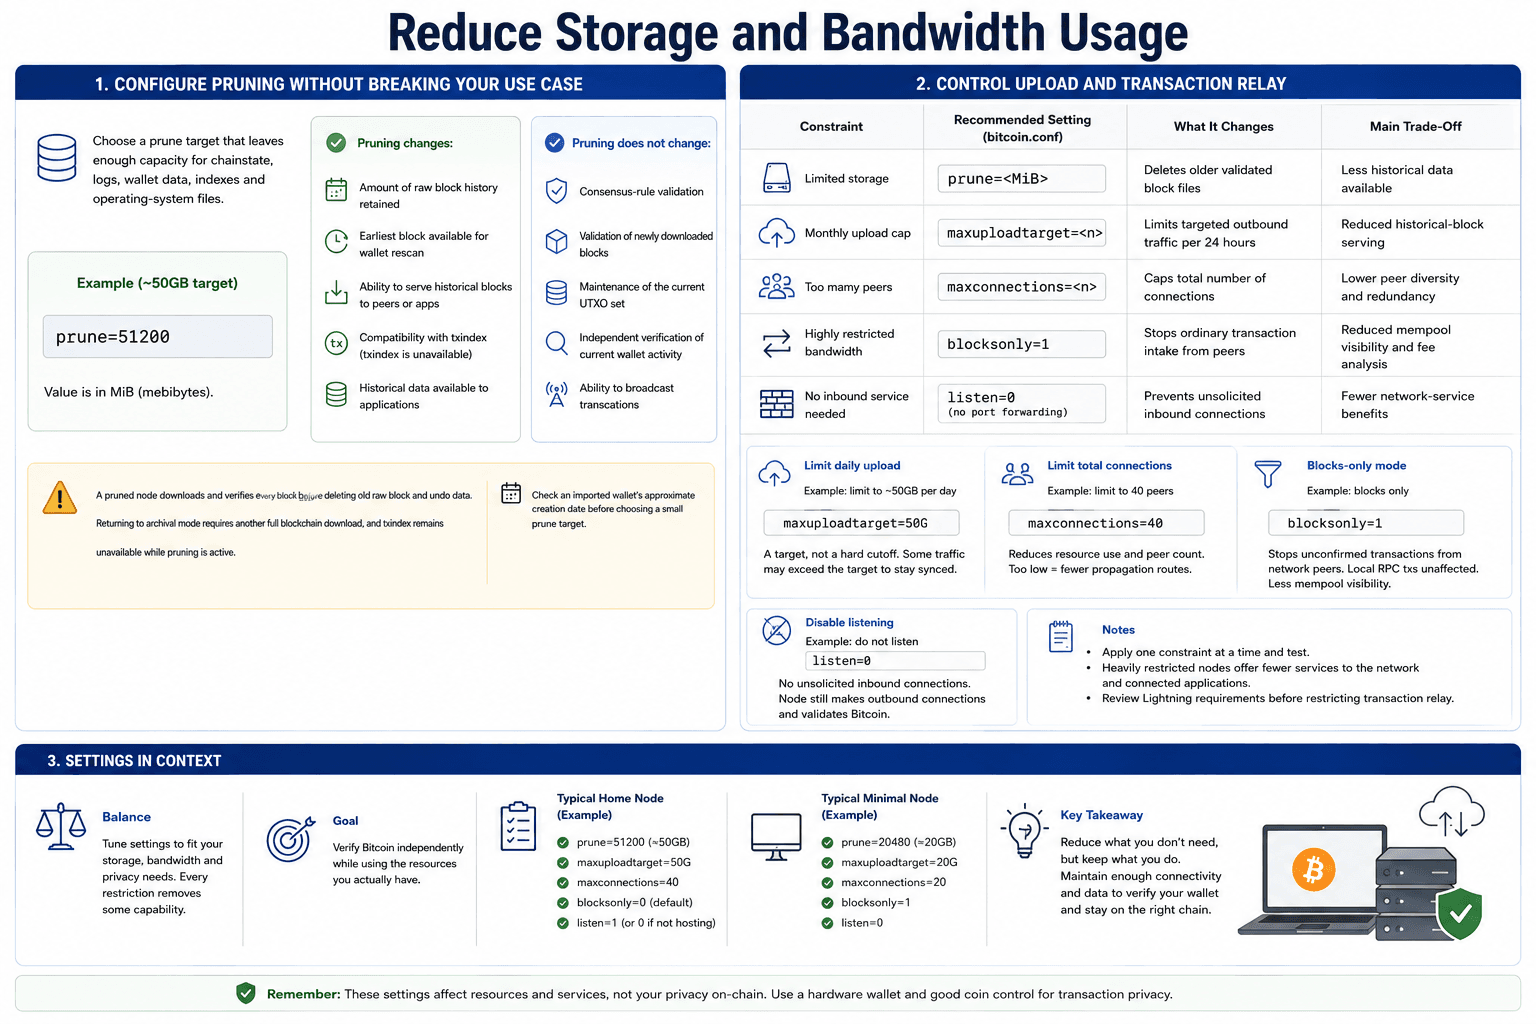 Managing Blockchain Storage, Upload Limits And Transaction Relay
Configure Pruning Without Breaking Your Use Case
Choose a prune target that leaves enough capacity for chainstate, logs, wallet data, indexes and operating-system files.
For a target near 50GB:
prune=51200
Pruning changes:
- The amount of raw block history retained.
- The earliest block available for a wallet rescan.
- The node’s ability to serve historical blocks.
- Compatibility with
txindex. - Historical data available to applications.
Pruning does not change:
- Consensus-rule validation.
- Validation of newly downloaded blocks.
- Maintenance of the current UTXO set.
- Independent verification of current wallet activity.
- The ability to broadcast transactions.
A pruned node downloads and verifies blocks before deleting old raw block and undo data. Returning to archival mode requires another blockchain download, while txindex remains unavailable during pruning.
Check an imported wallet’s approximate creation date before choosing a small target. An older wallet may require block data the node no longer retains.
Control Upload and Transaction Relay
| Constraint | Recommended Setting | What It Changes | Main Trade-Off |
|---|---|---|---|
| Limited storage | prune= | Deletes older validated block files | Less historical data |
| Monthly upload cap | maxuploadtarget= | Limits targeted outbound traffic | Reduced historical-block serving |
| Too many peers | maxconnections= | Caps total connections | Lower peer diversity |
| Highly restricted bandwidth | blocksonly=1 | Stops ordinary transaction intake from peers | Reduced mempool visibility |
| No inbound service | listen=0 or no port forwarding | Prevents unsolicited inbound connections | Fewer network-service benefits |
A daily upload target can be added to bitcoin.conf. For example:
maxuploadtarget=50G
This setting targets a maximum amount of outbound data during each 24-hour period. It is a threshold rather than a hard cutoff. Current blocks and selected peer traffic may continue so the node remains synchronized.
A total connection limit may be set as follows:
maxconnections=40
This reduces peer count and resource use. An excessively low value gives the node fewer routes for block and transaction propagation.
Blocks-only mode can be enabled with:
blocksonly=1
This stops ordinary unconfirmed transactions received from network peers. Transactions submitted locally through RPC remain unaffected.
Blocks-only mode reduces bandwidth but removes much of the network mempool view. That trade-off can weaken fee analysis, local Mempool tools and some Lightning workflows.
Operators running payment channels should review how connectivity affects Bitcoin Lightning wallets before restricting transaction relay.
Disabling listening can be configured with:
listen=0
The node can still create outbound connections and validate Bitcoin. It will no longer accept unsolicited inbound peers.
Avoid applying every restriction at once without a clear reason. A heavily pruned, blocks-only, low-connection node can verify a personal wallet, but it supplies fewer services to the wider network and connected applications.
How To Maintain, Update and Recover Your Bitcoin Node?
Safe node maintenance relies on clean shutdowns, verified software updates and backups of irreplaceable wallet information.
Blockchain data can be downloaded again. Private keys and recovery information cannot.
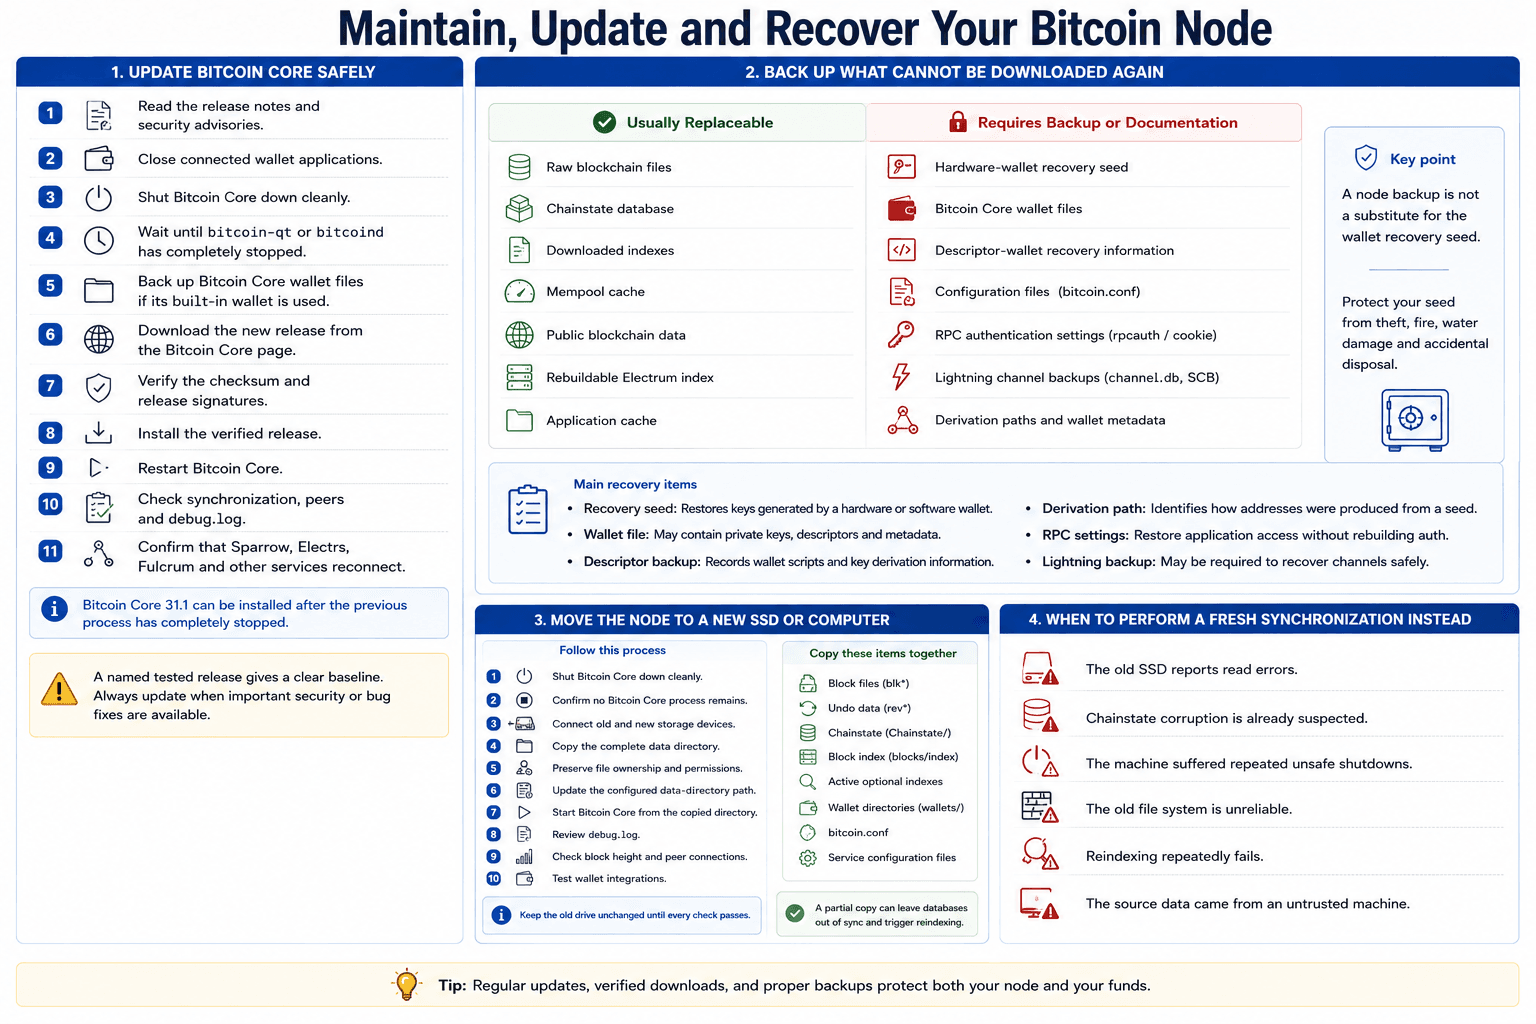 Updating, Backing Up And Migrating Bitcoin Core Safely
Update Bitcoin Core Safely
Follow this sequence when a new stable release becomes available:
- Read the release notes and security advisories.
- Close connected wallet applications.
- Shut Bitcoin Core down cleanly.
- Wait until
bitcoin-qtorbitcoindhas completely stopped. - Back up Bitcoin Core wallet files if its built-in wallet is used.
- Download the new release from the Bitcoin Core page.
- Verify the checksum and release signatures.
- Install the verified release.
- Restart Bitcoin Core.
- Check synchronization, peers and
debug.log. - Confirm that Sparrow, Electrs, Fulcrum and other services reconnect.
Bitcoin Core 31.1 can be installed after the previous process has completely stopped. Windows users run the replacement installer, while macOS and Linux users replace the application or binaries.
A named tested release gives the instructions a clear baseline. A generic “2026 setup” can become stale after an update changes behavior or fixes a security problem.
Back Up What Cannot Be Downloaded Again
| Usually Replaceable | Requires Backup or Documentation |
|---|---|
| Raw blockchain files | Hardware-wallet recovery seed |
| Chainstate database | Bitcoin Core wallet files |
| Downloaded indexes | Descriptor-wallet recovery information |
| Mempool cache | Configuration files |
| Public blockchain data | RPC authentication settings |
| Rebuildable Electrum index | Lightning channel backups |
| Application cache | Derivation paths and wallet metadata |
A node backup is not a substitute for the wallet recovery seed.
The main recovery items are:
- Recovery seed: Restores keys generated by a hardware or software wallet.
- Wallet file: May contain Bitcoin Core private keys, descriptors and metadata.
- Descriptor backup: Records wallet scripts and key derivation information.
- Derivation path: Identifies how addresses were produced from a seed.
- RPC settings: Restore application access without rebuilding authentication manually.
- Lightning backup: May be required to recover channels safely.
- Configuration files: Preserve pruning, network, Tor and data-directory settings.
Hardware-wallet users should keep the recovery backup separate from the node. Losing a node does not destroy the funds when the seed and wallet details remain available.
A seed phrase needs protection from theft, fire, water damage and accidental disposal.
Our wallet recovery guide covers restoration through recovery phrases, wallet.dat files, hardware-wallet backups and derivation paths.
Move the Node to a New SSD or Computer
Copying a healthy Bitcoin Core data directory can avoid another full Initial Block Download.
Use this process:
- Shut Bitcoin Core down cleanly.
- Confirm that no Bitcoin Core process remains.
- Connect the old and new storage devices.
- Copy the complete data directory.
- Preserve file ownership and permissions.
- Update the configured data-directory path.
- Start Bitcoin Core from the copied directory.
- Review
debug.log. - Check block height and peer connections.
- Test wallet integrations.
- Keep the old drive unchanged until every check passes.
Copy related data together:
- Block files
- Undo data
- Chainstate
- Block index
- Active optional indexes
- Wallet directories
bitcoin.conf- Service configuration files
A partial copy can leave databases out of sync and trigger reindexing.
A fresh synchronization is safer when:
- The old SSD reports read errors.
- Chainstate corruption is already suspected.
- The machine suffered repeated unsafe shutdowns.
- The old file system is unreliable.
- Reindexing repeatedly fails.
- The source data came from an untrusted machine.
Troubleshooting Common Bitcoin Node Problems
Most node problems come from slow storage, insufficient free space, incorrect system time, peer connectivity or a wallet using the wrong protocol.
Begin with non-destructive checks. Reindexing and a full resynchronization should remain final measures.
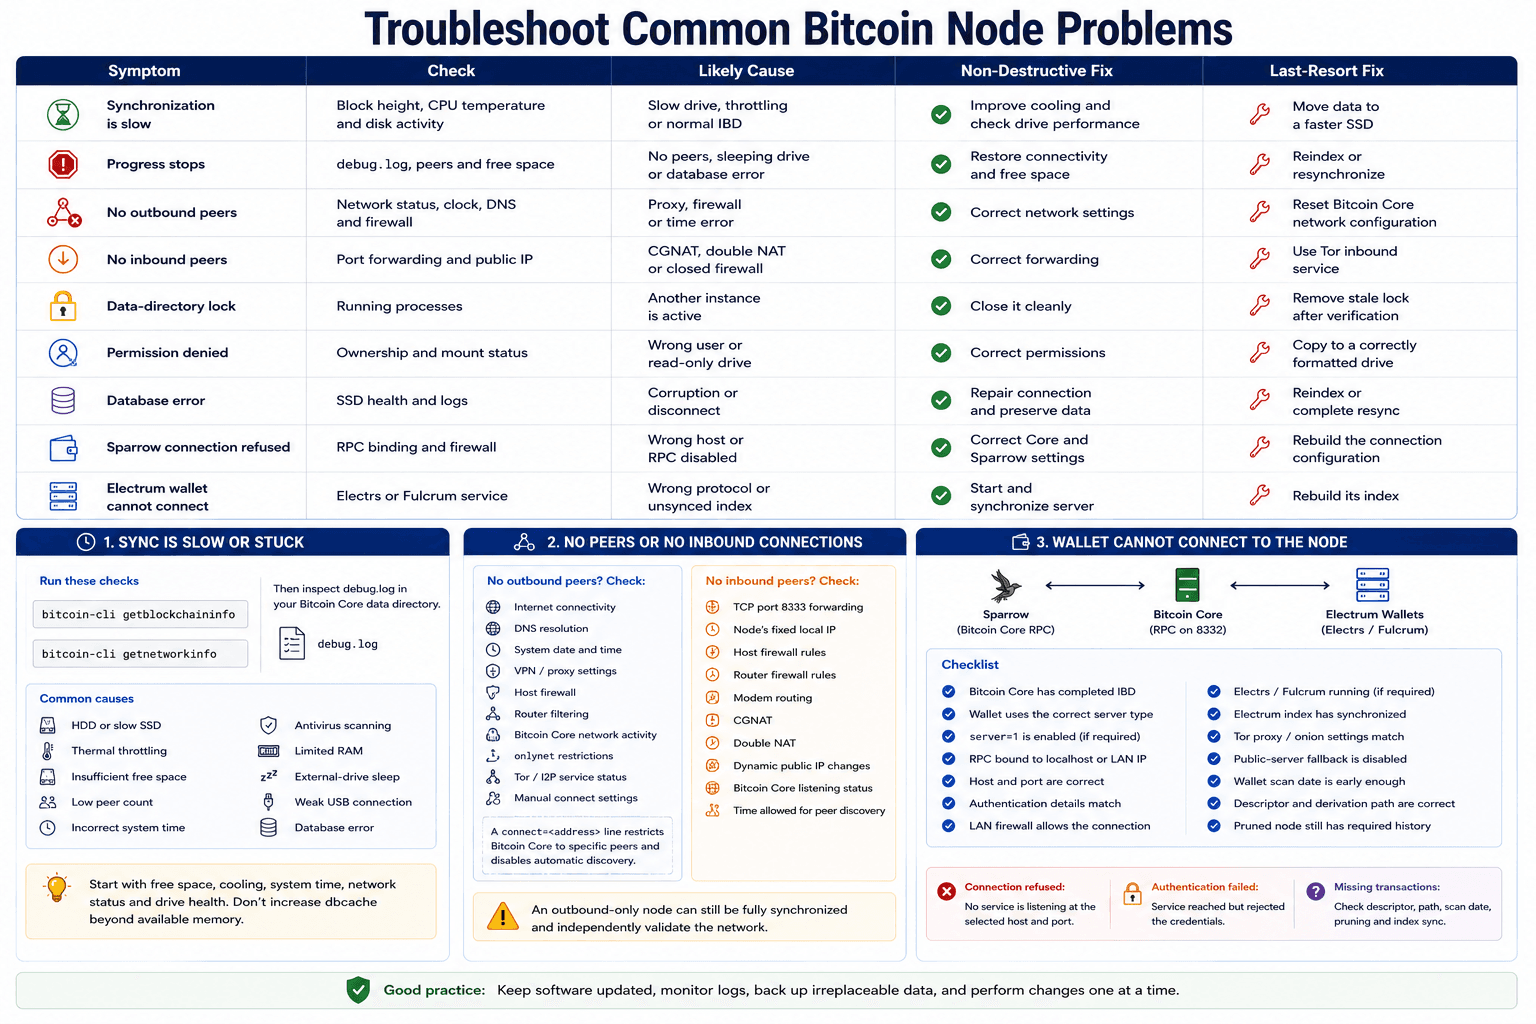 Diagnosing Synchronization, Peer, Storage And Wallet Connection Problems
| Symptom | Check | Likely Cause | Non-Destructive Fix | Last-Resort Fix |
|---|---|---|---|---|
| Synchronization is slow | Block height, CPU temperature and disk activity | Slow drive, throttling or normal IBD | Improve cooling and check drive performance | Move data to a faster SSD |
| Progress stops | debug.log, peers and free space | No peers, sleeping drive or database error | Restore connectivity and free space | Reindex or resynchronize |
| No outbound peers | Network status, clock, DNS and firewall | Proxy, firewall or time error | Correct network settings | Reset Bitcoin Core network configuration |
| No inbound peers | Port forwarding and public IP | CGNAT, double NAT or closed firewall | Correct forwarding | Use Tor inbound service |
| Data-directory lock | Running processes | Another instance is active | Close it cleanly | Remove stale lock after verification |
| Permission denied | Ownership and mount status | Wrong user or read-only drive | Correct permissions | Copy to a correctly formatted drive |
| Database error | SSD health and logs | Corruption or disconnect | Repair connection and preserve data | Reindex or complete resync |
| Sparrow connection refused | RPC binding and firewall | Wrong host or RPC disabled | Correct Core and Sparrow settings | Rebuild the connection configuration |
| Electrum wallet cannot connect | Electrs or Fulcrum service | Wrong protocol or unsynced index | Start and synchronize server | Rebuild its index |
Sync Is Slow or Stuck
Slow IBD is normal when block height keeps increasing, storage remains active and debug.log records successful validation.
A genuinely stalled node shows no meaningful progress for an extended period and often repeats an error.
Check the blockchain state:
bitcoin-cli getblockchaininfo
Check network status:
bitcoin-cli getnetworkinfo
Then inspect debug.log inside the Bitcoin Core data directory.
Common causes include:
- HDD or slow SSD: Random chainstate activity becomes the bottleneck.
- Thermal throttling: The CPU reduces speed after sustained heat.
- Insufficient free space: Database and block writes fail.
- Low peer count: Block downloads become unreliable.
- Incorrect system time: Peer connections and validation can fail.
- Antivirus scanning: Block files are repeatedly inspected.
- Limited RAM: More database work shifts to storage.
- External-drive sleep: The drive pauses during sustained synchronization.
- Weak USB connection: The drive repeatedly resets or disconnects.
- Database error: Bitcoin Core cannot read or update chainstate.
Start with free space, cooling, system time, network status and drive health. Do not increase database cache beyond the machine’s available memory.
No Peers or No Inbound Connections
No outbound peers prevents the node from receiving current blockchain data.
Check:
- Internet connectivity
- DNS resolution
- System date and time
- VPN or proxy settings
- Host firewall
- Router filtering
- Bitcoin Core network activity
onlynetrestrictions- Tor or I2P service status
- Manual
connectsettings
A connect=
No inbound peers is a different condition. An outbound-only node can remain fully synchronized and independently validate the network.
For inbound connectivity, check:
- TCP port 8333 forwarding
- The node’s fixed local IP
- Host firewall rules
- Router firewall rules
- Modem routing
- CGNAT
- Double NAT
- Dynamic public IP changes
- Bitcoin Core listening status
- Time allowed for peer discovery
Double NAT commonly appears when the ISP modem and home router both translate addresses. Forwarding the port on only one device leaves the outer layer closed.
Disk, Database or External-Drive Errors
A full drive can stop block and chainstate writes. Leave enough free capacity for database compaction, temporary files and continued blockchain growth.
A data-directory lock usually means another Bitcoin Core process is active. Confirm that no process is running before removing a stale lock file.
Permission errors often follow:
- Moving data between Linux users
- Mounting a drive under the wrong owner
- Copying files from another operating system
- Attaching a read-only volume
- Using an incompatible file system
Correct permissions only after confirming the intended data-directory path.
When chainstate is damaged, Bitcoin Core offers two rebuilding options.
Rebuild only chainstate:
bitcoind -reindex-chainstate
This deletes and reconstructs the chainstate database from locally stored block files.
Rebuild the block index, chainstate and active indexes:
bitcoind -reindex
This performs substantially more work and can take much longer.
The distinction is:
-reindex-chainstate: Rebuilds the UTXO database from existing block files.-reindex: Rebuilds the block index, chainstate and active optional indexes.- Complete resync: Deletes replaceable blockchain data and downloads it again.
Back up wallet files and configuration before either reindex operation. A full resync should be used when block files are missing, corrupted or stored on failing hardware.
Wallet Cannot Connect to the Node
Start by confirming that the wallet uses the correct protocol.
A direct Sparrow connection uses Bitcoin Core RPC. An Electrum-compatible wallet generally needs Electrs or Fulcrum. Port 8333 accepts Bitcoin peers and does not provide either wallet protocol.
Check:
- Bitcoin Core has completed IBD.
- The wallet uses the correct server type.
server=1is enabled when required.- RPC is bound to localhost or the correct LAN address.
- The host and port are correct.
- Authentication details match.
- The LAN firewall permits the connection.
- Electrs or Fulcrum is running where required.
- The Electrum index has synchronized.
- Tor proxy and onion settings match.
- Public-server fallback is disabled.
- The wallet’s scan date is early enough.
- The descriptor and derivation path are correct.
- A pruned node still holds the required historical blocks.
Connection refused usually means no service is listening at the selected host and port.
Authentication failed means the service was reached but rejected the credentials.
A successful connection with missing transactions often points to:
- An incorrect wallet descriptor
- The wrong derivation path
- An xpub from the wrong account
- A scan date set too late
- Historical blocks already removed by pruning
- An Electrum index that has not finished building
For readers considering another interface, our best crypto wallets guide compares hardware, desktop, mobile and multi-network options. The wallet still needs explicit support for Bitcoin Core or a private Electrum server.

Final Verdict: Is Running a Bitcoin Node Worth It?
Running a Bitcoin node is worth it for self-custody users who will connect their wallets and use the node’s verified data.
The strongest case belongs to people holding meaningful BTC outside custodial platforms. Their wallet can verify balances and transactions without querying public infrastructure.
It also makes sense for:
- Merchants: A node verifies incoming payments through locally checked blockchain data.
- Developers: Applications gain a reliable Bitcoin backend and RPC interface.
- Educators: The software provides direct exposure to block validation, peers and chainstate.
- Privacy-conscious users: Private wallet queries reduce exposure to public servers.
- Service operators: Electrum, Mempool and Lightning applications need dependable node data.
- Learners: Running a node turns abstract Bitcoin concepts into observable processes.
The case is optional for users whose main aim is contributing peer capacity. That contribution is useful, especially when the node is archival and accepts inbound peers, but it does not generate direct financial income.
The case is weak for custodial-only users and anyone expecting mining rewards, staking income or passive yield.